Table of Contents
Advertisement
Quick Links
RiseAtlas625M,
with QuickTrolleySystem
SystemRoMedic
TM
RiseAtlas625M is a safe and easy-to-use stationary ceiling lift unit which can be used in all settings and in all types of
rooms, both on permanent rail systems and on portable, freestanding lift stands. When used with the appropriate lifting
accessories, RiseAtlas625M provides secure, comfortable and individually adapted lifting of users in connection with
seated or horizontal transfers to and from the bed, wheelchair or toilet. RiseAtlas625M offers a large lifting area and
the possibility of both very low and very high lifting, making it an excellent solution also for lifting from the floor and for
gait training and standing training. RiseAtlas625M can also be used for convenient transfer of users from one room to
another. RiseAtlas625M is manually transferred along the rail (M for manual) and features Handicare's unique
SystemRoMedic™ QuickTrolleySystem. This model is fitted with a quick release trolley which readily allows for
dismantling of the ceiling lift unit from the rail.
Functional inspection
Visual inspection
Inspect lift functions regularly. Check to ensure that product is free from damage.
Before use
Ensure that the product is correctly mounted in the trolley.
Check rail end stops.
Check sling bar connection and safety latch function.
Check lifting movement.
Inspect the lift for signs of wear and damage.
Check the hand control cable for signs of wear.
Check to ensure that hand control markings coincide with lift functions.
Check battery charge level.
Always read the user manual
Always read the user manuals for all assistive devices used during a transfer.
Keep the user manual where it is accessible to users of the product.
Under no circumstances may the lift be used by persons who have not received instruction in the operation of the lift.
It is strongly prohibited to modify the original product.
Manual nr: 705-En Ver. 6 150504
User Manual - English
50100059
SWL: 285 kg/625 lbs
Advertisement
Table of Contents

Related Manuals for SystemRoMedic RiseAtlas625M

Summary of Contents for SystemRoMedic RiseAtlas625M
- Page 1 SWL: 285 kg/625 lbs RiseAtlas625M is a safe and easy-to-use stationary ceiling lift unit which can be used in all settings and in all types of rooms, both on permanent rail systems and on portable, freestanding lift stands. When used with the appropriate lifting accessories, RiseAtlas625M provides secure, comfortable and individually adapted lifting of users in connection with seated or horizontal transfers to and from the bed, wheelchair or toilet.
-
Page 2: Table Of Contents
- Preventive service maintenance .............14 - Emergency stop ...................15 - Electrical emergency lowering ...............15 - Manual emergency lowering/raising ............15 - Trouble-shooting ..................16 Accessories ..................17 Maintenance ..................18 Technical information ...............19 - Detailed description ................19 SystemRoMedic M A N U A L... -
Page 3: Installation
Incorrect installation may cause short-circuiting and damage the charger. Alteration of the charging method must be performed by authorized personnel according to instructions issued by Handicare AB. SystemRoMedic M A N U A L... -
Page 4: Emergency Stop Strap
Mount the charger cable. If necessary mount the cover for the charger. c) Connect the accompanying hand control to the charger station and the hand control cable to the lift unit. Check charger function. SystemRoMedic M A N U A L... -
Page 5: Charging The Lift Unit
If the rail system is of the traverse type, the secondary rail is placed at the end of the primary rail at which the charger station is located. Check to ensure that the battery symbol on the lift unit lights up. SystemRoMedic M A N U A L... - Page 6 5) Connect the red cable to the charger rail on the right side, the charger plate’s plus side (positive), and the black cable on the left side (negative), according to fig 4. 6) Install the end-stop on the rail. NOTE! No spring pin + Plus SystemRoMedic M A N U A L...
- Page 7 6) Connect the red cable to the charger contact on the right side, the charger plate’s plus side (positive), and the black cable on the left side (negative), according to fig 6. 7) Install the end-stop on the rail. Spring pin + Plus SystemRoMedic M A N U A L...
- Page 8 For maximum service life, charge batteries regularly. Do not allow the battery charge level to fall below 25% (orange symbol on control panel). Emergency stop must not be activated during charging. Batteries may only be replaced by authorized personnel. SystemRoMedic M A N U A L...
-
Page 9: Using Quicktrolleysystem
6. To remove the lift unit from the rail, perform the above procedure in reverse. Images 1-5: Locking the trolley to the lift unit. SystemRoMedic M A N U A L... -
Page 10: Different Rail Systems
RiseAtlas is shipped with the emergency stop activated to prevent battery discharge during transport or long-term storage. Always keep the key for the emergency lowering close to the lift. All personnel who use the lift must be informed of where the key is kept. SystemRoMedic M A N U A L... -
Page 11: Using The Product
- Inspect the lift for signs of wear and damage. - Check the hand control cable for signs of wear. - Check to ensure that hand control markings coincide with lift functions. - Check battery charge level. SystemRoMedic M A N U A L... -
Page 12: Safe Working Load
ISO 10535:2006 with CSA-C22.2 No. 60601-1:08 Symbols on the product Battery status Emergency stop The lift requires service or Directional indication, transfer maintenance motor Overload Warning! Read the user manual Read user manual SystemRoMedic M A N U A L... -
Page 13: Hand Control
When the top limit switch has been activated it will reverse the strap 5 mm to clear the pressure from the switch. This action will take place after the up button has been deactivated. SystemRoMedic M A N U A L... -
Page 14: Information Panel
Normally, a technician must be contacted when this symbol is activated. Preventative service/maintenance The symbol for service/maintenance lights up automatically when the lift unit has been used for 12 months. Contact an authorized Handicare service technician for maintenance and resetting. SystemRoMedic M A N U A L... -
Page 15: Emergency Stop
Turn it counter-clockwise to lower and clockwise to raise the sling bar. Always ensure that emergency lowering is done in an appropriate location. NOTE! Lowering is very slow. Re-setting manual emergency lowering/raising: Contact an authorized Handicare service techni- cian. Do not use the lift unit. Allen key SystemRoMedic M A N U A L... -
Page 16: Trouble-Shooting
- Prevents the lift from lifting more than the maximum load. If this happens A symbol for overload and a warning triangle light up (amber) a signal is heard. If this symbol is activated, the user is too heavy. SystemRoMedic M A N U A L... -
Page 17: Accessories
Parking Placard, article no.: 50400048 Lifting slings Handicare’s SystemRoMedic™ line includes a wide range of functional and comfortable, high-quality lifting slings that are adapted for all types of lifting and for users with different needs. The lifting slings are available in several materials and in sizes ranging from XXS to XXL. -
Page 18: Maintenance
1060 hPa +50 °C -10 °C 700 hPa Service agreements Handicare offers service agreements for maintenance and regular testing of your lift unit. Contact your local Handicare representative. Serial number SystemRoMedic M A N U A L... -
Page 19: Technical Information
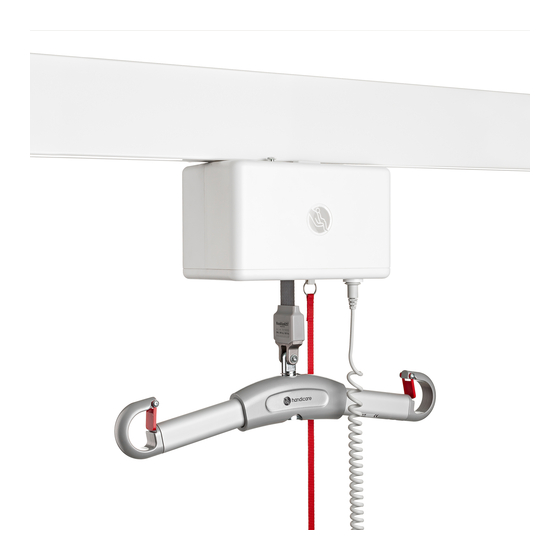
DESCR 1. Outlet for hand control 2. Hand control 3. Lift strap 4. Emergency stop and electrical emergency lowering 212,2 272,5 5. Manual emergency lowering/raising 6. Control panel RiseAtlasM Q-models Basic rail system SystemRoMedic M A N U A L... - Page 20 SystemRoMedic™ is a complete solution that provides for the majority of patient transfer or manual handling requirements. From the simplest to the most complex scenarios, from the lightest to the heaviest. The concept encompasses assistive devices for four different categories of transfers: •...
Need help?
Do you have a question about the RiseAtlas625M and is the answer not in the manual?
Questions and answers