Table of Contents
Advertisement
RS1-G5, RS3-G5, RS4-G5
RS4-G5 FM
RS7-G5 FM
REMOTE START SYSTEM
CONGRATULATIONS on your choice of a Cool Start™ Remote Engine Starter and Keyless Entry with DP
Technology by Crimestopper Security Products Inc. This booklet contains the information necessary for operating
your system. If any questions arise, contact your installation dealer or Crimestopper Security Products Inc.
The RS1-G5, RS3-G5 & RS4-G5 system comes with (2) 1-way AM remotes
The RS4-G5 FM system comes with (2) 1-way FM remotes.
The RS7-G5 FM system comes with a 2-Way LCD Pager and a 1-Way FM remote.
OPTIONAL Features are to be connected only if desired or agreed upon by the customer and the installing dealer
i.e. Door Locks, Trunk Pop, Dome Light Illumination, Horn-Honk, Anti-Grind, etc. These features may also require
additional parts and/or labor fees. Consult with your installer beforehand to be sure of what is going to be installed
with your particular system.
CRIMESTOPPER SECURITY PRODUCTS, INC.
1770 S. TAPO STREET, SIMI VALLEY, CA. 93063
REV 07-2014
(1-Way System)
(2-Way Paging System)
OPERATING INSTRUCTIONS
This device complies with FCC Rules part 15. Operation is
subject to the following two conditions: 1) This device may not
cause interference, and (2) this device must accept any
interference that may be received, including interference that
may cause undesired operation.
responsible for any radio or TV interference caused by
unauthorized modification to this equipment. Such modification
could void the user's authority to operate the equipment.
The manufacturer is not
Advertisement
Table of Contents

Subscribe to Our Youtube Channel
Related Manuals for Cool Start RS1-G5


Summary of Contents for Cool Start RS1-G5
- Page 1 REMOTE START SYSTEM OPERATING INSTRUCTIONS CONGRATULATIONS on your choice of a Cool Start™ Remote Engine Starter and Keyless Entry with DP Technology by Crimestopper Security Products Inc. This booklet contains the information necessary for operating your system. If any questions arise, contact your installation dealer or Crimestopper Security Products Inc.
-
Page 2: Table Of Contents
TABLE OF CONTENTS Operation Cautions & Warnings…….……………..….………………………………….…………….….…………2 Using the Remote Control (1, 4 and 5 button)….……………….……………………….………..…………..3-4 Using the 2-Way Pager……………………………………………….……………………….………..…………...5-6 Setting the Clock and Beep or Vibrate Selection…………………………………………………….……….….6-7 Status LED………………………………………………………………………………………………..……….….……8 Remote Engine Control…………….…..……………………………………………………………….…….…..…8-11 Turbo Timer Mode……………………………….……………………………………...……………….…………..….12 Manual Transmission Mode……………………………….……………………………………...…………………..13 Convenience and Safety Features……………………………….………………………………….…...……..14-15 Transmitter Programming….…………….…………………………………………….……………….…………16-17 2 Vehicle Operation.…………………………………….………………...…………………………………….………18 No Factory Keyless Entry after Remote Start…………..………………………………………………………….19... -
Page 3: Using The Remote Control (1, 4 And 5 Button)
RS1-G5 RS3-G5 RS1-G5: The transmitter supplied with this system is a single button remote control. RS3-G5: The transmitter supplied with this system has 4 vertical buttons – Lock, Unlock, Vehicle Select and Start. To eliminate the possibility of accidentally starting the vehicle, there are (3) choices for button press selection. - Page 4 USING THE 5 BUTTON REMOTE CONTROL FM 1-WAY AM 1-WAY VEH 1 = Green LED VEH 1 = Blue LED VEH 2 = Red LED VEH 2 = Red LED AUX Outputs thru Data DISARM / ARM / UNLOCK LOCK AUX 1 = Trunk + Lock AUX 2 = Trunk + Unlock AUX 3 = Trunk + Start...
-
Page 5: Using The 2-Way
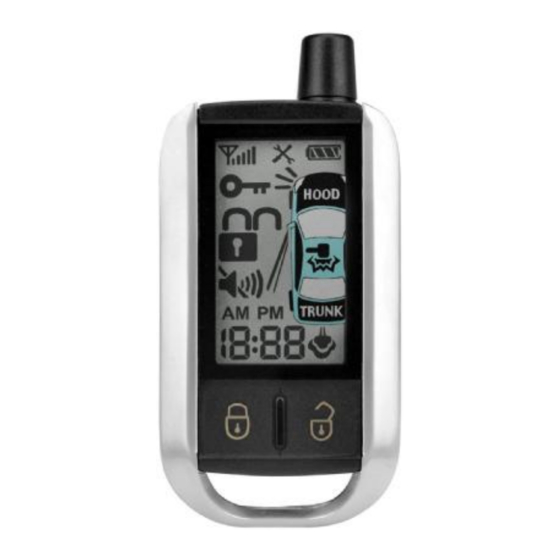
USING THE 2-WAY PAGER TRANSMITTER SIDE BUTTONS LCD SCREEN ICONS Valet Mode (Tools) Transmit Signal Battery Life TRUNK Hood Open Ignition ON RELEASE Sensor Warning Lock/Unlock (Small Hammer) (Arm/Disarm) Sensor Trigger VEHICLE (Big Hammer) Silent no beeps SELECT Door Open CLOCK / Trunk Open Run Count Down... -
Page 6: Setting The Clock And Beep Or Vibrate Selection
USING THE 2-WAY PAGER TRANSMITTER The 2-Way LCD Pager remote transceiver is used to send and receive information from the vehicle. The Control Module transmits High Frequency FM signals from the vehicle to your pager over long distances. Your range will vary depending on location, terrain, and local RF noise/interference. This system is not guaranteed to page you if you are behind concrete walls, underground, in a large structure, or in an area with high levels of electronic interference. - Page 7 REMOTE BEEP & VIBRATE SELECTION The LCD pager remote BEEPS and VIBRATES when it receives a signal from the vehicle. The Beeps and Vibration are selectable (on/off). To enter program mode, 1. Press VEH Button on the side of the remote control 5 times. 2.
-
Page 8: Status Led
STATUS LED LED Operation: (Optional, requires Installation of LED) LED will flash when locking your doors with remote. LED will remain solid in Valet Service Mode. REMOTE ENGINE CONTROL REMOTE START Button Press Selection (Option # 6): To eliminate the possibility of accidentally starting the vehicle, there are (3) options for button press selection. This option allows you to change whether the Remote starter is activated by a: 4. - Page 9 REMOTE ENGINE CONTROL REMOTE ENGINE STARTING - UNSUCCESSFUL START In the event that the engine does not start on the first attempt, the system shuts down for a few seconds, then attempts to restart the engine a 2 and 3 time.
- Page 10 REMOTE ENGINE CONTROL IDLE DOWN MODE: This mode allows the unit to take over operation of the parked vehicle while the ignition key is removed and you exit the vehicle. The vehicle will remain running for the programmed time or until canceled. The Run Time choices are: 10, 20, 30 minutes or Infinity Run.
- Page 11 REMOTE ENGINE CONTROL SELECTABLE HOURLY COLD-START MODE (1-4 HOURS) This mode allows the vehicle to be programmed to self-start every 1, 2, 3 or 4 hours and run for the programmed run time. This can be helpful during extremely cold conditions where engine fluid freeze-up is a concern. TIMED SELF-START MODE –...
-
Page 12: Turbo Timer Mode
TURBO TIMER MODE (OPTION #22) The optional Turbo Timer mode allows the CoolStart system to keep a Turbo or Turbo Diesel vehicle running for 1, 3 or 5 minutes [selectively] after you remove the key and exit the vehicle. This is handy for turbo cool- down without the need for expensive turbo timers. -
Page 13: Manual Transmission Mode
MANUAL TRANSMISSION MODE (Option 11) MANUAL TRANSMISSION EXIT PROCEDURE (Option #11-1, 11-3 & 11-4) This system features a Manual Transmission Mode. When exiting the vehicle, there is safety check out procedure required for the manual transmission mode to work. There are 3 choices of operation, 1. -
Page 14: Convenience And Safety Features
CONVENIENCE AND SAFETY FEATURES KEYLESS ENTRY (Power Door Locks, may require Data Module - Optional) This system enables you to remotely lock and unlock the vehicle’s doors (if equipped with power locks) via remote control for safety and convenience. Note: This feature may require extra labor and/or parts to install. Press the Lock or Unlock transmitter button as you leave or come near the vehicle. - Page 15 CONVENIENCE AND SAFETY FEATURES REMOTE TRUNK RELEASE OR DOMELIGHT ILLUMINATION (Option 9) This system includes an output that can be programmed to remotely release a factory electronic trunk or illuminate the interior light when you unlock your vehicle for lighted entry at night. If you have the optional trunk pop installed, simply press and release the Trunk Button #3 on the transmitter to remotely open trunk.
-
Page 16: Transmitter Programming
TRANSMITTER PROGRAMMING on 1 BUTTON Note: All transmitter codes must be learned at time of programming!! The RS1-G5 learns up to 4 different transmitter codes. 1. Turn Ignition Key to the ON position. 2. Press Programming button 4 times, then after a few seconds the unit flashes the parking lights 4 times. - Page 17 TRANSMITTER PROGRAMMING on 4 & 5 BUTTON Note: All transmitter codes must be learned at time of programming!! The Cool Start system learns up to 4 different transmitter codes. 4. Turn ignition key to the ON position. 5. Press Programming button 4 times, after a few seconds the unit flashes the parking lights 4 times.
-
Page 18: Vehicle Operation
2 VEHICLE OPERATION Your remotes have the ability to control a second vehicle with a Crimestopper system installed. To set up the 2-Vehicle operation you must first program your remotes to Vehicle #2. Follow the “Transmitter Programming” steps (Pg. 15) at the second vehicle and learn YOUR remote, along with vehicle #2’s existing remotes. -
Page 19: No Factory Keyless Entry After Remote Start
Entry. The Remote Starter will Re-Lock the doors after remote starting (programmable). When you return to a remote started vehicle, just press the Unlock button on the remote control. On RS1-G5, the Start button can be programmed to unlock the doors (option 23-1), Consult your installer. -
Page 20: 2-Way Data Port And Smart Phone Data Port
2-Way DATA PORT Some vehicles require a Databus Module to Bypass the factory Immobilizer and operate the keyless entry Databus modules are used to communicate with the vehicles computer at the OBD2 Data connector or Canbus wires. This reduces installation error. Crimestopper Systems with DP Series have a direct Data Port Plug-In for the Databus bypass module. -
Page 21: Remote Battery Replacement (1, 4 And 5 Button Remote)
BATTERY REPLACEMENT on 1 BUTTON REMOTE To replace the battery: Simply remove the screw on back of the transmitter and slide the case apart as shown. Remove the two CR-1620 Lithium batteries and replace. Put case back together and tighten screw. - Page 22 BATTERY REPLACEMENT on 4 BUTTON REMOTE To Replace the Battery: The Remote Control uses two CR-2025 Lithium 3 Volt Batteries. Simply remove the Phillips screw located behind key ring (see diagram below). Use a small screw driver as shown in Figure 2 to remove the back cover. Slide old batteries out. Insert the new batteries into plastic cover and slide into place with the (+) end facing up.
- Page 23 BATTERY REPLACEMENT on 5 BUTTON REMOTE To Replace the Battery: The Remote Control uses two CR-2025 Lithium 3 Volt Batteries. Simply remove the Phillips screw located behind key ring (see diagram below). Use a small screw driver as shown in Figure 2 to remove the back cover. Slide old batteries out.
- Page 24 FCC Statement 1. This device complies with Part 15 of the FCC Rules. Operation is subject to the following two conditions: (1) This device may not cause harmful interference. (2) This device must accept any interference received, including interference that may cause undesired operation. 2.
Need help?
Do you have a question about the RS1-G5 and is the answer not in the manual?
Questions and answers