Table of Contents
Advertisement
Quick Links
Advertisement
Table of Contents

Related Manuals for TurboChef plexor


Summary of Contents for TurboChef plexor
- Page 1 Owner’s Manual for the turbochef plexor oven ©2021 TurboChef Technologies, LLC...
- Page 3 For further information, call 800.90 TURBO +1 214.379.6000...
- Page 4 Original Instructions The information contained in this manual is important for the proper installation, use, maintenance, and repair of this oven. Follow these procedures and instructions to help ensure satisfactory baking results and years of trouble-free service. Errors – descriptive, typographic, or pictorial – are subject to correction. Specifications are subject to change without notice.
-
Page 5: Table Of Contents
Table of Contents Important Safety Instructions General Safety Information Reducing Fire Risk Grounding Instructions Power Cord Replacement or Removal Precautions to Avoid Possible Exposure to Excessive Microwave Energy RF Interference Considerations Protective Earth (Ground) Symbol Equipotential Bonding Symbol Specifications and Installation Theory of Operation Features Dimensions... -
Page 6: Important Safety Instructions
SAFETY INSTRUCTIONS IMPORTANT SAFETY INSTRUCTIONS WARNING: When operating this oven, strictly adhere to the following safety precautions to reduce the risk of burns, electric shock, fire, injury, damage to oven or property near oven, or possible exposure to excessive microwave energy. GENERAL SAFETY INFORMATION Read all instructions before using this appliance. -
Page 7: Reducing Fire Risk
REDUCING FIRE RISK Remove wire twist-ties from paper or plastic bags used to facilitate cooking in the oven. If materials inside the oven ignite, keep the oven door closed, turn the oven off, and disconnect the power cord or shut off power at the fuse or circuit breaker panel. If smoke is observed, switch off or unplug the oven. -
Page 8: Precautions To Avoid Possible Exposure To Excessive Microwave Energy
SAFETY INSTRUCTIONS PRECAUTIONS TO AVOID POSSIBLE EXPOSURE TO EXCESSIVE MICROWAVE ENERGY (a) Do not attempt to operate this oven with the door open since open-door operation can result in harmful exposure to microwave energy. It is important not to defeat or tamper with the safety interlocks. -
Page 9: Theory Of Operation
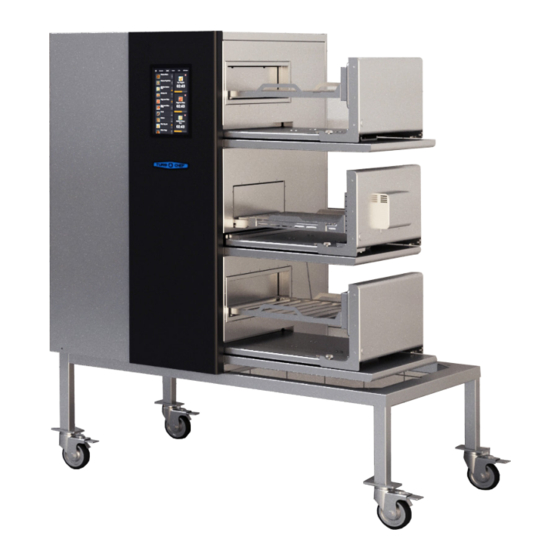
Height: 61.16” (1553 mm) combination, and can be field retrofitted if menu Width: 48.88” (1242 mm) needs change. What truly sets PLEXOR apart is Depth: 32.81” (833 mm) its modular design and ability to operate three technologies on a single user interface and with a Oven Weight single plug. -
Page 10: Certifications
Europe/Asia (Delta): 220-240 VAC, 50/60 Hz, 40 A TurboChef will not recognize a fallen oven as Europe/Asia (WYE): 380-415 VAC, 50/60 Hz, 20 A a warrantable claim and is not liable for any Australia: 380-415 VAC, 50/60 Hz, 20 A injuries that may result. - Page 11 Installation Near Open Heat Source When placing a TurboChef oven near an open heat source (Figure 2), strictly adhere to the following: - If the oven is being placed near a grill or stove, a divider must exist between the oven and the open heat source, with a minimum of 6”...
-
Page 12: Voltage Selection
Ventilation The TurboChef PLEXOR oven has been approved by Underwriter’s Laboratory for ventless operation (UL KNLZ listing) for all food items except for foods classified as “fatty raw proteins.” Such foods include bone-in, skin-on chicken, raw hamburger meat, raw bacon, raw sausage, steaks, etc. - Page 13 Daily Maintenance Supplies and Equipment Follow the steps below when cleaning your PLEXOR TurboChef ® Oven Cleaner (Product Number: oven. Use only TurboChef ®-approved cleaning 103180), Kay ClickSan® sanitizer, nylon scrub pad, chemicals. The use of any other cleaning products may...
-
Page 14: Daily Maintenance
• Use a food vacuum or damp towel to remove large particles from the oven cavity and sleigh. • Spray TurboChef Oven Cleaner on the top surface of the oven sleigh and onto the top, bottom, and sides of the interior... -
Page 15: Oven Controls
Figure 3: PLEXOR Home Screen, Ovens Off Figure 4: PLEXOR Oven Ready Screen Oven Controls 4. Group Name Touch the group name at the top to view items 1. On Icon in that group only. Swipe/scroll left to right to Touch to start preheating each module. -
Page 16: Preset Cooking Instructions
COOKING Preset Cooking Instructions The oven is programmed with recipe settings at the time of manufacture and is ready to operate out of the box. New menu settings can be loaded via USB (page 16) or programmed manually (page 11). This oven uses impingement, convection, and microwave to cook food faster than traditional cooking methods. - Page 17 Step 3: Place Food on the Cook Rack of the Available Module Group Navigation Bar WARNING: Inside of oven and oven door are hot! Step 4 (Optional): Select a Group • From the top navigation bar, select a group. Scroll left to right to view additional groups.
-
Page 18: Menu Options And Settings
Dynamics ConnectWare®, an externally-mounted connectivity module that can utilize one or more connection methods such as WiFi, MiWi, and Ethernet. The WiFi option on the PLEXOR display shows signal strength and allows the ConnectWare module to be configured to connect to different access points. -
Page 19: Editing Recipe Parameters
Editing Recipe Parameters From the Edit Recipes screen, users can: Rename food groups and items Add keywords Add/replace image and icons Copy or move a recipe to another group Remove a recipe Change cook settings NOTE: Enable or disable recipe edit from the Settings screen (page 10). Follow the instructions below to access the Edit Recipe screen: Select the item to be The edit menu will... - Page 20 EDITING RECIPES Editing Name Keywords From the Edit Recipe screen, touch the name From the Edit Recipe screen, touch the Keyword icon. icon. Type the new name and touch enter. Add or remove keywords (separate the keywords using a comma) and touch enter. Keywords will assist when searching for an item.
-
Page 21: Editing A Group
Remove a Recipe 3. Comments From the Edit Recipe screen, touch the Remove Add comments for recipes, if desired. A icon, and then the next Remove icon to confirm comment is text that appears before or after your selection. a stage and is used to instruct or inform the oven operator. - Page 22 EDITING RECIPES 7. % Microwave (Rapid Cook Module Only) “% Microwave” can be set from 0-100% in 5% increments. By default, the percentage represents the percentage of microwave power for the entire duration of cook time. NOTE: There is a “Pulse” option. When pulse is set to “Off”...
-
Page 23: Oven Module Prioritization
Oven Module Prioritization The oven module prioritization setting eliminates guesswork on the part of the oven operator and helps ensure the food product is cooked to optimal quality, while also helping to balance the need to maximize throughput during busy times. From the Cook Settings screen, touch the module icon. -
Page 24: Usb Operation
USB OPERATION AND TROUBLESHOOTING USB Operation While all oven modules are either cooling down or off, insert a USB drive into the USB port on the PLEXOR. The user will be prompted to “Save Recipes,” “Update,” or “Cancel.” Save Recipes: This option will back up the recipes on the PLEXOR to a USB drive. These settings can then be applied to other PLEXOR ovens. - Page 25 I ssue Po ssi b l e C a u se( s) Re s o l u t io n No power to - Oven is not plugged in. - Plug the oven in. oven. - Main circuit breaker is tripped. - Verify the wall circuit breaker is on.
-
Page 26: Warranties
Equipment or otherwise will be furnished to you upon request, is excluded from this warranty. This warranty does not apply to damage or failure which results, in TurboChef ’s or its service agent’s... - Page 27 Charges for Non-Warranty Service or Rejection of Service Visit In the event that repairs, replacement or service are provided by TurboChef ’s service agents for work not covered by this limited warranty, customer agrees to pay the service agent directly according to the service agent’s normal scale of charges. In the event TurboChef is invoiced by the service agent for services not covered under this extended warranty, TurboChef will invoice customer and customer will pay such invoice based on terms of net 10 days.
-
Page 28: International Limited Warranty
This Limited Warranty commences upon delivery of the Equipment to Your premises. The Authorized Distributor will inspect and install the Equipment at Your premises in accordance with TurboChef ’s instructions and will record the serial number of the Equipment, Your contact details, the date and location of installation and the results of the Authorized Distributor’s inspection. - Page 29 +1 214.379.6073 The claim must include the serial number of the Equipment and be received by TurboChef on or before the last day of the Warranty Period. Upon receipt of Your claim, TurboChef will promptly notify an Authorized Distributor or an authorized service agent to contact You, to verify Your claim and, if necessary, to arrange for an on-site repair visit during normal working hours.
- Page 30 The application of the United Nations Convention on International Sale of Goods to this Limited Warranty is expressly excluded. This Limited Warranty may not be altered, amended or modified by the Authorized Distributor or its service agent, and no representation, alteration, amendment or modification by TurboChef shall be valid unless in a signed form from TurboChef.
- Page 32 For service or information: w i th in n o rth am e r i c a c a l l Customer Support at 800.90 T U R B O outsi d e no rt h a me r i c a c al l +1 214.379.6000 or Your Authorized Distributor Global Operations Customer Support...
Need help?
Do you have a question about the plexor and is the answer not in the manual?
Questions and answers