Table of Contents
Advertisement
Advertisement
Table of Contents

Related Manuals for J5create Ultra Station


Summary of Contents for J5create Ultra Station
- Page 1 Ultra Station User Manual JUD500...
-
Page 2: Table Of Contents
Table of Contents GETTING STARTED ..........................5 INSTALLATION FOR WINDOWS......................6 Device Driver Installation......................6 Verify Device Driver Installation ....................8 Setup The Sound ........................9 Device Driver Un-installation ....................11 INSTALLATION FOR MAC ........................ 12 Device Driver Installation......................12 Setup The Sound ........................ - Page 3 Ethernet, speakers, microphone and any other USB3.0 / 2.0 peripheral to your laptop with one USB 3.0 cable. Now you can use the Ultra Station’s Keyboard / Mouse “Wormhole” functions to drag & drop across two computers for file copying &...
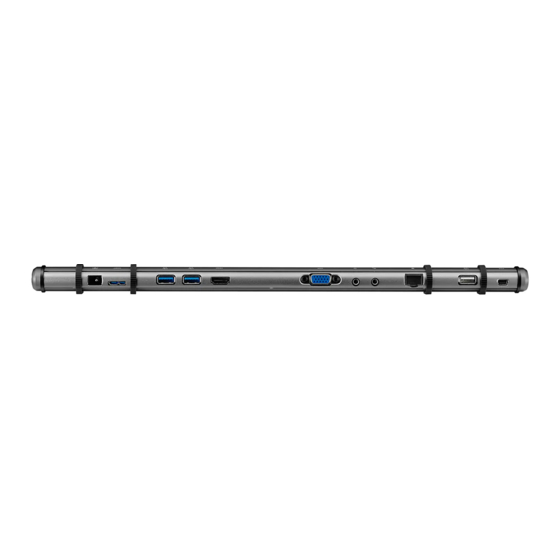
- Page 4 Host (2) Upstream Port USB 3.0 Micro B Female connector Cable USB 3.0 Micro B to Type A Downstream Port USB 3.0 Type-A Female Connector with Battery Charge Downstream Port USB 3.0 Type-A Female Connector Downstream Port USB 2.0 Type-A Female Connector Video VGA Port (5) DB 15pin Female Connector...
-
Page 5: Getting Started
Run the setup program as an administrator to avoid errors in installation Connect the VGA or HDMI Cable of Display to the VGA or HDMI port of Ultra Station first before connecting the USB cable to the computer Un-install the previous driver first before installing the latest driver ... -
Page 6: Installation For Windows
5. Connect Ethernet Cable to Port 9 6. Connect Audio Cable(audio out, audio in)to Port 7 & 8 7. Lay your laptop on the top of the j5 Ultra Station 8. Push the “j5” power button 9. USB HUB port 3,4,10 are now ready to use 10. - Page 7 The Display functions of the ULTRA STATION will be activated after the computer restarted. You might see the mirror display is shown on the display device. Windows 7:...
-
Page 8: Verify Device Driver Installation
ULTRA STATION will be numbered 2 monitor. Verify Device Driver Installation The following procedure is for verifying the driver installation status of the ULTRA STATION Windows 7: Right Click “My Computer” “Manager” “Device Manager” click “+” sign of “Network adapter”... -
Page 9: Setup The Sound
USB HDMI display Device only one output will receive audio. The following explains how to set-up and change the default sound output from the display device connected with the USB 3.0 ULTRA STATION. Windows 7: 2. The speaker options are shown below. - Page 10 Audio Devices” and select “Changes the speaker settings”. Note: A. The speakers are numbered according to the number if USB ports detected by your computer system. B. The Default sound will output from the ULTRA STATION with the greatest number of USB ports.
-
Page 11: Device Driver Un-Installation
3. Select “the Default device” you want, and click “apply”. then click “ Volume” to choose which speaker you want to use as your default. Device Driver Un-installation ※ Unplug the USB Cable of the ULTRA STATION before uninstalling the driver 1. Click “Start”→ Control Panel → 2. A message will appear confirming that you Programs and Features→... -
Page 12: Installation For Mac
3. When the Driver is completely uninstalled, select “Yes, I want to restart my computer now”. Click Finishto restart. INSTALLATION FOR MAC Device Driver Installation Installing the device driver enables your computer’s operating system to recognize the ULTRA STATION. Be sure that you are referring to the appropriate installation procedure before you begin installing. - Page 13 ULTRA STATION USER MANUAL 4. Click “Agree” to proceed 5. Click “ Install” to proceed 6. Type in your password and click “OK” Installation is processing…This will take a few moments 7. Installation is completed, click “ Close” 8. After Lan driver installation finished, Choose the OS version you are using and press “Install Driver”...
- Page 14 9. Click “Continue” to proceed 10. Type in your password and click “OK” 11. Click “Continue Installation” 12. Installation is processing…This will take a 13. Click “Restart” to complete the software few moments installation...
-
Page 15: Setup The Sound
Setup The Sound Mac audio system restricts the audio function to one output at a time; therefore, when using the USB ULTRA STATION only one output will receive audio. , and then “System Preferences” 2. Go to the “System Preferences” and select 1. -
Page 16: Verify Device Driver Installation
The following procedure helps you to verify the driver installation status of USB 3.0 Display Adapter 2. The picture shows the installation process for the 1. GO , select “About This Mac” Ultra Station and select “ More Info…” Device Driver Un-installation 1. Unplug the USB Cable of ULTRA STATION from the USB port 2. -
Page 17: Installation For Wormhole
ULTRA STATION USER MANUAL INSTALLATION FOR WORMHOLE GETTING STARTED-MAC 1. Connect one end of the Wormhole Switch to a standard USB port on one of the two computers. And connect the other end of the Wormhole Switch to a USB port on the second computer. -
Page 18: Getting Started-Windows
3. 3. After the Wormhole Switch is plugged in the “Wormhole” CDROM icon will appear either on the desktop or on the “Macintosh HD”. Double click on the “Wormhole” icon. 4. When the Wormhole Switch is connected properly the wormhole launch page will be shown. -
Page 19: Functions Instructions: Windows 7
ULTRA STATION USER MANUAL Troubleshooting: If auto-run is not launched, please follow the steps: A. Insure both computers are properly connected to the USB cable. B. Go to My Computer and double-click the j5 Wormhole Switch icon ( ) to start the application. - Page 20 ULTRA STATION Display Mode Extended mode (Default) This feature allows the display device attached to the ULTRA STATION to work as an “extended” display of the on- board screen. You can adjust the position by clicking “number” of the display first and select “Extend these displays”...
- Page 21 ULTRA STATION USER MANUAL Mirror mode-Duplicate This feature allows the same contents of on-board screen to be displayed to the screen of ULTRA STATION You can select “Duplicate these displays” and click “Apply” Note: The resolution for the secondary and...
- Page 22 Super Utility A super utility provides more options. You can find the icon on the lower right task bar. Identify Monitors When “Identify Monitors” is selected, a serial number will be shown at the upper right corner of the display device. You can see the serial number of each display when using the Hotkey function.
-
Page 23: Functions Instructions: Windows Xp
You can choose all the functions simply and directly only by clicking on this icon( ) seen on the lower right toolbar. Display ID Smart Display Device ID Detection The ULTRA STATION supports VESA defined DDC/EDID. The utility will show the display device ID whenever it is attached to the ULTRA STATION... - Page 24 If there is no display device attached to the ULTRA STATION, it will show up as “Unknown Monitor.” In some cases, the attached display device does not support EDID, in this case the ID will also show up as “Unknown Monitor”.
- Page 25 ULTRA STATION USER MANUAL Display Mode Extended (Default Mode) A default display mode allows the attached ULTRA STATION enabled display device to work as an “Extended” display of the on-board screen. Mirror Mode When Mirror is selected, the screen of...
- Page 26 When Primary is selected, the display device When Off is selected it will disable the will become the main display. The display of display of the ULTRA STATION. the internal graphics card will automatically switch to be the extended display and act as an extension desktop.
- Page 27 ULTRA STATION USER MANUAL Multi-Display Control Panel When Multi-Display Control Panel is selected, the Multi-Display Control Panel window will pop-up to enable the modification of the Hotkeys. ※ Using Hotkey Default setting is Ctrl + Display No. Click the window you want to move on task bar to become active, and then press Hotkey.
-
Page 28: Functions Instrutions: Mac
FUNCTIONS INSTRUTIONS: MAC Display Resolution From “System Preferences” click on the Go to , and then “System “Display” tab. You should see this screen. Preferences On this screen, you can adjust the resolution, display mode and color range. Display Mode Click on the “arrangement”... - Page 29 ULTRA STATION USER MANUAL TIP: To simplify using the USB Display device click “show display in menu bar.” You will see the display icon that you can double- click on at any time. Windows Arrangement Space Click “Show Spaces in menu bar.” You...
-
Page 30: Functions Instrutions: Wormhole
Exposé View different windows with a single keystroke. F9 : view all open windows F10: view windows of the current application only F11: show desktop *For more windows arrangement functions, please see Apple’s computer user manual. FUNCTIONS INSTRUTIONS: WORMHOLE Keyboard and Mouse Sharing o Use Mouse to Move Off the Edge of Screen:... - Page 31 ULTRA STATION USER MANUAL the first computer to type the text on the file of the second computer. Note: 1. Please use a Mouse and Keyboard set. The Keyboard Switch function always follows the mouse cursor of the same computer. When using a USB Mouse or Keyboard that is not a set, it will default to its limited screen switching function mode only.
- Page 32 B. File Shuttle: 1. Once your Windows computer connects to the Android tablet, the File Shuttle will launch automatically and you will see the icon ( ) in the tool bar of Windows computer. 2. The file system of Android tablet will appear in the Windows computer. You will be able to transfer files between the two computers.
- Page 33 ULTRA STATION USER MANUAL Keyboard sharing for iPad This Wormhole Switch also provides a Keyboard sharing for iPad. You can connect a PC and an iPad via the Wormhole Switch and switch the PC’s keyboard to work on the iPad.
- Page 34 (Right/Left/Up/Down) o Disable (Enable) the Keyboard and Mouse Control Temporarily& Disable (Enable) Clipboard Share Temporarily: You can quickly Disable or Enable sharing option. If Disabling one of those functions temporarily, the icon ( ) will be shown.If Disabling both functions temporarily, the icon ( ) will be shown.
- Page 35 ULTRA STATION USER MANUAL The File Shuttle Definition A. The bar description Close Minimize Computer Icon Active Information Option The bar Guider File List Simply Drag a file from your computer to here. The file will copy to the destination of another computer.
- Page 36 b. Right click Dock area to choose below action Copy: Copy the selected files and Paste it to the other destination. Remove from Dock: Use Remove from Dock to delete the selected files on the Dock. Select All: Click Select All to select all the files on the Dock, and then copy and paste all the files to the destination Minimize Press...
- Page 37 ULTRA STATION USER MANUAL The list of the device item from the other computer The list record of recent searching path File Destination Path You can quick select the destination by clicking the path. Add Folder Click on the icon to add a new folder and edit the file name.
- Page 38 TROUBLE SHOOTING If you have any questions about the use of the JUD500 ULTRA STATION, please follow the instructions below. If any further assistance is needed, please visit our website or call j5 create support hotline. Known Issues Direct 3D is not supported under XP. It would be supported under Win 7 Aero mode.
-
Page 39: Technical Support
2. Online Support Please visit the j5 create website (www.j5create.com) to find the latest software for your device. If you are still experiencing the same issue, you can submit a description of your problem via email service@j5create.com... - Page 40 If such a situation occurs, j5 create will calculate the cost of materials and repair for your reference. This warranty is given by j5 create in lieu of any other warranties express or implied. REGULATORY COMPLIANCE This equipment has been tested and found to comply with FCC Part 15 Subpart B § 15.109/15.107 Class B. Operation is subject to the following two conditions: •...
Need help?
Do you have a question about the Ultra Station and is the answer not in the manual?
Questions and answers