Table of Contents
Advertisement
Advertisement
Table of Contents

Subscribe to Our Youtube Channel
Related Manuals for MAAX Coleman Spas 100 Series


Summary of Contents for MAAX Coleman Spas 100 Series
- Page 1 M a n u a l 10 0 , 3 00 , 4 0 0 & 7 0 0 series...
-
Page 2: Copyrights And Trademarks
All rights reserved. Nothing from this publication The information contained in this manual is to may be copied, stored in an automatic data the best knowledge of MAAX Spas (Arizona), system or transferred in any form or by any Inc., accurate. However, MAAX Spas (Arizona), means (electronic, mechanical, by photocopying, Inc. -
Page 3: Table Of Contents
Contents Copyrights and trademarks page 2 Owner’s details page 2 Contents page 3 Important safety instructions page 4 - 6 Spa system components page 7 - 8 Jets and air controls page 9 Electrical specifications page 10 Operating systems page 11 - 12 Temperature page 13 - 14 Standard/Economy/Sleep modes... -
Page 4: Important Safety Instructions
Important safety instructions Avoiding/reducing the risk of injury conductor of at least 6 mm , which is fixed and/or drowning: to the earth clip on the control box supplied 1. The temperature of the water in the spa for this purpose. must never exceed 40 °C. - Page 5 • Get a qualified engineer to carry out floor must be supported in the same way. the electrical connections. If your spa is being installed outside, we suggest • Replace damaged electrical cables you create a solid base for the spa to stand on. immediately.
- Page 6 would otherwise cause damage or someone to slip. 3. The floor must be flat with an anti-slip finish. Carpet is not recommended. 4. The walls, ceiling and woodwork must be constructed of a material with high resistance to damp. 5. Check whether the floor can carry the full weight of the spa and water.
-
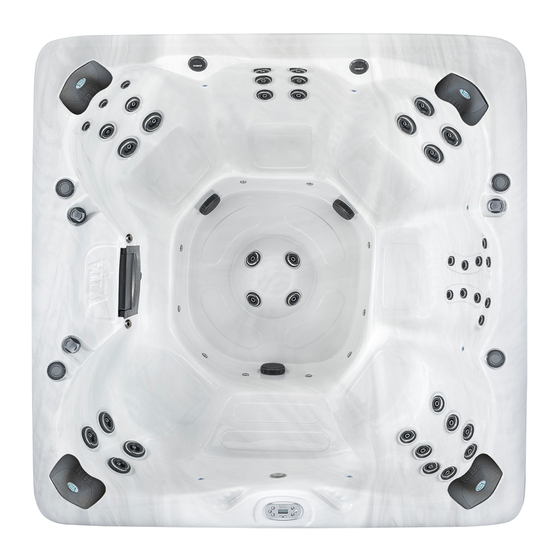
Page 7: Spa System Components
Spa system components A. Skimmer: Removes floating dirt from the F. Access to the drainage channel (next to surface of the water, creates a point for the water maintenance panel): Drainage taps on the spa to flow back to the pump and contains a filter are on the kick-plate. - Page 8 Spa components Purely for reference. The equipment may look C. Sliding valves: Used to stop the flow of water different from what is shown in the picture. from the spa to the equipment during mainte- nance. The number of valves depends on the model.
-
Page 9: Jets And Air Controls
Jets and air controls Jets Cleaning the jest To remove the inserted piece, use the palm All the jets are designed so that each of them of your hand to apply pressure to the flange provides a unique hydro-massage. All the large of the jet. -
Page 10: Electrical Specifications
Electrical specifications N OT E : Before you carry out any repairs to the spa, Warning: risk of electric shock DISCONNECT the electricity supply at the Read and follow all instructions main switch or the distribution board. Important safety regulations All electrical connections of this spa system The electrical configurations for the operating must ONLY be carried out be a qualified and... -
Page 11: Operating Systems
Starting procedures Operating systems 1. Fill the spa with tap water via the filter Powerworks™ operating system 630/736 series opening up to the mark on the skimmer. (430/432 series) Never use softened water in your spa. Softened water can affect the chemical The 630/736 series Powerworks™... - Page 12 PANEL 630/736-SERIES: Push buttons BUTTON FUNCTION The push buttons are the knobs that are located on the operating panel on the top of the spa. • Increase the temperature You can use them to program the various • Change the time setting spa functions (e.g.
-
Page 13: Temperature
Temperature JETS 2 (430 series: High Jets) Press JETS 2 to activate the therapeutic pump. The highest temperature that can be set is The order of the jet action is: 40 °C and the lowest is 26 °C. The actual water temperature is shown on the display. - Page 14 Press SET UP to lock the temperature and the Next, press SET UP. You will now see the fol- display will then show: lowing in the central locked display: You have two seconds to carry out this procedure You have two seconds to carry out this procedure in the correct sequence.
-
Page 15: Standard/Economy/Sleep Modes
Standard/Economy/Sleep modes The water temperature is now shown on the display. You can switch between Standard, Economy and Sleep modes by pressing the MODE/PROG Advance setting of filter cycles (630/736 series) button (430/432 series: MODE). If you place Now the time is set, the spa will automatically the spa in Standard mode, the low speed of filter the water for three hours every 12 hours. - Page 16 MODE/PROG and the display will show SET the MODE button the spa works properly and FILTER 1. Each time you press MODE/PROG, safely at 37.5 °C. In this mode, all user buttons the filter start time, the status of the heater and are active.
-
Page 17: Filter Cycles
Press on UP or DOWN to set the duration of Turning the LCD display round (630/736 series) the cycle. Each time you press the button, the The 630/736 series operating system has a function cycle duration is show on the LCD display as that allows the LCD display to be ‘turned round’... -
Page 18: Fiber Optics System
The different lighting options are: N OT E : Mode 1: Random colour changes with a By setting pump 1 on low speed for one flowing, smooth transition from cleaning cycle the filtration will start, one colour to the next. although no ozone will be generated, Mode 2: One colour - red unless a programmed filter cycle is started... -
Page 19: Equipment Safety Features
Equipment Safety Features Automatic cut-off Your spa comes with an automatic time-out function. This is for the protection of the equipment and the user. In the interests of your safety and to limit the unnecessary use of the pumps and lighting, the selected equipment is automatically switched off by the time-out function as follows: Accessory... -
Page 20: Error Messages On The Lcd Display
Error messages on the LCD display The most common error messages, their likely causes and solutions, are described in the following table: The LCD- display shows... This means... What happens... Possible cause... Solution... Overheating - one of The heater is •... -
Page 21: Common Lcd Messages
The LCD- display shows... This means... What happens... Possible cause... Solution... No water flow to the Spa functions • Sliding valves closed • Open the sliding valves heater are switched off • Blocked drainage • Remove the blockage channels • Contact your supplier •... -
Page 22: Maintenance
Maintenance Chemical composition of the water pH level The chemical composition of the water in a spa pH is the balance of acidity and alkalinity in the system is extremely important. Chemicals are water. Maintaining the right acidity is important used to clean the water and regulate the pH for the effectiveness of the water cleaning agent, balance. - Page 23 combination with water cleaning and balancing used intensively, as well as when replacing or chemicals results in a clean, healthy spa, ensures topping up the water. the minimal use of chemical products and protects you against irritation caused by chemicals. Emptying the spa Cleaning the water with ozone N OT E :...
- Page 24 The internal drainpipe(s) is/are behind the front The filter system in your spa may also include a panel. Remove the screws from the access panel, First Filter. This is an extra filter that is fixed to and then the panel itself. Locate the drainpipe(s). the top of the skimmer basket.
- Page 25 every year. How often you have to clean the filter the spa (page 23). Check the chemical com- depends on how intensively the spa is used. ponents in the water carefully until all traces of the anti-freeze agent have been removed. Getting your spa ready for winter In cold climates, where the temperature drops below freezing, special care is needed to prevent the...
-
Page 26: Lights
Protect the varnish of your spa - always cover Lights the spa when not in use. The lights in the spa can be replaced via the housing. Remove the side panel and the insulation, which is thickest around the lighting units. -
Page 27: Common Problems With The Spa Water
Common problems with the spa water Problem Cause Solution Cloudy water • Insufficient filtration / • Check whether the filter is working properly; clean the dirty filter filter with a special filter cleaner or degreaser. • Too much oil / •... - Page 28 Problem Cause Solution Ring of • Build-up of cosmetic oils, • Remove the scum with a hand net, or change the water. scum/dirt on lotions and chemicals from the spa walls soap or cleaning agents Algae • pH value out of balance •...
-
Page 29: General Problems With The Equipment
Problem Cause Solution Cleaning agent • Excessive organic growth • Increase shock dosage; add cleaning agent; shower before disappears in the water using the spa too quickly • Temperature too high • Reduce the temperature • Low pH • Increase the pH using sodium bicarbonate. •... - Page 30 Problem Usual cause Solution Abnormal water • Very strong condensation • Use the cover and refill as necessary consumption and/or splashes Low water • Running in FILTER mode - slow speed • Select High Speed jets stream from • Block wall suctions or skimmer •...
-
Page 31: Tips For Use
MAAX Spas (Arizona), Inc. offers our customers This manual refers exclusively to spa models a limited guarantee. This applies to the structure, produced since 2003. -
Page 32: Wiring Diagram 430 Serie
Wiring diagram 430 serie... -
Page 33: Wiring Diagram 432 Serie
Wiring diagram 432 serie... -
Page 34: Wiring Diagram 630 Serie
Wiring diagram 630 serie... -
Page 35: Wiring Diagram 736 Serie
Wiring diagram 736 serie...
Need help?
Do you have a question about the Coleman Spas 100 Series and is the answer not in the manual?
Questions and answers