Table of Contents
Advertisement
Advertisement
Table of Contents

Related Manuals for Williams OVERTURE III


Summary of Contents for Williams OVERTURE III
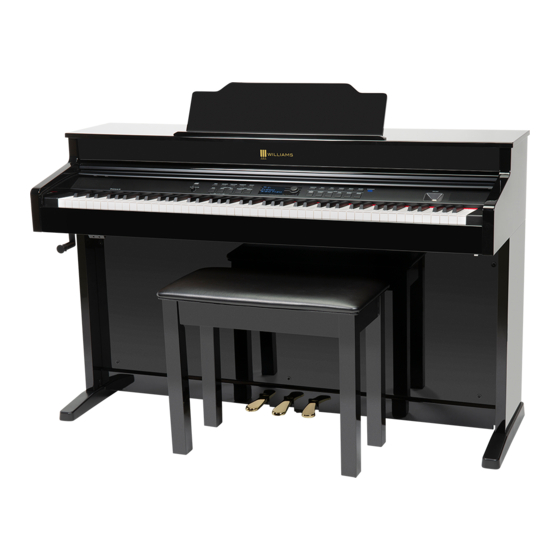
- Page 1 O V E R T U R E I I I digital piano with bluetooth® audio owner's manual...
-
Page 2: Important Safety Instructions
IMPORTANT SAFETY INSTRUCTIONS • Do not use near water. • Clean only with a soft, dry cloth. • Do not block any ventilation openings. • D o not place near any heat sources such as radiators, heat registers, stoves, or any other apparatus (including amplifiers) that produces heat. • Do not remove the polarized or grounding-type plug. • Protect the power cord from being walked on or pinched. • Only use the included attachments/accessories. • Unplug this apparatus during lightning storms or when unused for a long period of time. • R efer all servicing to qualified service personnel. Servicing is required when the apparatus has been damaged in any way, such as power-supply cord or plug is damaged, liquid has been spilled or objects have fallen into the apparatus, the apparatus has been exposed to rain or moisture, does not operate normally, or has been dropped. FCC STATEMENTS 1. C aution: Changes or modifications to this unit not expressly approved by the party responsible for compliance could void the user’s authority to operate the equipment. 2. N OTE: This equipment has been tested and found to comply with a Class B digital device, pursuant to Part 15 of the FCC Rules. These limits are designed to provide reasonable protection against harmful interference in a residential installation. This equipment generates, uses, and can radiate radio frequency energy and, if not installed and used in accordance with the instructions, may cause harmful interference to radio communications. However, there is no guarantee that interference will not occur in a particular installation. If this equipment does cause harmful interference to radio or television reception, which can be determined by turning the equipment off and on, the user is encouraged to try to correct the interference by one or more of the following measures:... -
Page 3: Assembly Instructions
OVE RTU R E I I I D I G ITAL P IAN O ASSEMBL Y INSTRUCTIONS STEP 1 PIANO PARTS LIST Place the four Cylindrical Nuts A (M6 Nut) into the holes in the Stand Legs, with the screwdriver slot facing out. Use a screwdriver to align the threads in the nuts with the openings on the bottom of the Stand Legs. STEP 2 Place the dowels in the feet into the appropriate holes in the bottom of the Stand Legs. Make sure that the feet are facing away from the back panel bracket as shown below. Thread two Foot Bolts B (M6X55) through the foot and into the cylindrical washers, rotating the washer to align if needed. Firmly tighten & repeat for the other side. Place the four plastic caps over the holes with the cylindrical washers. W ILLIAM S P IAN OS. CO M... - Page 4 STEP 3 Attach the piano base to the left and right legs, and secure using four C (M6X16) screws. STEP 4 Screw the three brackets D (ST4X12) into the piano base by following the pre-drilled holes. The bracket should be facing the front of the piano, with the screws facing the back of the piano. O W N E R ' S MAN UAL...
- Page 5 OVE RTU R E I I I D I G ITAL P IAN O STEP 5 Screw the modestly panel into the brackets and legs using the pre- drilled holes and included screws with washers E (M4X10). The vanity board should be on the front side of the brackets, and screws should enter through the front side of the piano. STEP 6 Place the main piano section on top of the legs. Slip the two tabs on the bottom of the piano into the U-shaped brackets toward the rear of the stand. Use four F (M6x20) screws to secure the brackets. Tighten all four screws. W ILLIAM S P IAN OS. CO M...
- Page 6 STEP 6 Attach the headphone hook to the underside of the piano, just to the left of the headphone output jacks by using the four pre-drilled holes and included G (M4X12) screws. FINAL STEP Plug the pedal array cable into the "Pedal" jack, and the power cable into the "Power" jack on the back of the piano. O W N E R ' S MAN UAL...
- Page 7 OVE RTU R E I I I D I G ITAL P IAN O PIANO BENCH PARTS LIST PIANO BENCH ASSEMBLY To assemble the piano bench, push insert A into the leg. Push wooden dowel C into the top of the leg. Add the nuts and washers in B to attach the leg, and use the supplied wrench D to tighten. W ILLIAM S P IAN OS. CO M...
-
Page 8: Table Of Contents
• 18 main piano and keyboard direct access sounds and 171 sounds selectable by value dial • Metronome feature with variable tempo to facilitate practice or recording • Wireless Bluetooth MIDI and Audio for connecting to tablets, smartphones, and apps • USB/MIDI connections and stereo/mono line out jacks, stereo line input jacks • Bluetooth Audio and MIDI BEFORE YOU GET STARTED Your piano was carefully packed at the factory, and the packaging was designed to protect the unit from rough handling. • If the unit is damaged, call Williams Product Support: (888) 241-1582 • Use the original packing carton when storing or transporting • Make sure children are supervised when near the piano or its packaging INITIAL OPERATION / QUICK START • Plug the power cord into a 100V - 240V supply. • Press the power button. The LED will light. • Press the Voice Select button for the desired voice. • Adjust the volume control. O W N E R ' S MAN UAL... -
Page 9: Taking Care Of Your Digital Piano
OVE RTU R E I I I D I G ITAL P IAN O TAKING CARE OF YOUR DIGITAL PIANO This Williams Overture III digital piano will provide years of musical enjoyment if you follow the suggestions listed below. PRODUCT SERVICING This product should be serviced by qualified service personnel when: • The power supply cord or the plug has been damaged. • Liquid has been spilled into the unit or it has been exposed to rain. • The instrument does not appear to operate normally or exhibits a marked change in performance. • The instrument has been dropped or the cabinet has been damaged. • Please contact contact@williamspianos.com for parts and service information. HANDLING AND TRANSPORT • Never apply excessive force to the controls, connectors or other parts of the instrument. -
Page 10: Front Panel
FRONT PANEL (LEFT SIDE) Power On/Off scrolling through the selections with the Value Dial. Master Volume Song Tutor Controls the overall output volume of the piano. Pressing the Left Hand and Right Hand buttons simultaneously will activate the Song Tutor, which Song includes 50 Built-in songs with right and left hand Pressing the Song button allows the user to choose part mutes. a song to play from the internally recorded tracks or Left Hand an external USB flash drive. Pressing the Left Hand button while Song Tutor is Track active will mute or unmute what is being played by Pressing the Track button allows the user to select the left hand on the active track. either track 1 or track 2 to record over. Select which Right Hand track will be active with the Value Dial. Pressing the Right Hand button while Song Tutor is Play active will mute or unmute what is being played by Plays the currently selected song. the right hand on the active track. Transpose Pressing the Song and Track buttons simultaneously Transposes the key of the piano. opens up the USB menu, allowing the user to select Octave a song to play from a USB flash drive. - Page 11 OVE RTU R E I I I D I G ITAL P IAN O FRONT PANEL (RIGHT SIDE) Voice Select Buttons/Value Dial Chorus Button (Pianos, Electric Pianos, Organs, Keys, Basses and Turns on and off the Chorus effect assigned to the Drums). Pressing these buttons will switch to the voice. sound category that is associated with the names Mod FX Button printed above them. Using the Value Dial will scroll Turns on and off the Modulation effect assigned to through all voices. the voice. Variation Reverb Button Pressing the Variation button switches between Turns on and off the Reverb effect assigned to the three different sounds within the currently selected voice.
-
Page 12: Back Panel
BACK PANEL Pedal Input AC Adapter Input Connects the built-in Sustain, Soft, and Sostenuto Connection for the included AC power cord. pedals located at the bottom of the piano. Headphones (x2) Outputs-Stereo / Mono Line Out ¼” Jacks The headphone jacks allow playing in silence. When The output jacks supply a line-level signal for headphones are plugged in, the speakers are mute. external amplification. Use both jacks for stereo or This jack is located on the bottom panel of the just the Left jack for mono. piano. TOP PANEL USB Input Aux In Jack The USB connection supports Class Compliant The 1/8” TRS Jack on the top panel allows the user MIDI Drivers to use with MIDI Sequencer to plug in an mp3 or audio device to play music applications. It also supports audio over USB from through the piano speaker. a computer, tablet or smartphone. O W N E R ' S MAN UAL... -
Page 13: Operations
OVE RTU R E I I I D I G ITAL P IAN O OPERATIONS The Overture III has an LCD that allows you to see the Voice name as well as its parameters. Most of the front panel buttons are very straight forward and easy to select for general functions. In cases where you want to edit settings in more depth you will need to use the front panel buttons as well as the Function button and Value knob to change parameters. Powering On the Overture III Press the POWER button in the upper left corner of using the Voice Select and Variation buttons. Some the front panel. This product has a power standby can be layered to produce two voices at once, or mode. If the piano turns off while you are not assigned to the left or right hands in the split mode. playing it, this is likely due to the Auto Power mode. When a Voice Select button is pressed, the button’s To adjust the Auto Power Off timer or deactivate this LED will indicate that it is active, and the voice feature, press the Function Button, then turn the name and number will be shown on the display. - Page 14 Metronome Function To Set the Volume Level of the Metronome: Press the Metronome button to turn on the 1. Press the [FUNCTION] button. metronome. The LED will light. You will hear the 2. Turn the Value Dial to select the Metronome Volume click in headphones or speakers. edit menu. The display will show “Metro Vol”. Press the Metronome button again to exit 3. Press the Function button again to enter the metronome function. The LED will turn off. relative parameter edit menu, and the FUNC indicator will blink to indicate the parameter is editable. 4. Turn the Value Dial to select the Metronome Volume range (0-127). To Set the Tempo: 1. Press the [FUNCTION] button. 2. Turn the Value Dial to select Tempo edit menu. The display will show “Tempo”. 3. Press the Function button again to enter the To Change Metronome Time Signature: parameter edit menu. The FUNC indicator will 1. Press the [FUNCTION] button.
- Page 15 OVE RTU R E I I I D I G ITAL P IAN O Octave This function will transpose the piano keyboard up or down by up to two octaves. There are two kinds of Octaves. One is for full keyboard octave the other is for split mode (left hand) octave. To Transpose the Full Keyboard: LAYER MODE 1. Press and hold the [OCTAVE] button. The display will show the current full keyboard Octave setting in the lower right-hand corner of the display. 2. While the Octave screen is on you can turn the Value Dial to select the Octave. (+ 2 or -2) To Layer Two Sounds: 1. Select your main voice using the Voice Select button or Value Dial.
-
Page 16: Split Mode
To Change the Main (Right Hand) Voice: 3. Press the Function button again to enter parameter edit menu. The FUNC Indicator will The main voice can be selected by using the Voice blink to indicate the value is editable. Buttons or Value Dial, in the same way as during normal operation. 4. Turn the Value Dial to select the level of the layer volume. (0-127) To Change the Split (Left Hand) Voice: Press and hold the Split button for 2 seconds. The Split button will flash to indicate that you are now SPLIT MODE editing the split voice, which can be selected using the Voice buttons or Value Dial. Split Mode allows the keyboard to be divided into To Change the Split (Left Hand) Voice Volume: two sections so that different voices may be played with the left and right hands. The Split Point (the 1. Press the [FUNCTION] button. -
Page 17: Recording
OVE RTU R E I I I D I G ITAL P IAN O In this mode, the right pedal becomes the sustain pedal for the right section of the keyboard and the left pedal becomes the sustain pedal for the left section of the keyboard. The middle pedal is disabled. This mode is ideal for teacher/student practices. When the Duet Button is pressed, the button’s LED will light up to show that the DUET mode is engaged. Use the Voice buttons or the Value Dial to select the voice. Press the DUET button again to exit the duet To Play A Demo Song: keyboard mode. The Duet LED will turn off. Press the [DEMO] button to begin playing a demo song, and press the Demo button again to stop the RECORDING demo. Use the Value Knob to select another song. See list of demo songs below. Recording Your Own Song Changing the Voice Volume Level The Overture III allows the user to record their own While a demo song is active, the keyboard may be song on up to two tracks. When a track is recorded,... -
Page 18: Effects
Chorus EFFECTS Chorus effects add shimmering movement to a voice. The setting can be subtle to extreme. The Reverb and Chorus effects may be applied to each voice individually and will be retained even To Change Chorus Type: when the power is turned off. 1. Press the [FUNCTION] button. To apply either effect, press either button. The 2. Turn the Value Dial to select the Chorus Type edit button will light and the effect will be heard when menu. The display will show “Chorus Type”. the piano is played. To turn off the effect press the button of the desired effect again and the LED light 3. Press the Function button again to enter the will go off. parameter edit menu. The FUNC Indicator will blink to indicate the value is editable. Reverb and Chorus settings are set per Instrument and will be retained even when the power is 4. Turn the Value Dial to select a Chorus Type. turned off. (OFF and choices 1 to 8) Reverb Chorus Type List To Change the Reverb Type: Type Name 1. Press the [FUNCTION] button. -
Page 19: Mod Fx
OVE RTU R E I I I D I G ITAL P IAN O ModFX Type MOD FX Fast Mono Tremolo Modulation effects are designed to add unique Med Vibrato playable sound effects to voices. Rotary In addition to the sounds, the Overture III has a new effects section that will allow users to have more Rotary control over their sounds called Mod FX. These new effects will be inserted into the audio pathway of the The Overture III includes a rotary effect, which is sound to the mixer and will be preset into the Voice. designed for organ voices. To select the speed of When you switch on the specific voice, a preset the rotary, press the sustain pedal with your foot. effect will be associated with the sound. You can Holding down the pedal will speed up the rotary then select whether the effect should be turned off voice to a tremolo. When the pedal is released, the or modified. speed of the tremolo will slow down to a choral setting. To turn on the Mod FX function for an instrument, press the ModFx button. The effect will become Rotary Speed Mode... -
Page 20: Advanced Functions
2. Turn the Value Dial to select the ModFX depth ADVANCED edit menu, the display will show “ModFX Depth”. FUNCTIONS 3. Press the Function button again to enter the parameter edit menu. The FUNC Indicator will Auto Power Off / Power Saving Mode blink to indicate the value is editable. The Overture III has a Power saving function that will shut off the Piano after 20 - 60 minutes of non- 4. Turn the Value Dial to select the ModFX Depth. use. The default setting is Off, however if you find (0 - 127) you want this function to work use the steps below. To Change ModFX Speed: 1. Press the [FUNCTION] button. 1. Press the [FUNCTION] button. 2. Turn the Value Dial to select the Auto Power edit 2. With a Vibrato or Tremolo effect selected as the menu. The display will show “Auto Power”. active ModFX Type, turn the Value Dial to select the ModFX Speed edit menu, the display will 3. Press the Function button again to enter the show “ModFX Speed”. -
Page 21: Song Tutor
To Play a Song and Mute the Parts: 1. Press both [RIGHT] and [LEFT] buttons to activate the Song Tutor mode. The first song will show up on the display and you will hear a count off measure then the song will play. This will also MIDI activate the Tutor indicator at the bottom of the display, showing which parts are currently active. The Overture III includes Bluetooth wireless MIDI for connection to apps like the Williams App for iOS. 2. To change the song, turn the Value Dial. The It can also connect with other piano learning apps song number will be shown in the upper left- on a variety of devices. hand corner of the display, and the song title will To Connect the Piano to your Tablet, be displayed in the main section of the display. Smartphone, or Computer: 3. To mute the Left or Right hand parts, press the 1. Open the Bluetooth MIDI settings in your app corresponding Left Hand or Right Hand button. -
Page 22: Usb Song Mode
To disable Bluetooth, disconnect from the Overture If you remove the drive, the USB Indicator at the top III in your app or device’s Bluetooth settings. of the display will turn off to indicate that the drive has been removed. NOTE: Bluetooth Audio and MIDI can’t be used simultaneously due to the bandwidth of the Bluetooth signal. If you need both Audio and MIDI MIDI connection to a device, use the USB port on top of the piano. - Page 23 NOTE: Because the Overture III is receiving playback information via MIDI, the currently selected voice on the piano may not correspond to the voice being played back. Setting The MIDI Channel 1. Press the [FUNCTION] button. 2. Turn the Value Dial to select the MIDI Channel edit menu. The display will show “MIDI Ch”.
-
Page 24: Sounds
SOUNDS These Voices can be called up from the front panel buttons and the Value Dial. Variation Pianos E. Pianos Organs Keys Basses Drums Original Grand Piano Tine E Piano Smiley Organ Orch Strings Upright Bass Standard Kit Voice Variation Rock Piano Reed E Piano Perc Organ Choir Aahs Picked Bass Power Kit Voice 1 Variation Honky Tonk 80s E Piano Pipe Organ Synth Brass 1 Slap Bass 1 Electro Kit Voice 2 O W N E R ' S MAN UAL... - Page 25 OVE RTU R E I I I D I G ITAL P IAN O All of the Voices in the Overture III can be accessed with the front panel Value knob. Order on Program Change Display Name Category / Group Screen Grand Piano Piano Bright Piano Piano Rock Piano Piano Honky Tonk Piano Piano PC-2 /MSB-109 * Grand Layered Piano Electric Tine Piano Keys PC-4-MSB- 109* Rock Electric Piano Keys PC-4-MSB- 110* Wah Electric Piano...
- Page 26 Order on Program Change Display Name Category / Group Screen Cathedral Pipe Organ Organ Reed Organ Organ Accordion Keys Harmonica Keys Bandolin Keys Celesta Keys Glockenspiel Keys Music Box Keys Vibraphone Keys Marimba Keys Xylophone Keys Tubular Bells Keys Dulcimer Keys Nylon Guitar Guitar Steel String Guitar Guitar Jazz Guitar Guitar Clean Guitar...
- Page 27 OVE RTU R E I I I D I G ITAL P IAN O Order on Program Change Display Name Category / Group Screen Fingered Bas Bass PC-33/MSB 109* Muted Bass Bass Picked Bass Bass PC-33/MSB 110* Rock Bass Bass Fretless Bass Bass Slap Bass 1 Bass Slap bass 2 Bass Synth Bass Acid Bass Synth Bass Reso...
- Page 28 Order on Program Change Display Name Category / Group Screen Voices Oohs Strings Synth Voice Strings Orchestra Hit Strings Trumpet Winds Trombone Winds Tuba Winds MuteTrumpet Winds French Horn Winds Brass Section Winds Synth Brass 1 Winds Synth Brass 2 Winds Soprano Sax Winds Alto Sax Winds Tenor Sax Winds Baritone Sax Winds Oboe Winds English Horn...
- Page 29 OVE RTU R E I I I D I G ITAL P IAN O Order on Program Change Display Name Category / Group Screen Square Wave Keys Saw Wave Keys Synth Calliope Keys Chiffer Keys Charang Keys Synth Voice Keys Sawtooth 5th Keys Bass & Lead Keys New Age Keys Warm Pad...
- Page 30 Order on Program Change Display Name Category / Group Screen PC-102/MSB-113* Synth Growl Keys PC-102/MSB-111* Wobble Keys Sci Fi Keys Sitar Ethnic Banjo Ethnic Shamison Ethnic Koto Ethnic Kalimba Ethnic Bagpipes Ethnic Fiddle Ethnic Shenai Ethnic Tinker Bell Ethnic Agogo Ethnic SteelDrum Ethnic WoodBlock Sound FX Taiko...
- Page 31 OVE RTU R E I I I D I G ITAL P IAN O Order on Program Change Display Name Category / Group Screen Standard Drum Kit** Drums Room Kit** Drums Power Kit** Drums Electro Kit** Drums Analog Drums** Drums Jazz Drum Kit** Drums Brushes Jazz Kit** Drums Orchestral Percussion** Drums Sound Effects Kit** Drums Dance Drums**...
-
Page 32: Drum Sounds
DRUM SOUNDS MIDI Note Standard Room Power Electro PC 0 PC 8 PC 16 PC 24 Click- SquareWave Click- SquareWave Click- SquareWave Click- SquareWave BrushTap BrushTap BrushTap BrushTap Scratch Push Scratch Push Scratch Push Scratch Push Scratch Pull Scratch Pull Scratch Pull Scratch Pull Stick Stick Stick Stick Snare Snare Snare Snare Bass Drum Bass Drum Bass Drum... - Page 33 OVE RTU R E I I I D I G ITAL P IAN O MIDI Note Standard Room Power Electro PC 0 PC 8 PC 16 PC 24 Ride Bow Cymbal Ride Bow Cymbal Ride Bow Cymbal Electro Cymbal China Cymbal China Cymbal China Cymbal Electro China Ride Bell Cymbal Ride Bell Cymbal Ride Bell Cymbal Electro Ride Cymbal Tambourine Tambourine Tambourine...
- Page 34 MIDI Note Standard Room Power Electro PC 0 PC 8 PC 16 PC 24 Low Woodblock Low Woodblock Low Woodblock Low Woodblock Low Quica Low Quica Low Quica Low Quica Hi Quica Hi Quica Hi Quica Hi Quica Triangle Mute Triangle Mute Triangle Mute Triangle Mute Triangle-Open Triangle-Open Triangle-Open Triangle-Open Cabasa Cabasa Cabasa Cabasa Shaker Shaker Shaker Shaker Bell Tree...
- Page 35 OVE RTU R E I I I D I G ITAL P IAN O MIDI Hip Hop Jazz Brush Latin Note PC 32 PC 40 PC 48 PC 56 Scratch Pull Scratch Pull Scratch Pull Scratch Pull Stick Stick Stick Stick Snare Snare Snare Snare Bass Drum Bass Drum...
- Page 36 MIDI Hip Hop Jazz Brush Latin Note PC 32 PC 40 PC 48 PC 56 Tambourine Tambourine Techno Crash Tambourine Splash Cymbal Splash Cymbal Electro Ride Cymbal Splash Cymbal Cowbell Cowbell Tambourine Cowbell Crash Crash Splash Cymbal Crash VibraSlap VibraSlap Cowbell VibraSlap Ride Bow Ride Bow Crash Ride Bow Bongo Small Bongo Small VibraSlap Bongo Small...
- Page 37 OVE RTU R E I I I D I G ITAL P IAN O MIDI Hip Hop Jazz Brush Latin Note PC 32 PC 40 PC 48 PC 56 Triangle Mute Triangle Mute Triangle Mute Triangle Mute Triangle-Open Triangle-Open Triangle-Open Triangle-Open Cabasa Cabasa Cabasa Cabasa Shaker Shaker...
- Page 38 MIDI Orchestra Techno Classic Rock LA Funk Note PC 64 PC72 PC80 PC88 Shallow Wood Low Simmons Tom Big Snare Rimshot Fat Snare Rimshot Snare Rim Shot Funk Snare Rim Shallow Brass Snare Maple Snare Drum 808 Snare Rim Timbale Shot Rim shot Rim Shot Hip Hop Snare Shallow wood snare Brush Snare Timbale Drum Hip Hop Snare 3 Shallow wood snare Brush Snare Timbale Rim Shallow Wood Low Simmons Tom Big Snare Rimshot Fat Snare Rimshot Snare Rim Shot Timpani Techno Hi Hat closed Big Low Tom...
- Page 39 OVE RTU R E I I I D I G ITAL P IAN O MIDI Orchestra Techno Classic Rock LA Funk Note PC 64 PC72 PC80 PC88 Bongo Small Bongo Small Bongo Small Bongo Small Bongo Large Bongo Large Bongo Large Bongo Large Conga Mute Conga Mute Conga Mute Conga Mute Conga Conga Conga Conga...
- Page 40 MIDI Orchestra Techno Classic Rock LA Funk Note PC 64 PC72 PC80 PC88 Mute Surdo Mute Surdo Mute Surdo Mute Surdo Open Surdo Open Surdo Open Surdo Open Surdo MIDI Metal Heavy Metal Vintage Sound Effects Note PC96 PC104 PC112 PC120 Click- SquareWave Click- SquareWave Click- SquareWave Click- SquareWave BrushTap BrushTap BrushTap BrushTap Scratch Push Scratch Push...
- Page 41 OVE RTU R E I I I D I G ITAL P IAN O MIDI Metal Heavy Metal Vintage Sound Effects Note PC96 PC104 PC112 PC120 Metal Med Tom Heavy Metal Med Tom Vintage Med Tom High Studio Tom Metal High Tom Heavy Metal High Tom Vintage High Tom High Studio Tom Metal High Tom Heavy Metal High Tom Vintage High Tom Crash Cymbal Crash Cymbal Crash Cymbal Crash Cymbal High Studio Tom Ride Cymbal...
- Page 42 MIDI Metal Heavy Metal Vintage Sound Effects Note PC96 PC104 PC112 PC120 Guiro Short Guiro Short Guiro Short Guiro Short Guiro Long Guiro Long Guiro Long Guiro Long Clave Clave Clave Clave High Woodblock High Woodblock High Woodblock High Woodblock Low Woodblock Low Woodblock Low Woodblock Low Woodblock Low Quica Low Quica Low Quica Low Quica Hi Quica Hi Quica Hi Quica Hi Quica Triangle Mute Triangle Mute Triangle Mute...
-
Page 43: Demo Songs
OVE RTU R E I I I D I G ITAL P IAN O DEMO SONGS Piano Song Display Name Heavy Handed Piano Concerto Jazz Combo Synthwave Fantasy - Chopin Top Down New Day Orch Cabriolet Laguna Latin Jazz Funky Wurli Ital Concerto Blue Roads Fortress - Bach W ILLIAM S P IAN OS. CO M... -
Page 44: Tutor Songs
TUTOR SONGS Difficulty Order Display Name File Name Rachmnv Rachmoninov - Prelude in C# Minor Chopin 1 Chopin - Fantasy Impromptu Bach 1 Bach - C Major Prelude Debussy1 Debussy - Clair de Lune Bach 2 Bach - Italian Concerto (Harpsic) Hard Liszt Liszt - Liebestraume Bach 3 Bach - C# Major Prelude Beethvn1 Beethoven - Moonlight Debussy2 Debussy - Dr. Gradus Bach 4 Bach - Mighty Fortress (Organ) Bach 8 Bach - Jesu 1 BWV776 Beethvn2 Beethoven - Rondo a capriccio OP129 G-major Medium Bach 5 Bach - Bourree Bach 6 Bach-Invention - 08 F major Bach 7 Bach - Musette 1 Chopin 2 Chopin - Prelude E Minor 1 Chopin 3... - Page 45 OVE RTU R E I I I D I G ITAL P IAN O Difficulty Order Display Name File Name Rock 2 Rock5 Rock 3 Rock1 Rock Blues Rock 4 Rock4 Rock 5 Rock2 Rock 6 Rock6 Blues 4 Blues 4 Etude 1 Etude 1 Etude 2 Etude 2 Etude 3 Etude 3 Etude 4 Etude 4 Etude 5 Etude 5...
-
Page 46: Specifications
SPECIFICATIONS Keyboard 88 weighted, velocity-sensitive keys Voices 18 main voices and 171 voices (including GM) Polyphony 240 Pedals Sustain, Sostenuto and Soft pedals Demo Songs 14 demo and 50 Song Tutor songs MIDI Transmit Settings Bluetooth MIDI, Bluetooth Audio USB Output, USB Input, 1/8” Aux Input, 1/4" (L/R) Outputs, 1/8” Connectors Headphone Outputs, DIN Connection Cable, 12V DC Power Input Speakers 2 x 25W at 1% THD Dimensions 42" (Height) x 55" (Width) x 21" (Depth) Weight 159 lbs. Supplied Owner's Manual, Music Stand, and Piano Bench O W N E R ' S MAN UAL... -
Page 47: Midi Implemenation Chart
OVE RTU R E I I I D I G ITAL P IAN O MIDI IMPLEMENTATION CHART Function Transmitted Recognized Remarks Basic Default 1–16 CH 1–16 CH Channel Changed 1–16 CH Mode Default Mode 3 Mode 3 Messages Altered ********** Note 0~127 0~127 Number True Voice 0~127 ********** Velocity... -
Page 48: Warranty
Williams provides the following limited warranty, to the original purchaser: this piano is warranted to be free from electronic and/or structural defects in materials and workmanship for a period of one (1) year from the date of original purchase. If this Williams piano is defective, at its option during the warranty period, subject to the terms of this limited warranty and upon proof of purchase, Williams will either repair or replace the listed piano with a same or similar model of equal age or newer.
Need help?
Do you have a question about the OVERTURE III and is the answer not in the manual?
Questions and answers