Table of Contents
Advertisement
Quick Links
DL-RMKTC1H1V-W Installation Guide
DL-RMKTC1H1V-W
RX / Receiver
NETWORK
TCP/IP
The Digitalinx DL-RMKTC1H1V-W is a multi-function AV distribution system designed to provide
HDMI / VGA video switching, system control, video extension and analog audio amplification
in a convenient kit. Utilizing the Valens Colligo VS2110 series chips, power, control, video up
to 1080p, and audio are transported over a single 30m (98 ft) solid core Category 5e cable
between the wall plate transmitter and the receiver. The wall plate control module connects
to the wall plate transmitter with a second Category 6 cable. All the power needed for the
system is provided by the receiver. Additionally, the receiver features a built-in web GUI for
control and analog audio de-embedding to a built-in 2x20 watt stereo amplifier.
INPUT
OUTPUT
HDBT IN/PoC
TO DISPLAY
TOUCHSCREEN
FIRMWARE
CONTROL
TX
RX
FROM
REMOTE
IR OUT
RS232
MUTE
ON
LINK
HDCP
AUDIO
MIC
MIC
L
R
MIC
LINE OUT
LINE
MIC
SOURCE
VOLUME
ON
HDMI
IR
CONFIG
24V DC
2x20 Watts @ 4Ω
OFF
VGA
Advertisement
Table of Contents

Subscribe to Our Youtube Channel
Related Manuals for DigitaLinx DL-RMKTC1H1V-W


Summary of Contents for DigitaLinx DL-RMKTC1H1V-W
- Page 1 HDMI CONFIG The Digitalinx DL-RMKTC1H1V-W is a multi-function AV distribution system designed to provide HDMI / VGA video switching, system control, video extension and analog audio amplification in a convenient kit. Utilizing the Valens Colligo VS2110 series chips, power, control, video up to 1080p, and audio are transported over a single 30m (98 ft) solid core Category 5e cable between the wall plate transmitter and the receiver.
-
Page 2: Included Accessories
Included Accessories • DL-RMKTC1H1V-W Control Keypad, Transmitter and Receiver Set • Locking Power Supply with US Power Cable • USB Type A to Type B Cable • IR Emitter • Two Mounting Rails with Screws • Six Wall Box Screws •... -
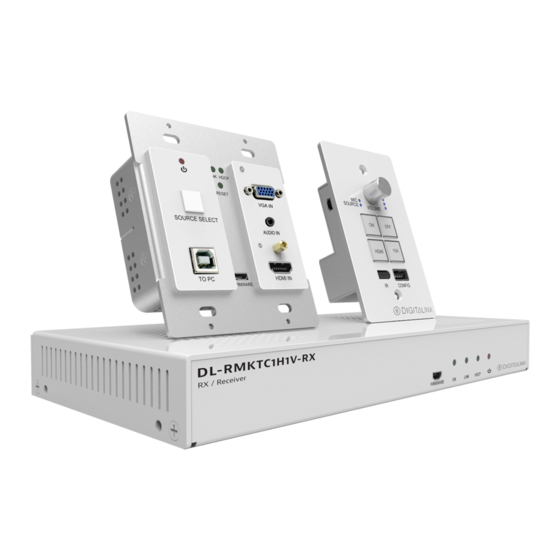
Page 3: Receiver Front Panel
Receiver Front Panel DL-RMKTC1H1V-W RX / Receiver LINK HDCP FIRMWARE 1. Firmware Update Port 2. System Power Indicator 3. HDBaseT Link Indicator 4. HDCP Status Indicator 5. Receiver Power Indicator Receiver Rear Panel NETWOR INPUT OUTPUT CONTROL AUDIO FROM REMOTE... -
Page 4: Transmitter Front
4. USB Port to Host PC AUDIO IN 5. Firmware Update Port 6. HDMI Input with Activity Indicator TO PC HDMI IN FIRMWARE Transmitter Rear DL-RMKTC1H1V-W TX / Transmitter A. HDBaseT Output and PoC Input B. Power and RS232 to Control Panel... -
Page 5: Control Panel Front
5. Multifunction Volume Control with Volume Level Indicator HDMI 6. System/Display Off Button 7. VGA Input Select Button CONFIG 8. Configuration Port Control Panel Rear A. Power and RS232 from Transmitter B. Firmware Update Port POWER RS232 DL-RMKTC1H1V-W PAD / Control Pad... -
Page 6: Cabling Requirements
Cabling Requirements To ensure proper performance of the DL-RMKTC1H1V-W, it is recommended that you use solid core Category 6 F/UTP cabling at a minimum between control keypad and transmitter and between transmitter and receiver. Category 5e F/UTP may perform well but may not support power over HDBaseT reliably. - Page 7 Speaker Wiring Configurations 4 Load with 4 Speakers – – 4 Load with 8 Speakers – – – –...
-
Page 8: Installation Instructions
Installation Instructions 1. Verify all components included with the DL-RMKTC1H1V-W are present before installation. 2. Turn off power and disconnect the audio/video equipment by following the manufacturer’s instructions. 3. Attach the included rubber feet or mounting ears to the receiver. -
Page 9: Web Browser Configuration
Web Browser Configuration The default IP address of the DL-RMKTC1H1V-W is 192.168.0.178. This can be changed in the Network settings. Logging In To change the settings of the web browser interface or program RS232 commands for the display, log into the DL-RMKTC1H1V-W as an administrator. The User Name is admin and the... - Page 10 Device Control Screen HDMI / VGA Switch between VGA and HDMI inputs. Display Turn the display on or off. System Turn the system on or off. Volume Mute and unmute audio sources. Volume may be changed by pressing the “+” or “-“ buttons or by dragging the volume slider.
- Page 11 Setting Tab Password Change the password for the admin and user login screen. Display Control Select Select whether the display will be controlled via IR or RS232. Display/Power Sync Select whether the display and system will be powered on and off simultaneously. This option is only active if the display is controlled via RS232.
- Page 12 Command Tab (RS232 Display Control) This tab defines the RS232 display control commands. If a display requires hex commands, make sure the Hex box is checked. Display On / Display Off (Delay(s)) Enter the RS232 command to turn ON or OFF the display and the subsequent delay time in seconds for which the command is to be generated.
-
Page 13: Configuration Tab
Configuration Tab This tab defines the scaled output resolution for the DL-RMKTC1H1V-W Choose a resolution setting compatible with the connected display. Output will scale automatically once selection has been made... -
Page 14: Network Tab
Network Tab DHCP/Static IP Select whether the system will use a static IP or will be provided an IP via DHCP. IP Address Enter the IP address for the system. Subnet Mask Enter the subnet mask for the system. Gateway Enter the gateway address for the system. -
Page 15: Transmitter Operation
IR Display Control By default the DL-RMKTC1H1V-W is set to control the connected display by IR. The adjustment in the web GUI for this setting is under the SETTING tab. When using IR control of a connected display the DISPLAY POWER SYNC option in the GUI is not available and system and display power status must be controlled separately. - Page 16 IR Display Control - IR Learning Mode Configuration Follow the instructions below to enter IR learning mode to program IR ON / OFF commands so the DL-RMKTC1H1V-W keypad can control display power. Enter IR Learning Mode Press and hold the HDMI button on the Control Panel for three seconds. The ON and OFF buttons will light up.
- Page 17 Control) in this manual for reference. After the RS232 settings are all in place, you can now turn the DL-RMKTC1H1V-W systems power and display power ON or OFF by quick pressing the ON / OFF status buttons on the DL-...
- Page 18 Control Keypad Operation (continued) Programming System and Display Power Control Separately To program RS232 display control so the display and DL-RMKTC1H1V-W power status can be controlled separately with the DL-RMKTC1H1V-W control keypad ON / OFF operation, navigate to the SETTING page in the web GUI and change the DISPLAY CONTROL SELECT option to RS232 and then change the DISPLAY POWER SYNC option to OFF.
- Page 19 Control Keypad Operation (continued) Select Input Sources Press the VGA or HDMI buttons on the Control Panel to select the appropriate source device. Volume Control Functions Turning the Volume knob clockwise will raise the volume; counterclockwise will lower the volume. Pressing the Volume knob will mute or unmute the current audio source.
- Page 20 The web browser control interface is an alternative method to control the system without having to interact with the Control Panel. The default IP address of the DL-RMKTC1H1V-W is 192.168.0.178. This can be changed in the Network settings by an administrator.
- Page 21 Device Control Screen HDMI / VGA Switch between HDMI and VGA inputs Display Turn the display on or off. System Turn the system on or off. Volume Mute and unmute audio sources. Volume may be changed by pressing the “+” or “-“ buttons or by dragging the volume slider.
-
Page 22: Fcc Statement
Copy and Load Control Settings The system IR or RS232 configuration can be copied to a USB thumb drive and loaded into additional systems or be saved as a backup. Copy Control Settings Insert a 4GB or smaller FAT32 formatted thumb drive into the Configuration port on the front of the Control Panel. -
Page 23: Technical Specifications
Technical Specifications Supported Audio, Video and Control Maximum Video Compatibility Deep Color 48/36/30/24 Bit at 1080p Video Compliance HDMI 1.4, HDCP 1.4 HDMI EDID Pass-through from Display Embedded Audio Up to PCM 2 channel Analog Audio Frequency Re- 20Hz-20KHz sponse Analog Audio Output Impedance 50 Ω... - Page 24 Thank you for your purchase. For Technical Support please call our toll free number at 800-530-8998 or email us at supportlibav@libav.com Digitalinx is a brand of Liberty AV Solutions. 11675 Ridgeline Dr. Colorado Springs, CO 80921 Toll-Free: 800-530-8998 Fax: 719-260-0075 www.libav.com...
Need help?
Do you have a question about the DL-RMKTC1H1V-W and is the answer not in the manual?
Questions and answers