
Related Manuals for Engler DRILL-AIRE PLUS

Summary of Contents for Engler DRILL-AIRE PLUS
- Page 1 DRILL – AIRE PLUS INTRUCTION MANUAL Engler High Speed Dental Air Unit Rev. C 03/18/2021...
-
Page 2: Company Profile
We also acquired the Alpha-Sonic, Ora-Sonic, and Pro-Sonic line of piezo scalers. Engler manufactures all of the inserts and tips used in the Engler products as well as many others on the market today in the 18K and 25K frequency range. -
Page 3: Engler Engineering Corporation's Brand Name Veterinary Products
ENGLER ENGINEERING CORPORATION’S BRAND NAME VETERINARY PRODUCTS ADS 2000, microprocessor controlled anesthesia delivery system / ventilator, • Excelsior, high speed dental air unit with vacuum / electrosurgery / ultrasonic scaler / high • speed drill / low speed polisher / air - water syringe, and on demand compressor, Scale - Aire, high speed dental air unit with ultrasonic scaler / high speed drill / low speed •... -
Page 4: Introduction
PLEASE READ VERY CAREFULLY Engler Engineering Corporation (EEC) makes every effort to verify that all parts for the device along with any optional accessories ordered with it are included in this shipment. It is imperative that the shipment be inspected immediately upon arrival. Should any parts be missing or damaged, Engler Engineering must be notified immediately. -
Page 5: Table Of Contents
TABLE OF CONTENTS COMPANY PROFILE......................2 ENGLER ENGINEERING CORPORATION’S BRAND NAME VETERINARY PRODUCTS........................3 INTRODUCTION......................4 TABLE OF CONTENTS....................5 INSTALLATION.......................6 DRILL - AIRE PLUS MINI DIAGRAM................7 BEFORE FIRST USE......................8 HIGH SPEED HANDPIECE......................8 LOW SPEED HANDPIECE......................9 GETTING TO KNOW YOUR CONTROLS..............11 WATER ON / OFF...........................11 AIR HANDPIECE TOGGLE SWITCH....................11... -
Page 6: Installation
INSTALLATION 1. Unpack unit and confirm all items checked off on your packing list.. STAND BRACKET WING NUTS WALL MOUNT 2. Attach unit to optional stand or wall mount (included): A. Assemble stand. B. Connect stand bracket to “key holes” on the back of the unit. C. -
Page 7: Drill - Aire Plus Mini Diagram
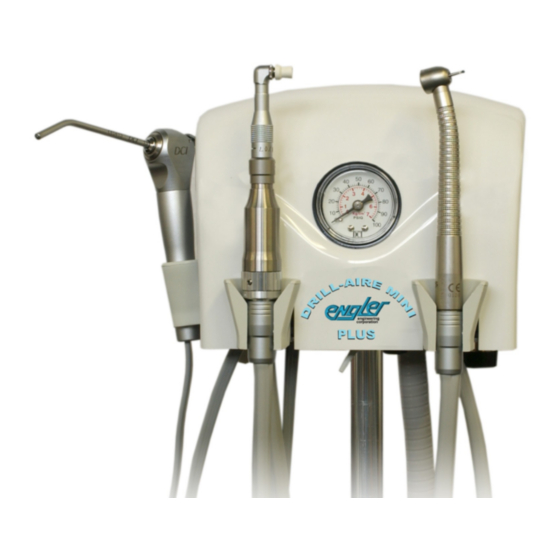
DRILL - AIRE PLUS MINI DIAGRAM Locate the handpieces on the front of your Drill - Aire Plus Mini. From right to left they are: High Speed Handpiece Low Speed Handpiece Air / Water Syringe AIR / WATER HIGH SPEED SYRINGE DRILL LOW SPEED... -
Page 8: Before First Use
BEFORE FIRST USE The Drill – Aire Plus was purged before shipping, the first time the high speed handpieces are activated, the water lines will be empty. Turn the water regulator several rotations counterclockwise, lift the handpiece from it's cradle, holding the handpiece over a sink, turn the power ON by turning the power knob to click on, then press the footswitch. -
Page 9: Low Speed Handpiece
LOW SPEED HANDPIECE The Drill - Aire Plus is equipped with the Doriot One-piece Handpiece. Maximum air input, 60 PSI Maximum RPM: 20,000 Normal operating RPM, 500 – 1500 RPM – (as slow as possible without splattering paste) Attachments: Accepts both handpiece burs and Doriot / U-type attachments (prophy angle) It is used with a prophy angle to polish the teeth after a scaling procedure. - Page 10 WATER ON / OFF WATER FLOW AIR FLOW CONTROL KNOB ADJUSTMENTS (Behind Selector Switch) LOW SPEED / HIGH SPEED HANDPIECE SELECTOR FOOTSWITCH...
-
Page 11: Getting To Know Your Controls
GETTING TO KNOW YOUR CONTROLS WATER ON / OFF The control is equipped with a wet / dry toggle to activate the water flow. Move the toggle forward to turn water on. AIR HANDPIECE TOGGLE SWITCH This switch allows you to select between low speed and high speed handpieces. HANDPIECE AIR FLOW CONTROL CONTROLS On the underside of the unit the flow control screws can be found. -
Page 12: Instructions For Operation And Maintenance
For the best care and maintenance order the Drill - Aire Plus Mini deluxe maintenance kit which includes Lares Handpiece Conditioner from Engler Engineering Corporation (optional, not included with unit). MAINTENANCE KITS There are maintenance kits available for the Drill - Aire Plus Mini (optional, not included with unit). -
Page 13: Start Up And Shut Down Sequence
START UP AND SHUT DOWN SEQUENCE Start up: 1. Connect unit to a clean, filtered water source. 2. Connect air / compressor / nitrogen source. 3. Set the regulator to 80 PSI. Note: When using a Nitrogen tank / cylinder, handpiece performance will diminish when the tank pressure drops below 500 PSI. -
Page 14: High Speed Handpiece
HIGH SPEED HANDPIECE INSERTING A BUR INTO THE HANDPIECE: CHANGING BURS Lares high speed handpieces should be used with friction grip burs with shank diameters that conform to ISO and ADA size standards. Model Recommended Optional 757 Ultralite / Euro Standard (19.0 mm) Surgical Length (26 mm) 757 Ultralite / Euro 1. -
Page 15: Cleaning The High Speed Handpiece
Cleaning the high speed handpiece 1. Remove the bur. 2. Unscrew the high-speed handpiece from the air-hose coupler. 3. Use the water port cleaning tool (item # 10541) to clean the small water spray holes. 4. Use the spray lube (with red tube) to spray lubricant into the chuck and into the air drive hole (the smaller of the two large holes). -
Page 16: High And Low Speed Handpiece Sterilization Procedures
2. Use our Smart Cleaner to clear clogged tube. If these simple solutions fail, more serious problems are likely affecting the handpiece, which should be sent to the manufacturer if under warranty or Engler Engineering Corporation if warranty has expired. -
Page 17: Important Safety Precautions
Lares approved conditioner or failure to follow the maintenance schedule described above will automatically void the limited warranty for this product. Lares Handpiece Conditioner is available from Engler engineering corporation, part #10083. All Lares high speed handpieces may be steam autoclaved or chemiclaved. - Page 18 Infection control continued CAUTION: DO NOT Autoclave or Chemiclave For Extended / Unusual Periods Of Time (Such As Overnight). DO NOT Leave Handpiece Components In Sterilizer After Cycle Is Completed. 7. Immediately remove handpiece from autoclave or chemiclave. Allow to cool sufficiently prior to handling.
-
Page 19: Sgii - Doriot One - Piece Handpiece
SGII – Doriot One - Piece Handpiece SGII Your unit may be equipped with the – Doriot One-Piece Handpiece instead of the E-TYPE LOW SPEED HANDPIECE, in this case use the following instructions. The speed of the polishing head is proportional to the amount of pressure applied to the foot-switch pedal. - Page 20 Clean / Lubricate Lubricate after every sterilization. Using the combination cleaner / lubricant available from Engler Engineering Corporation. Spray the cleaner / lube into the drive air tube. Run motor to expell excess lubricant. This ensures all internal parts of motor are completed lubricated. Wipe off handpiece.
- Page 21 Weekly: Additional lubrication should be applied to inside nose of motor. Sterilization: Place motor into autoclave bag or pouch. Cycle per autoclave / chemiclave manufacturers’ instructions. DO NOT EXCEED 275 F (29 psi)/ 135 C (2 bar). CAUTION DON’T use over-sized, bent, or scored burs. DON’T immerse instrument in water or use ultrasonic cleaner.
-
Page 22: Three-Way Air / Water Syringe
THREE-WAY AIR / WATER SYRINGE This handpiece allows the operator to rinse the operative site with a stream of water or mist or dry / blow debris with a stream of air. The button on the left controls water flow. The button on the right controls airflow. - Page 23 When operating the prophy head always consider the safety of the patient. Should the prophy head function abnormally, cease operation immediately. See below for maintenance instructions. If you need further assistance contact Engler Engineering Corporation for instructions. Before use, always confirm that the brush or rubber cup is correctly seated in place.
-
Page 24: Prophy Angle Cleaning And Maintenance Instructions
PROPHY ANGLE CLEANING AND MAINTENANCE INSTRUCTIONS USING PROPHY WRENCH The Prophy Angle is a precision engineered dental device. all gear and shaft assemblies are made of high grade stainless steel which must be kept free of debris. If cleaned and lubricated correctly will provide long, trouble-free service. -
Page 25: Maintenance Free Prophy Angle
Take care when servicing your Prophy Angle by gently trying clockwise, then counter-clockwise. Too much force may strip the threads on the Prophy Angle or Head Cap which will void the warranty. The recommended oil for maintaining the Prophy Angle is available from Engler Engineering . Part #P-01... - Page 26 Do not heat over 275 ºF (135 ºC). Use only Engler Care Free Prophy Rubber Cups. Other brands will not properly seal the angle, causing premature wear and voiding the warranty. Use 1 year, sterilize, then dispose of properly.
-
Page 27: Water Tank Instructions
WATER TANK INSTRUCTIONS PT-1 Water Tank PUMP-UP WATER BOTTLE DIRECTIONS: Remove pump / cap assembly by turning it counter-clockwise. Fill tank with distilled water or medicated solution up to the “FILL LINE”. Do NOT fill beyond this line. Replace pump / cap assembly and tighten securely. Pressurize tank by pumping it approximately 30 - 40 times (depending on the amount of liquid used). -
Page 28: Water Tank Care & Maintenance
This process should be repeated as often as necessary or when pumping becomes difficult. Black particles found in water bottle indicates that the pump assembly is deteriorating. Order • new pump assembly from Engler Engineering. Pump assembly has been pre-lubricated. WARNING: READ AND FOLLOW ALL INSTRUCTIONS Inspect the pump periodically. - Page 29 TO PREVENT SLIME FROM FORMING INSIDE THE TANK Allowing slime mold to form inside the tank is a generally hazardous and unhealthy condition. Slime in the water tank will make it's way into the dental unit possibly causing permanent damage by clogging the small tubing inside.
-
Page 30: Technical Specifications
9” X 4” X 6” Net weight: 8 lbs. Shipping weight: 14 lbs. Shipping box dimensions: 14” X 14” X 14" Engler Engineering Corporation 1099 East 47th Street, Hialeah, Florida 33013 800-445-8581 – 305-688-8581 – FAX 305-685-7671 Web site: www.englerusa.com Help site: www.engler411.com...
Need help?
Do you have a question about the DRILL-AIRE PLUS and is the answer not in the manual?
Questions and answers