
Related Manuals for Sprint Ride-Fi

Summary of Contents for Sprint Ride-Fi
- Page 1 [Ride-Fi] User Guide [UG template version 15b_mbb [draft version for review control] [Sprint_TCL_Y856UB_UG_EN_092515_D1]...
-
Page 2: Table Of Contents
Table of Contents Before You Begin ..........................1 Compatible Operating Systems (OS)....................1 Package Contents ..........................2 SSID and Security Key ......................... 2 Additional Information ........................... 3 Parts and Functions ..........................4 LED Indicators ............................5 LED Indicator Layout ........................5 LED Indicator Description ...................... - Page 3 Settings Tab ............................48 Wi-Fi Basic Settings ........................48 Wi-Fi Advanced Settings ......................51 Mobile Network Settings ......................52 Device Settings ........................... 55 Advanced Router Settings ......................58 Notification ............................63 About ..............................64 Support Tab ............................65 Troubleshooting ..........................66 Specifications ............................
-
Page 4: Before You Begin
The following topics describe the basics of using this guide and your new mobile broadband device. Before You Begin Thank you for purchasing your new Ride-Fi. The following topics explain how best to use this guide to get the most out of your mobile broadband device. -
Page 5: Package Contents
See below for details on everything you will find in the box for your Ride-Fi ● Ride-Fi ● Get Started guide ● Important Information booklet SSID and Security Key Before connecting Wi-Fi devices to your Ride-Fi, you will need to confirm the SSID (network name) and security key. -
Page 6: Additional Information
[SSID and Key] [Main Wi-Fi] Additional Information The following list describes additional information useful to know before you begin using your Ride-Fi. ● Your mobile broadband device accommodates software updates. Always use the latest software. ● Note that connection speeds may drop or connections may be disabled depending on line traffic or connection environments. -
Page 7: Parts And Functions
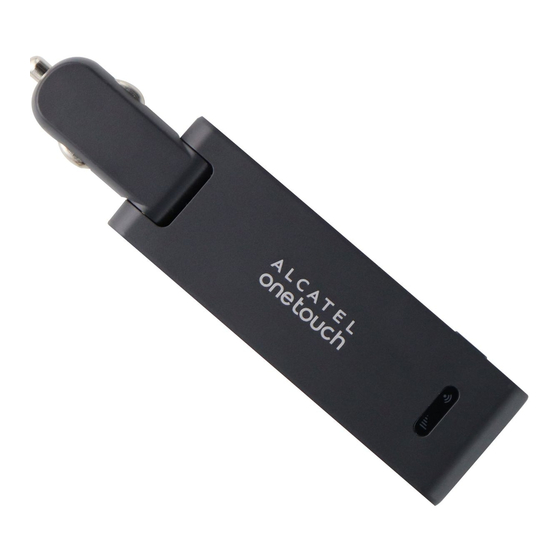
Get Started The following topics give you all the information you need to set up your device and wireless service the first time. Parts and Functions Learn your device's primary parts and functions. Device Layout The following illustration outlines your device's primary external features and buttons. Power button LED Indicators USB port... -
Page 8: Led Indicators
Part Description Power input of the device, to be plugged into the car’s 12V or 24V Car Charger power socket to get power for the device. USB 2.0 for charging other devices. USB port Remove the cover to remove or insert the SIM card. Backcover Push to power on or off, reboot or wake up from sleep mode. -
Page 9: Sleep Mode
Flashing Blue (1s) 1,Registered and dialing into 4G(LTE) network Solid Blue 1, Dialed to 4G network 2, During power on/off (3s) Flashing Lilac (1s) Registered and dialing into 1X or 3G (EVDO) network Solid Lilac Dialed to 3G/2G network Solid Red 1,No signal (such as No Service, Limited Service, No Sim, Invalid Sim, Pin Lock etc) Flashing Red(1s) -
Page 10: Sim Card
If no transmissions or operation of your device in 30mins, WLAN will be disabled. Pressthe Power key to turn on LED indicatorand exit sleep mode. WLAN function is enabled and Wi-Fi devices can reconnect to the Ride-Fi The time required to recover the network connection varies by environment, settings, etc. ... -
Page 11: Insert A Sim Card
● Always power off the mobile broadband device before inserting or removing the SIM card. Insert a SIM Card Follow these instructions to insert a SIM card. Remember to power off your device before inserting a SIM card. : Your device's SIM card is preinstalled. These instructions are for reference only. Note 1. -
Page 12: Removethe Sim Card
Removethe SIM Card Follow these instructions to remove the device's SIM card. 1. Plug out the device from the car's power socketto power off the device before removing the SIM card. 2. Remove the back cover. -
Page 13: Check The Ssid And Security Key
3. Open the SIM card cover and remove the SIM card. 4. Attach the back cover. Check the SSID and Security Key Your device's default SSID (network name) and security key are printed on a label beneath the device's battery. Turn the device off and remove the battery to access this information. -
Page 14: Turn Your Device On And Off
1. Remove the back cover. 2. Check the SSID (network name) and security key printed on the label beneath the battery. 3. Replace the back cover. Turn Your Device On and Off The instructions below explain how to turn your device on and off, or to restart your device if it cannot be powered on and off using the Power key Turn Your Device On ■... - Page 15 ■ Press and hold the Power keyfor 3 seconds. Your device's Wi-Fi function activates and automatically connects to the Internet. Turn YourDevice Off ■ Press and hold the Power key for 3 seconds, or plug out the device from the 12v or 24v power socket...
- Page 16 Your device will power off. Restart Your Device If your device will not turn on or off using the Power key, use the action below to restart it. 1. Press and holdpower key for 10 seconds.
- Page 17 Your device will restart. 2. Release the keys after Wi-Fi has restarted. 3. You can also restart your device by plug out and plug in the device from the 12v or 24v power socket. Note: Restarting your device does not reset the device settings.
-
Page 18: Wi-Fi (Wlan) Overview
Connect with Wi-Fi (WLAN) The following topics outline basic features and operations of your device's Wi-Fi (WLAN) connections, including connecting with various OS and device types. Wi-Fi (WLAN) Overview Below are some basics of your device's Wi-Fi (WLAN) function. Wi-Fi (WLAN) Information ●... -
Page 19: Connect Windows Pcs With Wi-Fi
■ Press and hold the Power key for 3 seconds Your device's Wi-Fi function activates and automatically connects to the Internet. Connect Windows PCs with Wi-Fi The following topics describe how to connect your device with various versions of Windows PCs via Wi-Fi. [add OS instructions, such as for Windows 10, as necessary] Windows10 Connect Windows 10 PCs to your device with Wi-Fi. - Page 20 5. Press and hold the Power key for 3 seconds Your device's Wi-Fi function activates and automatically connects to the Internet. 6. Activate your PC's Wi-Fi function. Consult your PC's operation manual for details on activating Wi-Fi. 7. On your PC, click Start>Settings>Network &Internet...
- Page 21 8. Select your device's SSID from the list, and click Connect.
-
Page 22: Windows 8
9. Enter the security key (WPA) and then click Next The PC connects to your device. The connected status icon on your device will show an additional device has been connected. Windows 8 Connect Windows 8 PCs to your device with Wi-Fi. 1. - Page 23 2. Press and hold the Power key for 3 seconds Your device's Wi-Fi function activates and automatically connects to the Internet. 3. Activate your PC's Wi-Fi function. Consult your PC's operation manual for details on activating Wi-Fi. 4. On your PC, move the cursor to the upper-right or lower-right corner (or swipe from the right side on a touchscreen PC) and select >Network...
- Page 24 5. Select your device's SSID from the list, and click Connect 6. Enter the security key (WPA) and then click Next The PC connects to your device. The connected status icon on your device will show an additional device has been connected.
-
Page 25: Windows 7
Windows 7 Connect Windows 7 PCs to your device with Wi-Fi. 1. Insert the device into the 12v or 24v power socket of the car. 2. Press and hold the Power key for 3 seconds. Your device's Wi-Fi function activates and automatically connects to the Internet. 3. - Page 26 4. On your PC, click Start>Control Panel>Network and Internet>Network and Sharing Center 5. Click Connect to a network.
-
Page 27: Connect Mac Computers With Wi-Fi
6. Select your device's SSID from the list, and click Connect 7. Enter the security key (WPA) and then click The PC connects to your device. The connected status icon on your device will show an additional device has been connected. Connect Mac Computers with Wi-Fi Follow the instructions below to connect a Mac computer to your device via Wi-Fi. - Page 28 2. Press and hold the Power key for 3 seconds. Your device's Wi-Fi function activates and automatically connects to the Internet. 3. On your Mac, in the Apple menu, click System Preferences…>Network.
- Page 29 4. Click Wi-Fi>Turn Wi-Fi On Your computer's Wi-Fi function activates. 5. Select your device's SSID from the Network Name pulldown list.
-
Page 30: Connect Idevice/Ipod Touch/Ipad
6. Enter the security key (WPA) in the Password field, check Remember this network, and then click Join The computer connects to your device. The connected status icon on your device will show an additional device has been connected. Connect iDevice/iPod Touch/iPad The following topics outline how to connect your iDevice, iPod Touch, or iPad to your device via Wi-Fi. - Page 31 2. Press and hold the Power key for 3 seconds. Your device's Wi-Fi function activates and automatically connects to the Internet. 3. Select Settings>Wi-Fi.
- Page 32 4. Select Turn on Wi-Fi Y856UBa The iDevice or iPod Touch's Wi-Fi function activates.
- Page 33 5. In the Choose a Network list, tap the device's SSID.
-
Page 34: Connect An Ipad
6. Enter the security key (WPA) and then tap Join The iDevice or iPod Touch connects to your device. The connected status icon on your device will show an additional device has been connected. Connect an iPad Follow the instruction to connect your iPad to your device using Wi-Fi. Note: The operations below are based on your iPad Wi-Fi security set to [xxx] 1. - Page 35 2. Press and hold the Power key for 3 seconds Your device's Wi-Fi function activates and automatically connects to the Internet.
- Page 36 3. Select Settings>Wi-Fi.
- Page 37 4. Select Turn on Wi-Fi The iDevice or iPod Touch's Wi-Fi function activates.
- Page 38 5. In the Choose a Network list, tap the device's SSID.
-
Page 39: Connect An Android™ Device
6. Enter the security key (WPA) and then tap Join The iPad connects to your device. The connected status icon on your device will show an additional device has been connected. Connect an Android™ Device You can share your device's connection with compatible Android devices, such as wireless devices, tablets, and Chromebook computers. - Page 40 2. Press and hold the Power key for 3 seconds. Your device's Wi-Fi function activates and automatically connects to the Internet.
- Page 41 3. On your Android device, from home, select Menu>Settings 4. Tap or click Wi-Fi The Wi-Fi settings menu appears.
- Page 42 5. Tap or click the Wi-Fi slider to turn Wi-Fi on. Wi-Fi is enabled on the Android device.
- Page 43 6. Tap or click your device's SSID from the list.
- Page 44 7. Enter the security key (WPA) and then tap or click Connect The Android device connects to your mobile broadband device. The connected status icon on your device will show an additional device has been connected.
-
Page 45: Usb Port Layout
Charging Your Personal Device The following topics describe how to charge your other personal devicesvia USB port of [Ride-Fi]. USB Port Layout Explore your device's USBportlayout. Output of theUSB port is 5V1A, you can charge your personal device such as device, tablet, camera, etc,... -
Page 47: Web Ui Overview
Settings The following topics provide an overview of items you can change using your device'sSettings menus, accessed primarily through the Web UI. Web UI Overview Use the device Web UI in a browser to check or change your mobile broadband device settings from a device connected via Wi-Fi. -
Page 48: Web Ui Window
4, Click Login to access the WebUI Web UI Window Explore the options available through the device's Web UI window. 1. Connect your mobile broadband device to an external device via a Wi-Fi connection. 2. Launch a browser and access the Web UI by entering http://192.168.128.1or http://myhotspot the address bar. -
Page 49: Home
Item Description Language and logout Select language and Login/out webui Tab menu Show the main configuration menu of the device Sub menu Show the corresponding sub menu of main menu. Setting area Show the detailed settings for corresponding sub menu. Home Check current status of network connection and data usage on the Home page. - Page 50 Check the Connected Devices ■ From the Web UI, click Connected Devices>Connected to display the list of connected devices. Set Access Permissions Control user's ability to access main or guest Wi-Fi. Changing this status will immediately update the status of devices listed ability to access Wi-Fi from this device, even if they have the password. 1.
-
Page 51: Settings Tab
2. Select an access status and then click Save Changes Add Permitted Devices The Access Permissions menu allows you to restrict access only to specific users, instead of anyone who enters the password. To restrict access in this manner, you need to add permitted users from the menu. 1. - Page 52 From the Web UI, click Settings>Wi-Fi>Basic to display the basic wireless network paramete...
- Page 53 : Enable or disable this function. If On is selected, your device will Multi SSID Switch broadcast two SSIDs including main SSID and guest SSID. : Enable or disable this function. If On is selected, it will prevents Wi-Fi Broadcast Isolation your device from communicating across the different Wi-Fi's.
-
Page 54: Wi-Fi Advanced Settings
Wi-Fi Advanced Settings Configure your device's advanced Wi-Fi settings. Caution for Using Wi-Fi Advanced Settings These advanced settings should only be changed for specific circumstances. 1. From the Web UI, click Settings>Wi-Fi>Advanced to view the wireless network advanced parameters and the WPS settings shown in the following figure. : Select an 802.11 mode from the drop-down list. -
Page 55: Mobile Network Settings
● : Set the maximum data plan for each month. Max Data Amount ● : Set a warning guard of the data consumption. Usage Warning ● : Not settable, you data plan will be reset in this day of each month. Auto Reset Data Mobile Network Settings Manage your mobile network settings. - Page 56 : Enable or disable this function. Turn it on to enable domestic Domestic roaming guard roaming guard and require confirmation before connecting to the roaming network. 2. Click to save your settings. Save Changes ■ From the Web UI, click Settings>Mobile Network>APN .
- Page 57 Advanced Mobile Network Settings Caution for Using Advanced Mobile Network Settings Advanced Mobile Network Settings should only be used as directed by Sprint Customer Service personnel. Certain advanced options will reset your device's connections and programming and will require reactivation.
-
Page 58: Device Settings
Clear Programming: Click Renew Device to clear all account information. Data Profile: Click View/Edit Data Profile to view and edit your Data Profile information. Device Settings The Device settings menu lets you set display brightness, manage account password, update software, back up, restore and check system log. - Page 59 Software Update 1. From the Web UI, click Settings>Device>Software Update . You can update the software on this page. 2. Click to update your device's firmware (software version). Update Firmware Back up and Restore ■ From the Web UI, click Settings>Device>Back up and Restore to access menus to back up your device settings to your computer, restore from the backup and restore your device to its...
- Page 60 factory default settings. To back up your device settings to your computer, follow the steps below: 1. Click Back up now 2. Click on the pop-up window. Save 3. Choose a location on your computer to save the backup file. 4.
-
Page 61: Advanced Router Settings
Connection History ■ From the Web UI, click Settings>Device>Connection History to view your data connection traffic on this page. System Logs ■ From the Web UI, click Settings>Device>System logs, and then click Download logs download the system logs on this page. Advanced Router Settings Set LAN settings, Firewall and Customization. - Page 62 LAN Settings 1. From the Web UI, click Settings>Advanced Router>LAN Settings to display the router information shown in the following figure. : IP address for LAN interface. IP Address : Subnet mask for the IP address. Subnet Mask : VPN passthrough must be enabled if you want to allow VPN tunnels to ...
- Page 63 Firewall ■ From the Web UI, click Settings>Advanced Router>Firewall . You may set up firewall rules to protect your network from virus and malicious activity on the Internet. IP Address Filtering To set IP Address Filtering rules, follow the steps below: 1.
- Page 64 2. Click Add 3. Enter the related parameters as described in the following table. Parameters Description Enter the LAN IP address. LAN IP address Set the LAN port. LAN port Enter the WAN IP address. WAN IP address Set the WAN port. WAN port Set which protocol will be used for filtering.
- Page 65 1. Turn on Portmapping. 2. Click Add 3. Enter the related parameters as described in the following table. Parameters Description Enter a name for the rule. Name Set the WAN port. WAN port Enter the LAN IP address. LAN IP address Set the LAN port.
-
Page 66: Notification
4. Click Save Changes to add the new portmapping rule. Customization 1. From the Web UI, click Settings>Advanced Router>Customization to enable or disable UPnP and Out of Service Notification on this interface. 2. Click to save your settings. Save Changes Notification Show the notification your device's get from the network. -
Page 67: About
About Show your device's connection information, firmware information, WWAN information, Wi-Fi details and device information. 1. Launch the Web UI on your connected device. See Web UI Overview for details. 2. Click the About tab to view the available information. -
Page 68: Support Tab
: You can also save this information to your computer by clicking Save to file. Note Support Tab Obtain support information on this interface. 1. Launch the Web UI on your connected device. See Web UI Overview for details. 2. Click the Support tab to view the available options. -
Page 69: Troubleshooting
Appendix The following topics cover items such as troubleshooting, device specifications, applicable warranty and service information, customer service contacts, and applicable trademark and copyright notices. Troubleshooting Check the questions and answers below for troubleshooting solutions for common device issues. Check Here First Question: Unable to connect via Wi-Fi (WLAN) Answer 1: Check whether the mobile broadband device is properly connected to the computer or other external device. - Page 70 Question: Forgot PIN / Unknown PIN Unblocking Key (PUK) / SIM card is locked. Answer: Contact Customer Service. Question: SIM card is not recognized. Answer 1: Check whether the SIMcard is properly installed. For details, see Insert a SIM Card. Answer 2: Check theSIMcard for damage.
-
Page 71: Specifications
: Restart the mobile broadband device. Answer 2 Specifications The following tables list the specifications for the mobile broadband device, and the materials. Mobile Broadband Device Specifications Item Description Ride-Fi (Y856UB) Model name 136.4mm (H) x 34mm (W) x 12mm (D) Dimensions Weight Interface... - Page 72 Parts Materials/Finishing Y856UB car charger contact pin conditions Y856UB SIM tray conditions Y856UB power key conditions conditions conditions conditions conditions conditions conditions...
-
Page 73: Safety Precautions
Safety and Notices The following topics address important safety precautions, general notes, and required RF exposure information for your mobile broadband device. Safety Precautions The following topics outline important safety precautions that must be observed when using your mobile broadband device. -
Page 74: Specific Absorption Rates (Sar) Forwireless Device
SAR values betweendifferent model devices do not mean variationsin safety. SAR values at or below the federalstandard of 1.6 W/kg are considered safe for useby the public. The highest reported SAR values of the Ride-Fi are: Simultaneous : 1.483W/Kg Body-worn: 1.349W/Kg... -
Page 75: Fcc Notice
FCC Notice This device complies with Part 15 of the FCC Rules. Operation is subject to the following two conditions: (1) this device may not cause harmful interference, and (2) this device must accept any interference received, including interference that may cause undesired operation. Changes or modifications not expressly approved by the party responsible for compliance could void the user’s authority to operate the equipment. -
Page 77: Index
Index Android Device Remove, 11 Connect Wi-Fi, 23 Sleep Mode, 7 Specific Absorption Rate (SAR), 57 Battery Charge, 15 Specifications Install, 14 AC charger, 46 Materials, 47 Remove, 14 Customer Service, 48 Micro USB cable, 47 Data Transfer Speed, 9 Mobile broadband device, 46 Device Driver Installation SSID, 3, 15... - Page 78 Remove USB connection, 26 WLAN Software Installation, 27 Activate, 18 USB connection, 25 Overview, 18 Windows Vista Connect Wi-Fi, 20 Connect Wi-Fi, 24 Index...
Need help?
Do you have a question about the Ride-Fi and is the answer not in the manual?
Questions and answers