Table of Contents
Advertisement
Quick Links
We appreciate the trust and confidence you have placed in Hampton Bay through the purchase of this closet organizer. We strive to continually
create quality products designed to enhance your home. Visit us online to see our full line of products available for your home improvement needs.
USE AND CARE GUIDE
25 IN. CUSTOM CLOSET ORGANIZER
Questions, problems, missing parts? Before returning to the store,
call Hampton Bay Customer Service
9 a.m. - 4 p.m. (Central Time), Monday-Friday
1 (855) 439-4663
HAMPTONBAY.COM
Or email us: customer.solutions@yahoo.com
Thank you for choosing Hampton Bay!
THANK YOU
MODEL#
HD-COUS-017
SKU#
1001810432
OMSID
206954986
(WHITE)
OMSID
207186373
(MOCHA)
Advertisement
Table of Contents

Subscribe to Our Youtube Channel
Related Manuals for HAMPTON BAY HD-COUS-017


Summary of Contents for HAMPTON BAY HD-COUS-017
- Page 1 THANK YOU We appreciate the trust and confidence you have placed in Hampton Bay through the purchase of this closet organizer. We strive to continually create quality products designed to enhance your home. Visit us online to see our full line of products available for your home improvement needs.
-
Page 2: Table Of Contents
Table of Contents Table of Contents ............2 Hardware Included ..............3 Safety Information ............2 Package Contents ..............4 Warranty ................. 2 Installation ..............5 One Year Limited Warranty ............. 2 Care and Cleaning ............10 Pre-installation .............. 3 Planning Installation ............... 3 Tools Required ................ -
Page 3: Pre-Installation
Pre-installation PLANNING INSTALLATION Compare all parts in the packaging with the Hardware Included and Package Contents sections in this manual. If any part appears missing or damaged, do not assemble this product. Contact the Customer Service Team. This product has materials that contain finished and unfinished (raw wood) edges. During assembly, make sure to note in each diagram which way the finished edges are facing. -
Page 4: Package Contents
Pre-installation (continued) PACKAGE CONTENTS Part Description Quantity o t t f l e f l e... -
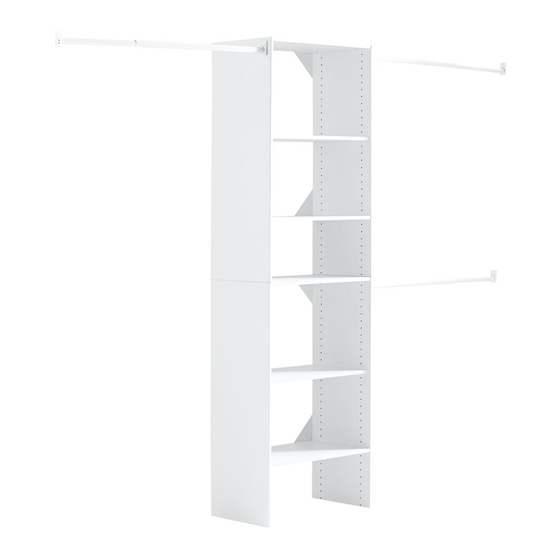
Page 5: Installation
Installation Attaching the cam posts to the Attaching the side supports to the side supports shelves □ Screw six cam posts (AA) into each of the two side □ With a side support (A) on each side of the top, bottom, and supports (A), as shown. - Page 6 Installation (continued) Attaching the corner supports Attaching the leveling feet □ □ Place corner supports (D) on each of the four corners of a Install bottom nuts (DD) and leveling feet (EE) into the shelving unit, as shown. bottom of one of the shelving units. This is now the bottom shelving unit.
- Page 7 Installation (continued) Attaching the top shelving unit to Attaching the shelving units to the the bottom shelving unit wall □ Insert a dowel (LL) into each side of the bottom shelving □ For the bottom shelving unit, drill a hole for the wall unit.
- Page 8 Installation (continued) Attaching the pole support Attaching the hole plugs brackets to the shelving unit □ Place the corner hole plugs (KK) and hole plugs (JJ) into the □ Measure and mark 2 in. down from the top of the shelving holes on the top of the top shelving unit.
- Page 9 Installation (continued) Attaching the pole support brackets to the wall □ Measure and mark the placement for the pole support brackets (MM) on the wall. Make sure that it is even with the pole support brackets (MM) on the shelving unit so that the poles (E) are level between the brackets. □...
-
Page 10: Care And Cleaning
Installation (continued) Extending the closet pole to the Attaching the poles to the desired length shelving unit □ Grasp and pull a pole (E) apart until it is long enough to □ Place one end of the pole (E) into the pole support bracket reach from the shelving unit to the wall. - Page 11 Questions, problems, missing parts? Before returning to the store, call Hampton Bay Customer Service 9 a.m. - 4 p.m. (Central Time), Monday-Friday 1 (855) 439-4663 HAMPTONBAY.COM Or email us: customer.solutions@yahoo.com Retain this manual for future use.
Need help?
Do you have a question about the HD-COUS-017 and is the answer not in the manual?
Questions and answers