Advertisement
D.I.Y L.E.D Cube with Touch Function
Level: Expert AK-120
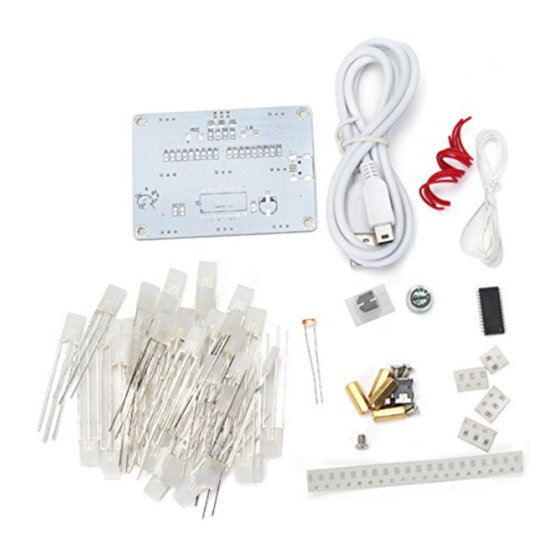
A brief Intro to SMT/SMD
So far the components that were selected are
all 0805 SMT package size. This is a common
dimension for Surface mount components.
Along with the 0603, theses will be the
common dimensions you may encounter with
the introduction to surface mounting.
The Resistors are usually denoted with a black
body and a number written across the unit to
reveal its value. Capacitors on the other hand
have a beige body and no writing on them. So
you don't want to drop or mix them up.
When soldering, keep all the components in
their packaging and avoid using a de-soldering
pump as the tiny components can be sucked up
from the pump.
Work over a clean environment or you may end
up spending the entire build time looking for
the components.
Recommended Tools
SL-30 Soldering Station with controllable temp
SL-624 Screwdriver Soldering Tip
835-P Flux
8241-T Isopropyl Alcohol
4140-P Flux Remover
DW5 Solder Wick
TOL-09161 Solder 60/40
H-HANDS-DEL Helping Hands
Touch Functions
K1: Each time you press the system will sequence
to a new pattern.
K2: The first press should playback the second
press recording.
The second press will allow you to talk or tap the
microphone to vary the light sequence.
The third press will be affected by the photo-
resistor value.
Advertisement
Table of Contents

Related Manuals for Abra AK-120


Summary of Contents for Abra AK-120
- Page 1 D.I.Y L.E.D Cube with Touch Function Level: Expert AK-120 A brief Intro to SMT/SMD Recommended Tools So far the components that were selected are SL-30 Soldering Station with controllable temp all 0805 SMT package size. This is a common SL-624 Screwdriver Soldering Tip dimension for Surface mount components.
- Page 2 Soldering Guide PART A 1) Flip the board to reveal the SMD Side of the board. 2) It is recommended to clean the board with isopropyl Alcohol. 3) Place some flux over the pads that need to be soldered. 4) Place the Mini-B USB jack onto the board and using a soldering iron and some solder, solder the first and last pin of the Mini-B USB jack only.
- Page 3 2) Keeping the entire unit leveled, you can rotate the board and place the unit to remain flat over your work area. Solder the pins into place and connect the Mini-B USB cable to the computer. 3) All lights should light up, if not. Please flip over the board and remove the defective led or check the USB port is properly soldered.
Need help?
Do you have a question about the AK-120 and is the answer not in the manual?
Questions and answers