Advertisement
Important Information
- For Windows® 98SE operating system, please go to
Input Device Driver" to have the Internet Keys Block and Multimedia Keys Block functions.
- For Windows® ME, Windows® 2000 and Windows® XP operating system, you could use the keyboard immediately after
plugging the receiver connector into PC. If you want to enjoy the full potentiality function of the keyboard, please visit our
website at
http://www.btc.com/
installed, these hot keys are reprogrammable, except Volume Up and Volume down. They can be configured as a string, a
combination key, a web site, an existing file, or a function that the driver pre-defines for you.
Hardware Installation
Plug in the receiver connector into your available USB port on PC.
1.
2.
Make sure the batteries of the keyboard and mouse are installed
correctly, please follow the polarity signs in the battery compartment.
Pairing Procedure
The wireless kit can operate out of the box immediately after you plug the
receiver USB connector into your PC USB port. If it can't work, please follow
the steps below to process ID setting of the Wireless Kit.
The pairing button locates on the top of the receiver with a LED under to
show the pairing or data reception status.
The ID-recognition function helps to protect against interference from other
RF products in the same environment. Remember to pair ID when other RF
products affect your keyboard kit.
1.
Press the pairing button on the top of the receiver first. Receiver LED
will blink slowly indicating it's ready to receive keyboard/mouse pairing
information.
2.
Next, press the pairing button on the bottom of the mouse once.
3.
Then press the pairing button on the top of the receiver again.
4.
Finally, press the pairing button on the bottom of the keyboard
Receiver LED flashes 3 times rapidly as indication it's paired with this
keyboard and mouse.
Note:
- The whole procedure should be complete within 60 seconds.
- Make sure your PC is on and running when doing the pairing
procedure.
- You don't have to pair ID again after changing batteries.
Driver Installation
USB Device Driver
The USB device driver is included in Windows operating system.
During initial installation of the USB device, the system will automatically detect a new hardware being added, and then
bring up "Add New Hardware Wizard" dialogue box. Please follow the Wizard's USB driver installation steps. Once this
installation step is completed the basic functions of the USB device will work under the operating system. The additional
functions are provided only after the KeyMaestro application is installed.
KeyMaestro Input Device Driver
1. After you download the driver, please find the "SetupKey.exe" in the directory and double-click this file.
2. Follow the on-screen instruction to install the driver.
3. The driver icon
will show at the right-bottom of the Windows system tray when the driver is loaded.
Quick Installation Guide
http://www.btc.com/
to download and install the "KeyMaestro Input Device Driver". Once the driver has been
5309URF BTC QIG 3100506721 Version 1.0 英文
website to download and install the "KeyMaestro
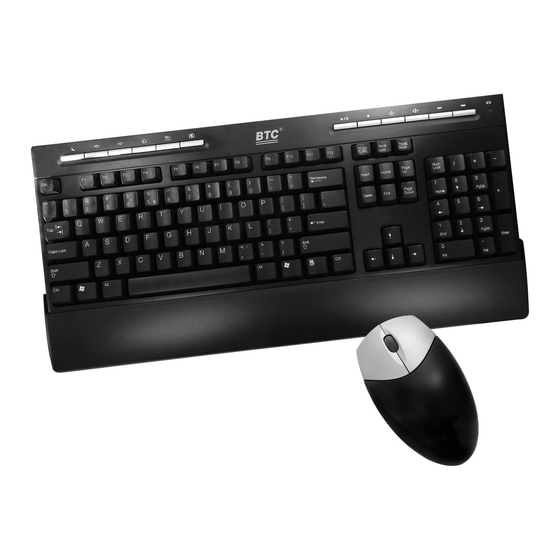
Front View of
Back View of
USB Connector
USB Connector
Pairing button on
ID Button(LED)
the
receiver (With a
LED
pairing button)
Pairing button on the
bottom of the mouse
Pairing button on the
bottom of the keyboard
(+ )
(-)
(-)
(+ )
top
of
the
under
the
English
Advertisement
Table of Contents


Need help?
Do you have a question about the 5309URF and is the answer not in the manual?
Questions and answers