
Related Manuals for JVC KD-R856BT


Summary of Contents for JVC KD-R856BT
- Page 1 ENGLISH KD-R856BT CD RECEIVER Please read all instructions carefully before INSTRUCTION MANUAL operation to obtain the best possible performance from the unit. GET0982-001A [U]...
-
Page 2: Table Of Contents
CONTENTS BEFORE USE Warning BEFORE USE Do not operate any function that takes your attention away from safe driving. BASICS Caution Volume setting: GETTING STARTED • Adjust the volume so that you can hear sounds outside the car to prevent accidents. CD / USB / iPod •... -
Page 3: Basics
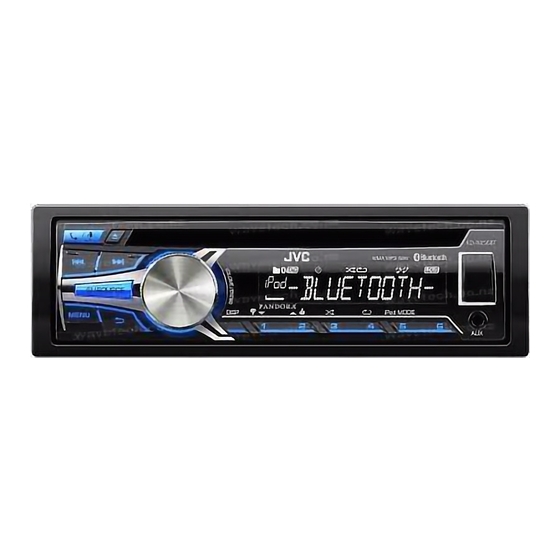
BASICS Faceplate Remote control (RM-RK52) Attach Remote sensor (Do not expose to bright sunlight.) Volume knob (turn/press) Loading slot Detach Pull out the insulation sheet when using for the first time. How to reset How to replace the battery Detach Display window button Your preset adjustments... -
Page 4: Getting Started
Press MENU to exit. For details on how to update the firmware, see: <http://www.jvc.net/cs/car/>. Set the basic settings * Not displayed when the corresponding source is selected. Press and hold MENU. Turn the volume knob to make a selection (see the following table), then press the knob. -
Page 5: Cd / Usb / Ipod
(commercially available) Repeat play * Press 4 B repeatedly to make a selection. • Audio CD or JVC Playlist Creator (JPC) / JVC Music Control (JMC) file ( 18): TRACK RPT, RPT OFF • MP3/WMA/WAV file: TRACK RPT, FOLDER RPT, RPT OFF iPod/iPhone •... - Page 6 CD / USB / iPod Select a track/file from a list Change the USB drive For iPod: Applicable only when [HEAD MODE] is selected. ( 5) When a smartphone (Mass Storage Class) is connected to the USB input Press MENU . terminal, you can select its internal memory or external memory (such as an Turn the volume knob to make a selection, then press the knob.
-
Page 7: Radio
RADIO Search for your favorite program (PTY Search) Available only for FM source. Press and hold G. Turn the volume knob to select a PTY code, then press the knob to start searching. If there is a station broadcasting a program of the same PTY code as you have selected, that station is tuned in. -
Page 8: Aux
RADIO Use a portable audio player RADIO TIMER Turns on the radio at a specific time regardless of the current source. 1 ONCE/ DAILY/ WEEKLY/ OFF: Select how often the timer will be turned Connect a portable audio player (commercially available). 2 FM/ AM/ SW1/ SW2: Select the FM, AM, SW1 or SW2 band. -
Page 9: Pandora
Pandora® (Applicable for Australia or New Zealand models only) Preparation: Create a new station Install the latest version of the Pandora application onto your device Press MENU. (iPhone/ iPod touch), then create an account and log in to Pandora. Turn the volume knob to select [NEW STATION], then press the knob. •... -
Page 10: Bluetooth
Bluetooth device for more information. Press B /SOURCE to turn on the unit. Secure using cord clamps Search and select “JVC UNIT” on the Bluetooth device. (not supplied) if necessary. “BT PAIRING” flashes on the display. Adjust the •... - Page 11 PHONE” “PIN IS 0000” scrolls on the display. On RM-RK52: Press and hold J / K / H / I . Search and select “JVC UNIT” on the Bluetooth device within Activate or Press the volume knob during a call.
- Page 12 BLUETOOTH® Improve the sound quality during a call Bluetooth mode operations While talking on the phone..Press to enter Bluetooth mode. Press and hold MENU. Turn the volume knob to make a selection (see the following table), Turn the volume knob to make a selection (see the following table), then press the knob.
- Page 13 BLUETOOTH® Use Voice Recognition VOICE Speak the name of the contact you want to call or the voice command to control the phone functions. ( Use Voice Recognition) Press and hold The connected phone (which has been paired the earliest) is SETTINGS Default: XX activated.
- Page 14 “ ” appears in front of the device name. AUDIO To erase a contact from the preset memory, select [DIAL NUMBER] in Shows the connected phone name using the JVC Smart Music Control * APPLICATION step and store a blank number.
- Page 15 Press B /SOURCE to select BT AUDIO. MY ADDRESS: Shows address of this unit. Operate the Bluetooth audio player to start JVC Smart Music Control is designed to view JVC car receiver status playback. and perform simple control operations on Android smart phones.
-
Page 16: Audio Settings
AUDIO SETTINGS Press and hold MENU. AUDIO Turn the volume knob to make a selection (see the following table), BASS BOOST +01 / +02: Selects your preferred bass boost level. ; OFF: Cancels. then press the knob. Repeat step 2 until the desired item is selected. LOUD 01 / 02: Boosts low or high frequencies to produce a well-balanced sound at Press MENU to exit. -
Page 17: Display Settings
DISPLAY SETTINGS MORE INFORMATION About discs and audio files • This unit can only play the following CDs: • This unit can play back multi-session discs; however, unclosed sessions will be skipped during playback. • Unplayable discs: - Discs that are not round. Press and hold MENU. - Page 18 5 V and exceeds 1 A. • When you play audio file with song data added using the recorded, “NO NAME” appears. JVC Playlist Creator or JVC Music Control, you can search for If not recorded, “NO NAME” appears. About iPod/iPhone audio file by Genres, Artists, Albums, Playlists, and Songs.
-
Page 19: Troubleshooting
TROUBLESHOOTING Symptom Remedy Symptom Remedy Sound cannot be heard. • Adjust the volume to the optimum level. “CANNOT PLAY” flashes • Check whether the connected device is compatible with this • Check the cords and connections. and/or connected device unit and ensure the files are in supported formats. ( 17) cannot be detected. - Page 20 TROUBLESHOOTING Symptom Remedy Symptom Remedy No Bluetooth device is • Search from the Bluetooth device again. The unit does not respond You may have tried to copy the same entries (as stored) to the unit. Press DISP or G to exit. detected.
-
Page 21: Specifications
SPECIFICATIONS FM Frequency Range 87.5 MHz to 108.0 MHz (50 kHz step) USB Standard USB 1.1, USB 2.0 (Full speed) Usable Sensitivity 8.2 dBf (0.71 μV/75 Ω) Compatible Devices Mass storage class (S/N = 26 dB) File System FAT12/ 16/ 32 Quieting Sensitivity 17.2 dBf (2.0 μV/75 Ω) Maximum Supply Current DC 5 V 1 A (DIN S/N = 46 dB) MP3 Decode Compliant with MPEG-1/2 Audio Layer-3 Frequency Response (±3 dB) 30 Hz to 15 kHz... - Page 22 Warning Installing the unit (in-dash mounting) • The unit can only be used with a 12 V DC power supply, negative ground. • Disconnect the battery’s negative terminal before wiring and mounting. • Do not connect Battery wire (yellow) and Ignition wire (red) to the car chassis or Ground wire (black) to prevent a short circuit.
-
Page 23: Connection
Wiring connection Part list for Signal cord (not supplied) installation JVC Amplifier (A) Faceplate Front output Rear/subwoofer output Fuse (10 A) Remote wire Vehicle dashboard (not supplied) (B) Trim plate Microphone input jack ( 10) Antenna terminal Factory wiring To the steering... - Page 24 • Android is trademark of Google Inc. • The Bluetooth® word mark and logos are registered trademarks owned by Bluetooth SIG, Inc. and any use of such marks by JVC KENWOOD Corporation is under license. Other trademarks and trade names are those of their respective owners.
Need help?
Do you have a question about the KD-R856BT and is the answer not in the manual?
Questions and answers