
Related Manuals for Kenwood KW-V230BT


Summary of Contents for Kenwood KW-V230BT
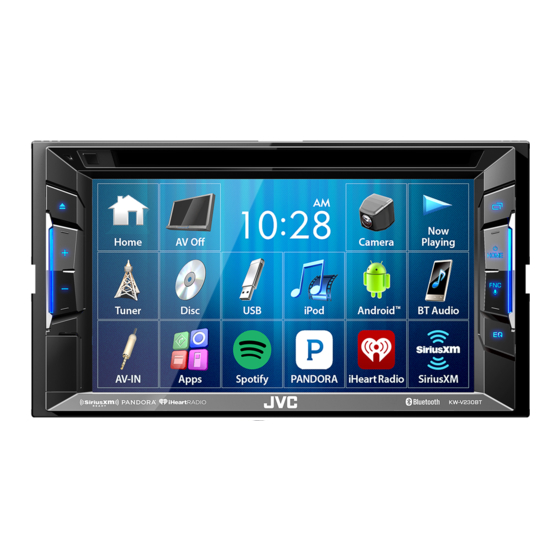
- Page 1 KW-V230BT KW-V130BT MONITOR WITH DVD RECEIVER INSTRUCTION MANUAL © 2016 JVC KENWOOD Corporation B5A-1363-00 (KN)
-
Page 2: Table Of Contents
How to read this manual: compliance with Federal Regulations, the following • Illustrations of KW-V230BT are mainly used for explanation. The displays and panels shown in this manual are reproductions of labels on, or inside the product are examples used to provide clear explanations of the operations. For this reason, they may be different relating to laser product safety. - Page 3 BEFORE USE BEFORE USE FCC WARNING IC (Industry Canada) Notice V Cautions on the monitor: This equipment may generate or use radio This device complies with Industry Canada’s licence- • The monitor built into this unit has been frequency energy. Changes or modifications to this exempt RSSs.
-
Page 4: Initial Settings
INITIAL SETTINGS INITIAL SETTINGS <Demonstration> Activate or deactivate the Initial setup Clock settings (Page 56) display demonstration. When you power on the unit for the first time or <Language> Select the text language Display the Home screen. reset the unit, the initial setting screen appears. (Page 57) used for on-screen On the monitor panel:... -
Page 5: Basics
BASICS BASICS INITIAL SETTINGS INITIAL SETTINGS 1 Reset button Set the clock time. Component names and functions Resets the unit. (Page 3) 2 Loading slot V Caution on the volume setting: 3 M (Eject) button Digital devices produce very little noise compared •... -
Page 6: Common Operations
BASICS BASICS ❏ Turning off the screen To turn off the AV source: Common operations On the pop-up short-cut menu (Page 8): ❏ Turning on the power Display the pop-up short-cut menu by pressing FNC/ on the monitor panel, then select [Display OFF]. - Page 7 BASICS BASICS ❏ Touch screen operations Gesture control on the source control screen: Common operating buttons: 1 Displays all playback sources and items. You can also control playback by moving your finger on the touch panel as follows (for some sources, the (Page 8) 2 Displays the <Settings>...
-
Page 8: Selecting The Playback Source
BASICS BASICS [Apps] Switches to the App screen from Selecting the playback source Using the pop-up short-cut menu the connected iPod touch/iPhone/ Android device. (Page 20) On the Home screen: While displaying the source control screen, you can [Spotify] Switches to the Spotify jump to the other screen from the pop-up short-cut application. -
Page 9: Discs
DISCS DISCS To eject a disc forcibly Operation buttons Playing a disc Press and hold M on the monitor panel. • Available buttons on the screen and operations • If a disc does not have a disc menu, all tracks on differ depending on the type of disc/file being it will be played repeatedly until you change the played back. - Page 10 DISCS DISCS ❏ Selecting a folder/track on the list For audio playback Operation buttons • Available buttons on the screen and operations differ depending on the type of disc/file being played back. Displays the other operation button window. • To hide the window, press [ ]. Displays the <Equalizer>...
- Page 11 DISCS DISCS ❏ Video menu operations For VCD Displays the disc menu (DVD). [ MENU] You can display the video menu screen during video [T MENU] Displays the disc menu (DVD). playback. Switches to the direct disc menu • The operation buttons disappear when the screen mode.
- Page 12 DISCS DISCS ❏ Selecting playback mode To select a track directly on a VCD • Each time you press the button, the playback • When playing a VCD with PBC activated, stop mode changes. (The corresponding indicator To select Repeat playback mode playback to deactivate the PBC function, then lights up.) use the direct selecting buttons to select a track...
- Page 13 DISCS DISCS ❏ Setting items <Down Mix> When playing back a multi-channel Settings for disc playback—<DISC disc, this setting affects the signals <Menu Select the initial disc menu language. Mode> reproduced through the front and/or Language> (Initial: English) (Page 68) rear speakers. <Subtitle Select the initial subtitle language •...
-
Page 14: Usb
Operation buttons Connecting a USB device Playback operations • Available buttons on the screen and operations You can connect a USB mass storage class device differ depending on the type of file being played When the operation buttons are such as a USB memory, Digital Audio Player etc. to back. - Page 15 ❏ Settings for USB playback—<USB ❏ Selecting a folder/track on the list <File Type>* Select the playback file type when a Mode> disc contains different types of files. • Audio: Plays back audio files. • Still Image: Plays back picture files. •...
-
Page 16: Android
Android Android ❏ Starting playback Operation buttons Preparation Displays the other operation button Start JVC Music Play on your Android ❏ Installing JVC Music Play window. device. • To hide the window, press [ ]. Install the Android™ application JVC Music Play on Select “Android™... - Page 17 Android Android ❏ Selecting a track from the menu ❏ Settings for playback on the Android <Artwork> Shows/hides artwork of the Android device—<Android Mode> device. <Android • AUTO MODE: Controls from the Setup> unit (using the JVC Music Play application). •...
-
Page 18: Ipod/Iphone
iPod/iPhone iPod/iPhone ❏ Selecting the connection method of Preparation Playback operations iPod/iPhone ❏ Connecting iPod/iPhone When the operation buttons are Turn off the AV source (Page 6) not displayed on the screen, touch • For details about connecting iPod/iPhone, see Display the <System> setting screen. the area shown on the illustration. - Page 19 iPod/iPhone iPod/iPhone ❏ Selecting an audio/video file from the Operation buttons Audio menu: Displays the other operation button menu window. • To hide the window, press [ ]. Displays the <Equalizer> screen. (Page 47) Displays the audio/video file list. (See Select the menu ( : audio or : video) the right column.) (1), a category (2), then a desired item...
-
Page 20: Apps
APPs APPs Switches the device between iPod You can use an App of the connected iPod touch/ Using an App touch/iPhone connected with a cable iPhone/Android on this unit. and Android device connected via • For Apps you can use on this unit, visit When the operation buttons are not displayed on Bluetooth. -
Page 21: Pandora
Pandora® Pandora® Operation buttons Playback operations You can stream Pandora from iPod touch/iPhone Displays the other operation button or Android devices. window. You can operate Pandora using the remote • Install the latest version of the Pandora • To hide the window, press [ ]. application on your iPod touch/iPhone/Android. - Page 22 Pandora® Pandora® ❏ Selecting a station from the list • You can change the page to display more Android™ items by pressing [ • Visit Google play and search for “Pandora” to Display the list selection screen. • The indicator appears on the left of the install.
-
Page 23: Iheartradio
iHeartRadio iHeartRadio iHeartRadio is a free, all-in-one digital radio service Operation buttons Playback operations that lets you listen to your favorite Live Stations or Displays the other operation create commercial-free, all-music Custom Stations button window. You can operate iHeartRadio using the remote featuring songs from the artists you select and •... - Page 24 iHeartRadio iHeartRadio ❏ Selecting the variety level for your ❏ Searching for a station Requirements for iHeartRadio custom station Display the <Station Search> screen. iPhone or iPod touch Display the variety type selection screen. • Install the latest version of the iHeartRadio On the custom station screen: application on your iPhone or iPod touch.
-
Page 25: Spotify
Spotify Spotify Displays the Spotify menu screen. With Spotify, your music is everywhere. Working out, Playback operations partying or relaxing, the right music is always at your Selects a track. [ ] [ ] fingertips. There are millions of songs on Spotify— Starts playback. - Page 26 Spotify Spotify ❏ Creating your station (Start Radio) ❏ Selecting a track Requirements for Spotify Display the Spotify menu screen. iPhone or iPod touch • Install the latest version of the Spotify application on your iPhone or iPod touch. (Search for “Spotify” in the Apple iTunes App Store to find and install the most recent version.) Select the list type (<Your...
-
Page 27: Tuner
TUNER TUNER [FM] Selects the FM band. Listening to the radio Presetting stations ❏ Indications and buttons on the source ❏ Storing stations in the memory Displays the preset station window. control screen You can preset 5 stations for each band. (Page 28) •... - Page 28 TUNER TUNER ❏ Selecting a preset station ❏ Activating/deactivating TI Standby FM RBDS features Reception Select the band (1), then display the ❏ Searching for FM RBDS programs—PTY preset station window (2). Search You can search for your favorite programs being broadcast by selecting the PTY code.
-
Page 29: Siriusxm® Satellite Radio
SiriusXM® Satellite Radio SiriusXM® Satellite Radio Only SiriusXM® brings you more of what you love When the following screen appears, press Listening to the SiriusXM® Satellite to listen to, all in one place. Get over 140 channels, [Return]. Radio including commercial-free music plus the best sports, news, talk, comedy and entertainment. - Page 30 SiriusXM® Satellite Radio SiriusXM® Satellite Radio ❏ Selecting a preset channel Operation buttons Presetting channels [SXM1] – Selects the band. Select the band (1), then display the ❏ Storing channels in the memory [SXM4] preset channel window (2). You can preset 5 channels for each band. Displays the other operation button Tune in to a channel you want to preset.
- Page 31 SiriusXM® Satellite Radio SiriusXM® Satellite Radio ❏ Replaying content Selecting a channel Replay Display operations buttons for replay. ❏ Selecting a channel on the list You can pause, rewind and replay content from the currently tuned channel. You can obtain information on channels or select a •...
- Page 32 SiriusXM® Satellite Radio SiriusXM® Satellite Radio SmartFavorites TuneStart™ TuneScan™ User stored channels (P1 to P5) of current band are When you select a SmartFavorites channel, you can When you activate TuneScan™, you will hear 6 recognized as SmartFavorites channels. SiriusXM listen to the current song from the beginning.
- Page 33 SiriusXM® Satellite Radio SiriusXM® Satellite Radio Display the <Parental Code Check> Enter the four-digit code and then press Setting reception restrictions screen. [Enter] again to confirm the code. ❏ Setting the parental control You can limit access to SiriusXM channels, such as Activating/Deactivating the parental control those with mature content.
- Page 34 SiriusXM® Satellite Radio SiriusXM® Satellite Radio Selecting the channels to lock—Parental Lock • You can change the page to display more Select a category (1), and then select a Channel Selection items by pressing [ channel (2). This parental control option allows you to pick •...
-
Page 35: Other External Components
OTHER EXTERNAL COMPONENTS OTHER EXTERNAL COMPONENTS ❏ Displaying the rear view camera screen Using the rear view camera To display the picture from the rear view camera • To connect a rear view camera, see page 64. The rear view screen is displayed when you shift the •... - Page 36 OTHER EXTERNAL COMPONENTS OTHER EXTERNAL COMPONENTS ❏ Using the parking guidelines on the To exit the camera screen To deactivate: Select [OFF] for <Parking Press HOME on the monitor panel. Guidelines>. rear view screen • You can also exit the camera screen by touching You can display parking guidelines to enable easier •...
-
Page 37: Using External Audio/Video Players-Av-In
OTHER EXTERNAL COMPONENTS OTHER EXTERNAL COMPONENTS ❏ Changing the AV-IN name Adjusting the parking guidelines Using external audio/video Adjust the parking guidelines according to the size You can change the AV-IN name displayed on the players—AV-IN of the car, parking space and so on. “AV-IN”... -
Page 38: Bluetooth
BLUETOOTH BLUETOOTH Auto pairing About mobile phones compatible with Phone Information for using Bluetooth® When <Auto Pairing> is set to [ON], iOS devices book Access Profile (PBAP) devices (such as iPhone) are automatically paired when If your mobile phone supports PBAP, you can connected via USB. - Page 39 BLUETOOTH BLUETOOTH Pairing a Bluetooth device using a PIN code (for Change the PIN code. Select the unit (“JVC KW-V”) on your Bluetooth 2.0) • If you wish to skip changing the PIN code, go Bluetooth device. to step 3. Display the <Bluetooth Setup>...
- Page 40 BLUETOOTH BLUETOOTH ❏ Connecting/disconnecting a registered • When a Bluetooth mobile phone is connected, Select [ON] (to connect) or [OFF] (to the signal strength and battery level are displayed Bluetooth device disconnect) for the target (1), then display when the information is acquired from the device. the <Paired Device List>...
- Page 41 BLUETOOTH BLUETOOTH ❏ Ending a call ❏ Switching between handsfree mode Using a Bluetooth mobile phone and phone mode While talking... ❏ Receiving a call While talking... When a call comes in... ❏ Adjusting the volume of calls/earpiece/ • Call information is displayed if acquired. microphone •...
- Page 42 BLUETOOTH BLUETOOTH ❏ Sending text during a call ❏ Making a call From the call history/phone book/preset list You can send text during a call using the DTMF (Dual Display the phone control screen. Tone Multi Frequency) function. On the Home screen: While talking...
- Page 43 BLUETOOTH BLUETOOTH • To use the A to Z search in the phone book: • To display other phone numbers: Voice dialing When the phone book list is displayed, you can • Available only when the connected mobile phone switch between phone numbers if several phone has a voice recognition system.
- Page 44 BLUETOOTH BLUETOOTH ❏ Presetting phone numbers Operation buttons Using the Bluetooth audio player Displays the other operation button You can preset up to 5 phone numbers. window. Display the phone control screen. • To register a new device, see page 38. •...
- Page 45 BLUETOOTH BLUETOOTH ❏ Selecting an audio file from the menu <Device Shows the device address of the unit. Address> <Auto • ON (Initial): A connection is Connect> automatically established with the last connected Bluetooth device when the unit is turned on. Select a category (1), then a desired item •...
-
Page 46: Settings
SETTINGS SETTINGS Display the <APP Setup> screen. When selecting [Android/Other Settings for using applications of On the Home screen: (Bluetooth)] as the device type: Select the iPod touch/iPhone/Android Android device (1), then press [OK] to Before using applications of iPod touch /iPhone/ connect (2). -
Page 47: Sound Adjustment
SETTINGS SETTINGS Storing your own adjustments—Adjusting the • To apply the adjusted equalizer to all playback Sound adjustment sound precisely sources, press [ALL SRC], then press [OK] to ❏ Using the sound equalization confirm. Select a sound mode. (See the left column.) •... - Page 48 SETTINGS SETTINGS ❏ Setting the speakers—car type, Select the speaker type (1), select the size <TW Gain (L)>/ Adjusts the output volume of <TW Gain (R)> the tweeter (left/right).* speaker size and crossover frequency of the selected speaker (2), then display <TW FREQ>...
- Page 49 SETTINGS SETTINGS ❏ Adjusting the Digital Time Alignment Select an item to make an adjustment. Determining the value for <Position DTA> (DTA) adjustment If you specify the distance from the center of the Make fine adjustments to the delay time of currently set listening position to every speaker, the speaker output to create a more suitable the delay time will be automatically computed...
-
Page 50: Adjustment For Video Playback
SETTINGS SETTINGS Select the aspect ratio. <Bright> Adjusts the brightness. (−15 Adjustment for video playback to +15) ❏ Adjusting the picture <Contrast> Adjusts the contrast. (−10 to +10) You can adjust the picture quality. <Black> Adjusts the blackness. (−10 to Display the picture adjustment screen. -
Page 51: Changing The Display Design
SETTINGS SETTINGS ❏ Zooming the picture ❏ Storing your own scene for the Changing the display design background image You can zoom the picture (<FULL>, <Zoom1> to You can change the background. <Zoom3>). While playing a video or picture, you can capture an Display the <User Customize>... -
Page 52: Customizing The Home Screen
SETTINGS SETTINGS Adjust the image. Select the position to place the icon (1), Customizing the Home screen then select the item you want to display in You can arrange the items to display on the Home the selected position (2). screen. -
Page 53: Customizing The System Settings
SETTINGS SETTINGS ❏ Updating the system Customizing the system settings You can update the system by connecting a USB ❏ Memorizing/recalling the settings device containing an update file. • You can memorize the settings changed in the • To update the system, visit <http://www.jvc.net/ <Settings>... - Page 54 SETTINGS SETTINGS ❏ Adjusting the touch position Touch the center of the marks at the upper left (1), the lower center (2), then the You can adjust the touch position on the touch panel if the position touched and the operation upper right (3) as instructed.
-
Page 55: Setting Menu Items
SETTINGS SETTINGS • Bass EXT: Activates/deactivates bass. Fader: Adjusts the front and rear speaker output Setting menu items – ON/OFF (Initial) balance. ❏ Displaying the <Settings> menu screen • SW LEVEL: Adjusts the subwoofer level. • F15 to R15 (Initial: 0) –... - Page 56 SETTINGS SETTINGS ❏ <Display> setting screen ❏ <Input> setting screen <Screen Adjustment> Adjust the brightness and blackness of the screen. <Dimmer> <Rear Camera> Press [Enter] to display the setting screen, select • Auto (Initial): Dims the screen and button Configure the rear view camera settings. [DIM ON] (dimmer on)/[DIM OFF] (dimmer off), illumination when you turn on the headlights.
- Page 57 SETTINGS SETTINGS ❏ <System> setting screen <Bluetooth Setup> Configure settings for using a Bluetooth device, <Language>* such as connection and other general operations. Select the text language used for on-screen (Page 45) information. <Beep> • English (Initial)/Español/Français/Deutsch/ • ON (Initial): Activates the key-touch tone. Italiano/Nederlands/Português/Türkçe/ •...
-
Page 58: Remote Controller
REMOTE CONTROLLER REMOTE CONTROLLER ❏ Changing the battery of the remote V Caution: To use the remote controller, purchase RM-RK258 • Keep the battery out of reach of children and in controller separately. original package until ready to use. Dispose of used batteries promptly. - Page 59 REMOTE CONTROLLER REMOTE CONTROLLER ❏ Searching for an item directly Operations using the remote 1 – 6 Enters preset station number. Tuner frequency controller (RM-RK258) ANGLE Not used for this unit. 1 Press DIRECT to enter the search mode. Changes the aspect ratio. ❏...
-
Page 60: Connection/Installation
CONNECTION/INSTALLATION CONNECTION/INSTALLATION • If the power is not turned on (“Miswiring DC Offset • Connect the speaker wires correctly to the Before installing the unit terminals to which they correspond. The unit may Error”, “Warning DC Offset Error” is displayed), V WARNING be damaged or fail to work if you share the ·... - Page 61 CONNECTION/INSTALLATION CONNECTION/INSTALLATION ❏ Supplied accessories for installation ❏ Installation procedure Installing the unit 1 Wiring harness x 1 To prevent a short circuit, remove the key ❏ Installing the unit using the mounting 2 Extension wire (2 m) x 1 from the ignition and disconnect the ·...
- Page 62 CONNECTION/INSTALLATION CONNECTION/INSTALLATION Connection ❏ Connecting wires to terminals For 3 way speaker system connection, see also page 64. If no connections are made, do not let the cable come out See page 64. from the tab. See page 64. 10 A fuse Connect the antenna cord to the antenna terminal.
- Page 63 CONNECTION/INSTALLATION CONNECTION/INSTALLATION ❏ Connecting a USB device ❏ Connecting an Android device ❏ Connecting iPod/iPhone USB device iPod/iPhone (Lightning iPod/iPhone (30-pin Android device (commercially available) connector models) connector models) (commercially available) (commercially available) (commercially available) USB 2.0 cable (commercially available) KS-U62 (optional accessory) USB 2.0 cable...
- Page 64 CONNECTION/INSTALLATION CONNECTION/INSTALLATION ❏ Connecting external components ❏ Connecting microphone for Bluetooth Connecting external amplifiers for 3 way speakers system Connect the microphone (5) to the MIC terminal. • To install the microphone, peel off the adhesive tape, fix on the installation position, then adjust the direction of the microphone to face the driver.
-
Page 65: References
REFERENCES REFERENCES ❏ To keep discs clean Maintenance More information Dirty discs may not play correctly. ❏ Caution on cleaning the unit ❏ File playback If a disc does become dirty, wipe it with a soft cloth Do not use any solvent (for example, thinner, in a straight line from the center to the edge. - Page 66 REFERENCES REFERENCES ❏ Disc playback Playing audio files (MP3/WMA/WAV/AAC) • This unit cannot play back the following files: • This unit can play back files with the extension – MP3 files encoded with MP3i and MP3 PRO Playable disc types code <.mp3>, <.wma>, <.wav>...
- Page 67 REFERENCES REFERENCES ❏ USB playback Unplayable discs • Operation and power supply may not work as • Unplayable disc types and formats are as follows: intended for some USB devices. Playable files on a USB device – DVD-Audio/DVD-ROM discs • Do not leave a USB device in the car, or expose to •...
- Page 68 REFERENCES REFERENCES ❏ Language codes (for DVD language selection) • When operating an iPod/iPhone, some operations may not be performed correctly or as intended. In Afar Galician Maori Somali this case, visit the following JVC web site: Abkhazian Guarani Macedonian Albanian <http://www.jvc.net/cs/car/>...
-
Page 69: Error Message List
REFERENCES REFERENCES “Connection Error”: “Please update Pandora App”: Error message list • The device is registered but the connection has • The Pandora application on your iPod touch/ If an error occurs while using the unit, a message failed. Connect the registered device. (Page 40) iPhone/Android is not the latest version. -
Page 70: Troubleshooting
REFERENCES REFERENCES “Pandora not available”: “SXM Check Tuner”: Troubleshooting • You cannot use the Pandora application from • Make sure the SiriusXM Connect Vehicle Tuner is What appears to be trouble is not always serious. the area where you are currently trying to access connected to the unit. - Page 71 REFERENCES REFERENCES ❏ Discs ❏ USB ❏ Android Recordable/Rewritable discs cannot be played “Reading” does not disappear from the screen. Sound cannot be heard during playback. back. • Turn the power off and on again. • Reconnect the Android device. •...
- Page 72 REFERENCES REFERENCES ❏ iPod/iPhone ❏ Tuner The sound is interrupted or skipped while using a Bluetooth audio player. No sound comes out of the speakers. SSM automatic presetting does not work. • Reduce the distance between the unit and the •...
-
Page 73: Specifications
REFERENCES REFERENCES ❏ DVD player section ❏ USB interface section Specifications D/A Converter 24 bit USB Standard USB 2.0 Full Speed/High Speed ❏ Monitor section Audio Decoder Linear PCM/Dolby Digital/MP3/ Compatible Device Picture Size (W x H) WMA/WAV/AAC Mass Storage Class 6.2 inches (diagonal) wide Video Decoder MPEG1/MPEG2/JPEG... - Page 74 REFERENCES REFERENCES ❏ FM tuner section ❏ Audio section ❏ General Frequency Range 87.9 MHz to 107.9 MHz (200 kHz) Maximum Power (Front & Rear) Operating Voltage 50 W × 4 14.4 V (10.5 V to 16 V allowable) Usable Sensitivity (S/N: 30 dB, 22.5 kHz) 7.2 dBf (0.63 μV/75 Ω) Full Bandwidth Power (Front &...
- Page 75 Bluetooth SIG, • Microsoft and Windows Media are either registered AND NON-COMMERCIAL ACTIVITY AND/OR WAS Inc. and any use of such marks by JVC KENWOOD trademarks or trademarks of Microsoft Corporation OBTAINED FROM A VIDEO PROVIDER LICENSED Corporation is under license.
- Page 76 0616MYHMDWJEIN...
Need help?
Do you have a question about the KW-V230BT and is the answer not in the manual?
Questions and answers