Table of Contents
Advertisement
Quick Links
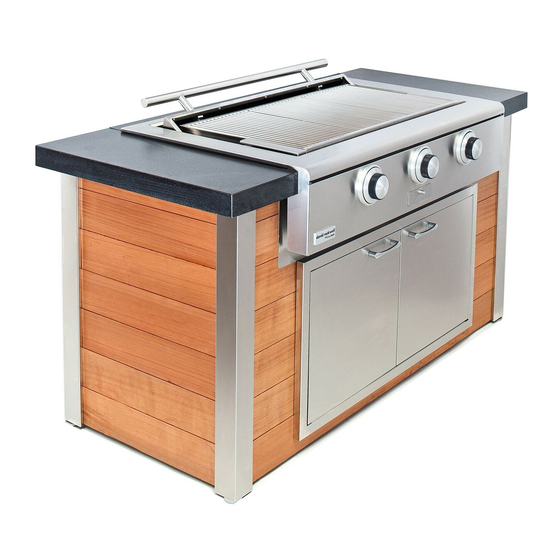
Rockwell by Caliber Social Grill Built-In Models
48" (3) Burner Built-In Grill and CRCAD20x42 Double Access Doors shown.
Model information:
48" 3 BURNER BUILT-IN GRILL:
Model: CRG48SS-L (2) 20,000 BTU Caliber Crossflame® grill burners and (1) 20,000 BTU sear zone infrared sear
burner with Stainless Steel 48" base, for use with built-in projects using LP Gas
(20lb cylinder not included)
Model: CRG48SS-N (2) 20,000 BTU Caliber Crossflame® grill burners and (1) 20,000 BTU sear zone infrared sear
burner with Stainless Steel 48" base, for use with built-in projects using NG Gas
(hard piping required by certified installer)
42" 2 BURNER BUILT-IN GRILL:
Model: CRG42SS-L (2) 20,000 BTU Caliber Crossflame® grill burners with Stainless Steel 42"
base, for use with built-in projects using LP Gas
Model: CRG42SS-N (2) 20,000 BTU Caliber Crossflame® grill burners with Stainless Steel 48"
base, for use with built-in projects using NG Gas
Installation + Use/Care Instructions
42" (2) Burner Built-In Grill and CRCAD20x42 Double Access Doors shown.
(20lb cylinder not included)
(hard piping required by certified installer)
Advertisement
Table of Contents

Related Manuals for Caliber Rockwell CRG48SS-L


Summary of Contents for Caliber Rockwell CRG48SS-L
- Page 1 Model information: 48” 3 BURNER BUILT-IN GRILL: Model: CRG48SS-L (2) 20,000 BTU Caliber Crossflame® grill burners and (1) 20,000 BTU sear zone infrared sear burner with Stainless Steel 48” base, for use with built-in projects using LP Gas (20lb cylinder not included) Model: CRG48SS-N (2) 20,000 BTU Caliber Crossflame®...
-
Page 2: Important Safety Notice
DANGER: AVERTISSEMENT S’IL Y A UNE ODEUR DE GAZ: If you smell gas: 1. Shut off gas to the grill. 1. Coupez l’admission de gaz de l’appariel. 2. Extinguish any open flame. 2. Éteindre toute flamme nue. 3. Open Lid. 3. - Page 3 Table of Contents Pages 2, 4-7 Care and Safety Precautions Pages 8-11 Grill Placement and Installation Pages 12-13 Pressure Testing and Hookups Page 14 LP Gas Hookup & Natural Gas Hookup Page 15 Gas Requirements Page 16 Air Shutter Adjustments Pages 17-18 Leak Testing Pages 19-20...
-
Page 4: Care And Safety Precautions
SAFETY PRACTICES TO AVOID PERSONAL INJURY! When properly cared for, your Caliber grill will give safe and reliable service for many years. However, extreme care must be used since the grill produces intense heat and can increase accident potential. When using your grill, basic safety prac-... - Page 5 » Keep all electrical cords and fuel supply hoses away from the heated areas of the grill. » Never use a dented or rusty LP tank. » The Natural Gas pressure regulator or LP Regulator hose assembly supplied with this unit must be used. » Contact Caliber Appliances for replacement parts.
- Page 6 WARNING! Spiders and insects can nest in the grill burners , causing gas not to flow through the burner. The gas will flow from the front of the burner into the control panel. This is a very dangerous condition which can cause a fire to occur behind the valve panel, thereby damaging the grill components and making it unsafe to operate.
- Page 7 » To avoid burns when cooking, use long handled BBQ tools. » Do not move the appliance during its use. » This unit is for outdoor use only! Do not operate in enclosed areas. This could result in carbon monoxide build-up which would result in injury or death.
- Page 8 GRILL PLACEMENT AND INSTALLATION Clearance to non-combustible construction*: A minimum of 12” clearance from the back of the grill(as mounted to the factory wood cart) to non-combustible con- struction is required to allow for movement around the entire perimeter of the grill. It is desirable to allow at least 18-24” rear and side clearance to non-combustible construction on all 4 sides of the grill for ease of movement around the grill.
- Page 9 GRILL PLACEMENT AND INSTALLATION - cont’d Handle/Lid Open Clearance 3” minimum to wall or backsplash Wind hitting the grill while in use, especially winds GRILL PLACEMENT blowing into or across this hood rear gap may cause poor burner performance, and in some cases may cause the control panel area to get excessively hot.
- Page 10 GRILL PLACEMENT AND INSTALLATION - cont’d 48” Rockwell by Caliber Specifications 42” Rockwell by Caliber Specifications...
- Page 11 GRILL PLACEMENT AND INSTALLATION - cont’d...
- Page 12 PRESSURE TESTING AND HOOKUPS CAUTION! Use grill only as it is built onto the included base cart. DO NOT build grill into a combustible enclosure. PRESSURE TESTING » The appliance and its individual shut off valve must be disconnected from the gas supply piping system during any pressure test- ing of that system, at test pressures in excess of 1/2 PSIG (3.5 kPa).
- Page 13 PRESSURE TESTING AND HOOKUPS - cont’d GENERAL A carpenter’s “spirit level” should be used to assure that the unit is level both front-to-back and side-to-side. If it is not level, burner combustion may be erratic or the unit may not function efficiently for grease flow into the grease tray If the floor is uneven or has a decided slope, re-leveling may be required after each moving of a this freestanding unit.
-
Page 14: Lp Gas Hookup
LP GAS HOOKUP LP GAS HOOK UP: (TYPE 1 OR QCC1 REGULATOR): Grills orifices for use with LP gas come equipped with a high capacity hose/regulator assembly for connection to a standard 20 lb. LP cylinder (Type 1). The LP tank is not included. Connection: 1/2”... - Page 15 GAS REQUIREMENTS (LP or NG Natural Gas) Verify the type of gas supply to be used, either Natural or LP, and make sure the marking on the appliance rating plate agrees with that of the supply. The rating plate is located underneath the unit bottom. Never connect an unregulated gas line to the appliance.
-
Page 16: Air Shutter Adjustments
AIR SHUTTER ADJUSTMENTS BURNER AIR SHUTTER ADJUSTMENT » Each burner air shutter is tested at the factory prior to shipment; however, variations in the local gas supply may make it necessary to adjust the air shutters. The flames of the burners should be visibly checked. »... -
Page 17: Leak Testing
LEAK TESTING Note: When an LP unit is being directly connected to an LP house system, you must follow the natural gas hook up guide- lines. The installer must provide the proper gas regulator to reduce the gas flow to 11” W.C. Note: The Grill does not come with the LP Regulator/Hose assembly installed. - Page 18 LEAK TESTING - cont’d Check all gas supply fittings for leaks before each use: 48” Grill Natural Gas: Water/Debris Cleanout Drain (See Debris Cleanout and Hookup section) Leak test points Leak test points NG safety shut off valve Leak test points See leak test points above.
- Page 19 DEBRIS CLEANOUT AND HOOKUP As an “open” grill design, the Rockwell by Caliber Built-In Grill features an angled “cleanout” area below the grill. The cleanout area is designed to trap water or debris (leaves, etc.) which may enter the open area around the pe- rimeter of the lid.
- Page 20 DEBRIS CLEANOUT AND HOOKUP - cont’d The included 1/2” hose connection hardware (hose not included) may be “hard plumbed into a drain or with an installer supplied flexible 1/2” hose to drain to a location away from the front of the built-in island. See additional views of water/debris cleanout drain.
- Page 21 “finding” or avoiding the “hot spot” that most other grills have. Caliber Crossflame Burner - The patented U-shaped grill burner with its unique crossover porting bars is the heart of the even grilling system and should be locked in place with its retaining bracket as shown below.
- Page 22 GRILL BURNER ASSEMBLY AND USE - cont’d Caliber Crossflame Radiant - The patented peaked shape of our radiant assists in evenly spreading heat as well as shedding grease and protecting the grill burner and burner ports below it. Peak Shaped Radiant...
-
Page 23: Lighting The Grill
LIGHTING THE GRILL BEFORE TURNING ON THE BURNERS » Ensure that all packaging material has been removed » Ensure that the grill has been leak tested and is properly located » Check that the radiant trays and grill racks are properly seated »... -
Page 24: Off Position
LIGHTING THE GRILL - cont’d The David Rockwell by Caliber™ Grill is equipped with 3 high quality, non-rusting, patented Crossflame Stainless Steel burners which when coupled with the patented burner radiants produce an even intense heat that will grill un- commonly even. -
Page 25: To Match Light The Grill
TO MATCH LIGHT THE GRILL If the burners do not light after several attempts, then the burners on the grill may be match lit using a long stem match and the. Sear burners on the 48” grill can also be match lit. Pass the lit match through the notch in the front of the grill rack, keeping your hand and face away from the grill area while pushing and turning the grill knob 90 degrees to the HI position. -
Page 26: Care And Maintenance
CARE AND MAINTENANCE GRILL RACKS It is recommended that the grill racks be cleaned immediately after grilling, AFTER the flame has been turned off. Be sure to wear a barbecue mitt to protect your hands from the heat and steam. Dip a wire brush in tap water and scrub the hot grill racks. -
Page 27: Warranty
Caliber to be defective. Replacement will be FOB Huntington Beach, CA, and Caliber will not be liable for any transportation costs, labor costs, or export duties. This warranty shall not apply, nor can we assume responsibility for damage that might result from a failure to follow manufacturer’s instructions or local codes, where the appliance has been tampered with or altered in any... - Page 28 Caliber Appliances. Copyright 2019 CAL I B E R AP P LI A NC ES . CO M Caliber Appliances 17812 Metzler Lane, Huntington Beach, California 92647 P/N# 30599 rev. 5/2019 (714) 848-1349...
Need help?
Do you have a question about the Rockwell CRG48SS-L and is the answer not in the manual?
Questions and answers