
Subscribe to Our Youtube Channel
Related Manuals for Stanley SXEW188501


Summary of Contents for Stanley SXEW188501
- Page 1 ELECTRIC PRESSURE WASHER 1800W 1885PSI For service, spare parts or product information, MODEL NO. SXEW188501 please contact Smart Marketing Group Pty. Ltd. AUST. 1300 660 457 N.Z. 0800 474 876...
-
Page 2: Table Of Contents
Warranty 3 – 4 General Safety Instructions 5 – 6 TECHNICAL INFORMATION Personal Safety Instructions Specifications Specific Safety Instructions Pressure washer SXEW188501 Components and Controls Maximum pressure 1885PSI Unpacking & Assembly Instructions 10 – 12 Rated pressure 1450PSI Flow rate 7.0L/min... -
Page 3: Introduction
INTRODUCTION Dear Customer, HOW TO CLAIM UNDER THIS WARRANTY • Call customer service. Thank you for purchasing this pressure washer which has passed through our extensive quality assurance processes. • Ensure you have the following: Original purchase Every care has been taken to ensure that it reaches you in receipt, Model of pressure washer, Serial number perfect condition. -
Page 4: Warranty
COMPLETE WARRANTY STATEMENT – PRESSURE WASHER As soon as you have purchased the pressure washer, we Damage caused by third party accessories is not covered under recommend that you check to make sure it is intact and that you this warranty. read the operating instructions carefully before using it. -
Page 5: General Safety Instructions
GENERAL SAFETY INSTRUCTIONS ASSEMBLY SELECT A PRESSURE WASHER WITH A SUFFICIENT RATING This pressure washer MUST be fully assembled by you prior to use. Failure to do so will result in the warranty being VOID. Select the right pressure washer for the job. Do not use a Failure to fully assemble this pressure washer may also result in pressure washer to do a job for which it was not designed. - Page 6 GENERAL SAFETY INSTRUCTIONS MAINTAIN YOUR PRESSURE WASHER WITH CARE CLEANING YOUR PRESSURE WASHER When not using your pressure washer ensure the ON/OFF Always stop your pressure washer before you commence switch is ‘OFF’. Never leave the ON/OFF switch ‘ON’ as this can cleaning.
-
Page 7: Personal Safety Instructions
PERSONAL SAFETY INSTRUCTIONS CLOTHING RESPIRATORY PROTECTION Do not wear loose clothing, jewellery or anything that could get When cleaning dirt, concrete, man-made fibres, especially MDF caught in moving machinery. (Medium Density Fibre board), the resin used in these materials can be hazardous to your health. Use an approved face mask HAIR with replaceable filter. -
Page 8: Specific Safety Instructions
SPECIFIC SAFETY INSTRUCTIONS Warning! Do not use the pressure washer in areas where • Never point gun/lance at people or animals. there is a risk of explosion or fire from combustible materials. • Never hose or wet people or animals. The sparks possibly caused when using this pressure washer •... -
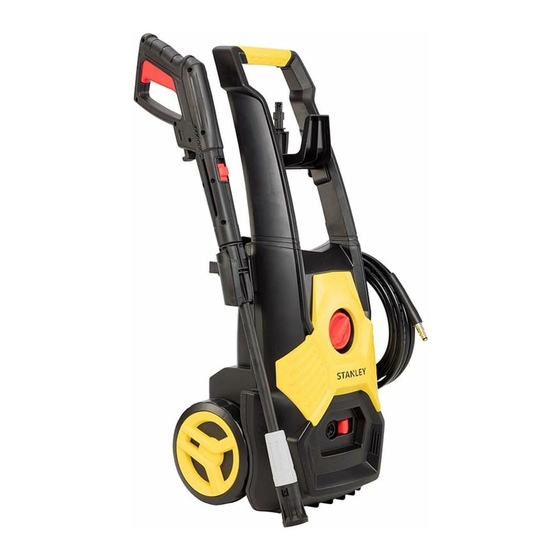
Page 9: Components And Controls
PIC. 1 1. Power cord and plug (not shown) 2. On / Off Switch 3. Hose and power cord holder 4. Gun with trigger 5. High pressure hose 6. Handle 7. Lance 8. High pressure hose connection 9. Adjustable nozzle 10. -
Page 10: Unpacking & Assembly Instructions
UNPACKING & ASSEMBLY PIC. 2 UNPACKING Note: Carefully unpack your pressure washer. Dispose of all packing material in an environmentally responsible manner. Open carton, gently lift the pressure washer clear of the carton and packaging, Remove from plastic bag. Note: Plastic bags can be a danger to young children, dispose of immediately. - Page 11 HOSE HOLDER (PIC. 4A) PIC. 4A Fit hose holder by; 1. Hold holder against the handle 2. Secure with 4 screws and tighten fully. HANDLE (PIC. 4B) Fit handle by; 1. Push handle onto pressure washer frame. 2. Secure with 2 screws and tighten fully by hand. PRESSURE HOSE TO PUMP CONNECTION (PIC.
- Page 12 UNPACKING & ASSEMBLY PIC. 6 PRESSURE HOSE TO GUN CONNECTION (PIC. 6) To connect hose; Push hose lever in towards the gun and push the hose fitting in, release the hose lever. Hose fitting should be locked in place. GARDEN CONNECTION (PIC. 7) Screw clear garden hose/filter connection to pump.
-
Page 13: Operating Instructions
OPERATING INSTRUCTIONS PIC. 8B WARNING: THIS UNIT IS INTENDED TO BE USED WITH COLD WATER ONLY! DO NOT USE HOT WATER IN THIS PRESSURE CLEANER! STARTING & STOPPING YOUR PRESSURE CLEANER Never switch your pressure cleaner ON unless the water has been turned on and connected to the pressure cleaner first. -
Page 14: Maintenance
NOZZLES MAINTENANCE INFORMATION Your pressure washer is supplied with these nozzles; It is recommended after every use or when required that following items are cleaned. ADJUSTABLE NOZZLE (PIC. 10) NOZZLE This nozzle can be adjusted while in use there is no need to stop the water flow. -
Page 15: Cleaning Tips
CLEANING TIPS RECOMMENDATIONS Always clean from top to bottom and from left to right. For stubborn dirt/stains you can use the turbo nozzle. Be careful as If painted surfaces are peeling or chipping, use extreme the turbo nozzle may damage timber or some surfaces if held caution as pressure washer may remove the loose paint too close or too long on the area. -
Page 16: Trouble Shooting
84 EW1740PCH STANLEY®, The STANLEY Logo, The Notched Rectangle and the Yellow and Black Diagonal Package Design are all trademarks of the Stanley Black & Decker, Inc or an affiliate thereof and are used under license. Product manufactured and distributed by Smart Marketing Group Pty Ltd. Manufactured in China.
Need help?
Do you have a question about the SXEW188501 and is the answer not in the manual?
Questions and answers