Table of Contents
Advertisement
Quick Links
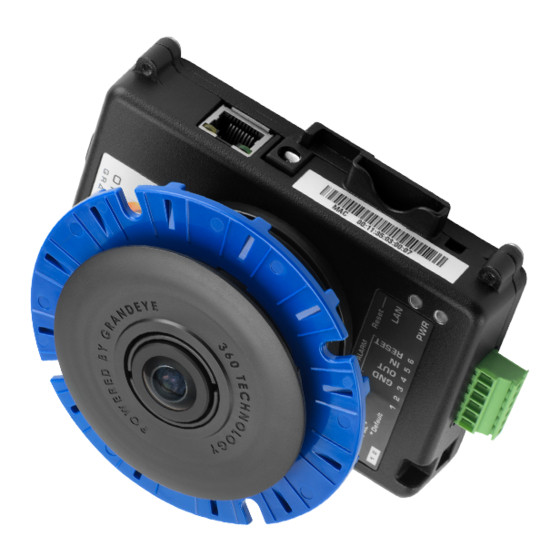
Evolution 05 Concealed Camera
QUICK START GUIDE
EVO-05-NCD
Important
•
Read these instructions carefully before installing
or operating this camera.
•
This camera should be installed by a qualified
service person and the installation should conform
to local and national regulations.
•
This camera is not suitable for installation in a
ceiling void also used as an air handling space.
•
Certified as FCC Class A. In a domestic
environment this camera may cause radio
interference in which case the user should take
adequate measures.
DANGER: RISK OF EXPLOSION IF
REPLACING A BATTERY WITH AN
INCORRECT BATTERY TYPE.
Welcome
The Oncam Evolution 05 Indoor Concealed 360° camera is
designed to be connected to an IP network. Configure and
operate the camera using a standard internet browser.
Described are the installation and configuration
procedures for a standard surface mount camera
application.
Power Input
Operating Temp.
Enclosure
Weight
Supplied Parts
• EVO-05 Camera
• Bezel
Black and White
Bezel Included
Technical Support
For the A&E, Specification, Installation and User Manual, Software
and Firmware visit:
https://www.oncamgrandeye.com/resources/product-downloads/
Tel:
Email:
MAC Address
Document the camera's installation location and unique
MAC address. Find the MAC address printed on the
camera label. This information may be needed during the
camera configuration.
12 VDC, 1.0 A (min) LPS, NEC Class 2
power supply or Power over Ethernet (PoE),
IEEE standard 802.3af
0 to +40°C (-32 to +104°F)
Polymer
0.35 kg (0.77 lbs)
• Locking Nut
• Quick Start Guide
UK +44 (0)20 7371 6640
US +1 978 735 4860
support@oncamgrandeye.com
Installation & Mounting
The Evolution Indoor Concealed camera is intended for
mounting in suspended ceilings with removable ceiling
panels with a material thickness of between 6 mm (1/4-
inch) to 25 mm (1-inch) thick. Ensure the camera has
sufficient clearance when installed.
Preparation
Remove the ceiling panel and cut a hole to
accept the 64 mm (2.52-inch) Bezel.
Installation
1.
Insert the Bezel through the hole
from the front of the cut out (Lens
side). Fit the blue Locking Nut
to the rear securing the Bezel in
place.
2.
Ensure the Locking Nut is
orientated so the smooth side is
against the surface of the ceiling
material.
NOTICE: Do not over tighten the Locking Nut.
3.
Insert the Camera Module into the Bezel from above.
Slide the Camera Module into the rear of the Bezel.
Note: Ensure the camera is correctly oriented
and the top of the image corresponds to the
orientation of the camera.
4.
Tighten the thumb screw to fix the
camera in the desired position.
5.
Pass the Ethernet cable around
the Camera Module; secure the
cable by clicking the connector
into position.
6.
Route wires to the connection points. Remove the
alarm connector from the camera (if used) to facilitate
connection and service.
7.
Fasten all wiring to a nearby ceiling member ensuring
there are no torque forces acting on the camera.
Advertisement
Table of Contents

Related Manuals for Oncam ONVIF Evolution 05


Summary of Contents for Oncam ONVIF Evolution 05
- Page 1 Welcome QUICK START GUIDE The Evolution Indoor Concealed camera is intended for The Oncam Evolution 05 Indoor Concealed 360° camera is mounting in suspended ceilings with removable ceiling designed to be connected to an IP network. Configure and panels with a material thickness of between 6 mm (1/4- operate the camera using a standard internet browser.
- Page 2 Admin username and password to access the camera. EVO-05-NXD-02 Indoor Concealed 11.2020 Rev F © Copyright 2020 ONVU Technologies AG. All rights reserved. Oncam is a trading name of ONVU Technologies AG. Specifications and configurations subject to change without notice.
Need help?
Do you have a question about the ONVIF Evolution 05 and is the answer not in the manual?
Questions and answers