Table of Contents
Advertisement
Quick Links
DCC Controlled Level Crossing Barrier / Semaphore Signal
Remove both the mounting tabs
Before
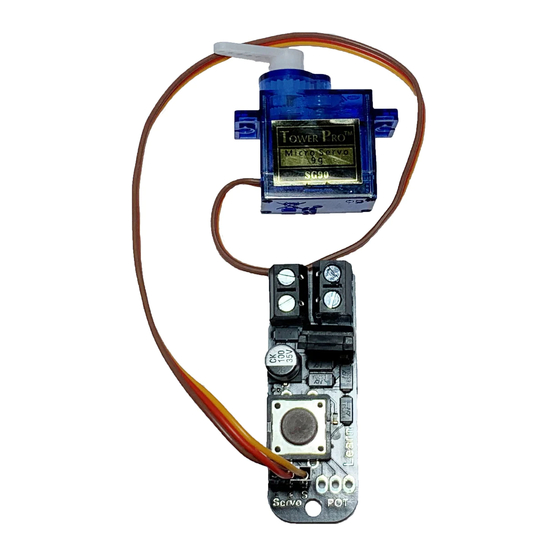
1. Plug the servo into the servo controller
2. Wire the Servo controller to the Track Output of your controller
3. Turn on the controller
4. Press the Learn button 2 times, the LED will start flashing twice
5. Select Loco 54
6. Press F0, the servo will rotate to its center position
Note: if on your controller F0 is turned on then the bounce effect is enabled,
if you don't want the bounce then turn F0 off. The bounce is mainly used on
semaphore signals to give them a realistic look.
Fit the barrier onto
the servo at about
45 degrees
Set the barrier speed
1. Press F7, the barrier will start moving up and down
2. Adjust Loco 54 speed until you are happy with the speed of the movement
3. Press F8 2 times to save these settings
Setting up the Accessory Address
1. Press the learn button once, the LED will do single flashes
2. Set you controller to the accessory number you want to control this with
3. Press the direction button that you want to use for the barrier down position
4. The LED will stop flashing and the address has been saved
After
Adjust the speed of Loco 54
until the barrier looks like this
Press F3 to
set this position
Glue the barrier to
the servo arm
Brown
or
Black
wire
Adjust the speed
of Loco 54
until the barrier
looks like this
Press F4
to set the position
To DCC
Controller
Learn
Button
To Servo
Advertisement
Table of Contents

Related Manuals for Train-Tech SV1


Summary of Contents for Train-Tech SV1
- Page 1 DCC Controlled Level Crossing Barrier / Semaphore Signal Remove both the mounting tabs Glue the barrier to the servo arm Before After To DCC Setting the Servo to its center position Controller 1. Plug the servo into the servo controller 2.
- Page 2 12V DC Controlled Level Crossing Barrier / Semaphore Signal Remove both the mounting tabs Glue the barrier to the servo arm Before After Setting the Servo to its center position 1. Fit the servo and switch to the servo controller Fit the barrier onto 2.
Need help?
Do you have a question about the SV1 and is the answer not in the manual?
Questions and answers