Table of Contents

Related Manuals for Edwards D397-01-880


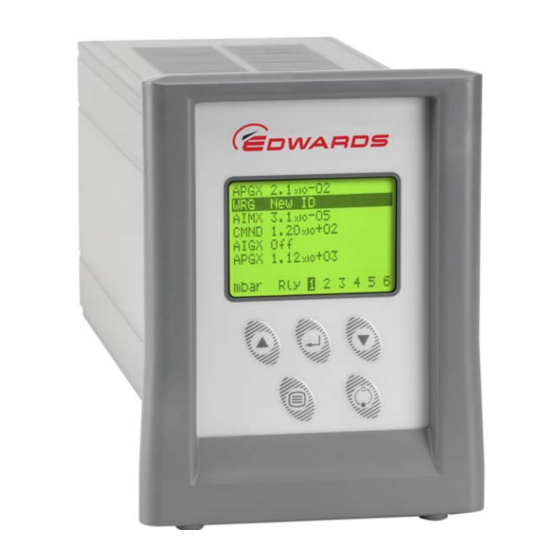
Summary of Contents for Edwards D397-01-880
- Page 1 D397-01-880 Issue E Instruction Manual TIC Instrument Controller 6-Gauge Description Item Number TIC Instrument Controller 6-Gauge D397-01-000 TIC Instrument Controller 6-Gauge Capacitance Manometer D397-02-000 Original Instructions...
- Page 2 This page has been intentionally left blank.
- Page 3 Declaration of Conformity Edwards, Innovation Drive, Burgess Hill, West Sussex, RH15 9TW, UK declare under our sole responsibility, as manufacturer and person within the EU authorised to assemble the technical file, that the product(s) TIC Instrument Controller D397-00-000 TIC Instrument Controller 6-Gauge...
- Page 4 P200-10-044 Issue A Material Declaration In accordance with the requirements of the Chinese regulatory requirement on the Management Methods for the Restriction of the Use of Hazardous Substances in Electrical and Electronic Products Order No. 32 (also known as ‘China RoHS2’) and SJ/T 11364 Marking for the Restricted Use of Hazardous Substances in Electronic and Electrical Products: Product Product Label...
-
Page 5: Table Of Contents
The main menu ......................34 4.11 Linking gauges ......................34 4.12 Parameters/Units .......................35 4.13 Screen options ......................36 4.13.1 Organising gauges on the view screen ................36 © Edwards Limited 2016. All rights reserved. Page i Edwards and the Edwards logo are trademarks of Edwards Limited. - Page 6 Setup screen IGC ......................32 Setup screen Capacitance Manometer ................34 Controlled item ......................35 Control setup ......................35 Gauge order set up .....................36 Page ii © Edwards Limited 2016. All rights reserved. Edwards and the Edwards logo are trademarks of Edwards Limited.
- Page 7 Fault finding ......................39 Factory default settings ....................40 Accessories ....................... 43 Trademark credits ® Barocel is a registered trademark of TBA © Edwards Limited 2016. All rights reserved. Page iii Edwards and the Edwards logo are trademarks of Edwards Limited.
- Page 8 D397-01-880 Issue E This page has been intentionally left blank. Page iv © Edwards Limited 2016. All rights reserved. Edwards and the Edwards logo are trademarks of Edwards Limited.
-
Page 9: Introduction
D397-01-880 Issue E Introduction Scope and definitions This manual provides Installation, Operation and Maintenance instructions for the Edwards TIC Instrument Controller 6-Gauge. The controller must be used as specified in this manual. Read this manual before installing and operating the controller. - Page 10 Up to 6 active gauges including: APG, APGX, ATC, ASG, Manometer AIM, WRG, AIGX, IGC and Capacitance Manometers 600, 622, 655 and 658 Page 2 © Edwards Limited 2016. All rights reserved. Edwards and the Edwards logo are trademarks of Edwards Limited.
-
Page 11: Technical Data
(internal pull-up to 24 V) Control input µ <2.0 V d.c. (I <160 High >3.5 V d.c. (internally pulled up to 24 V) © Edwards Limited 2016. All rights reserved. Page 3 Edwards and the Edwards logo are trademarks of Edwards Limited. -
Page 12: Logic Interface
0 to 10 V (5 mA max) 50 mV resolution Figure 2 - Pin connections for a 15-way sub-miniature 'D' type socket Page 4 © Edwards Limited 2016. All rights reserved. Edwards and the Edwards logo are trademarks of Edwards Limited. - Page 13 Gauge 2 enable input Gauge 3 enable input Do not connect Do not connect Do not connect System interlock input (SYSI) © Edwards Limited 2016. All rights reserved. Page 5 Edwards and the Edwards logo are trademarks of Edwards Limited.
-
Page 14: Serial Communications
Figure 3 - Pin connections for a 9-way sub-miniature 'D' type socket Table 4 - Serial communications connector pin-out Allocation RS232 transmit RS232 receive RS232 common RS485 data A RS485 data B Page 6 © Edwards Limited 2016. All rights reserved. Edwards and the Edwards logo are trademarks of Edwards Limited. -
Page 15: Analogue Outputs
Gauge 4 signal Gauge 2 signal Gauge 5 signal Gauge 3 signal Gauge 6 signal Common (0 V) Common (0 V) © Edwards Limited 2016. All rights reserved. Page 7 Edwards and the Edwards logo are trademarks of Edwards Limited. - Page 16 D397-01-880 Issue E This page has been intentionally left blank. Page 8 © Edwards Limited 2016. All rights reserved. Edwards and the Edwards logo are trademarks of Edwards Limited.
-
Page 17: Installation
Unpack and inspect Remove all of the packaging material and check the controller. If the controller is damaged, follow the Edwards return of equipment procedures that are laid out in the back of this manual. Do not use the controller if it is damaged. -
Page 18: Bench Mounted Tic Dimensions (Mm)
This unit is IP20 rated. Please ensure that the unit is not installed where fluids can enter into the controller. CAUTION The unit must be supported at the rear. Page 10 © Edwards Limited 2016. All rights reserved. Edwards and the Edwards logo are trademarks of Edwards Limited. -
Page 19: Front Panel Removal
7, item 1). Figure 7 - Rack mounting of a TIC 1. Fixing screw and washer 2. 19" rack guide rails © Edwards Limited 2016. All rights reserved. Page 11 Edwards and the Edwards logo are trademarks of Edwards Limited. -
Page 20: Controller Electrical Connections
2. Logic interface 3. Serial communications port 4. Earth stud 5. Mains input 6. Mains on/off 7. Gauge inputs (4-6) 8. Analogue outputs Page 12 © Edwards Limited 2016. All rights reserved. Edwards and the Edwards logo are trademarks of Edwards Limited. -
Page 21: Connecting The Electrical Supply
TIC 6-Gauge Controller D39702000 using gauge connectors 4-6. Up to six compatible active gauges can be fitted to the gauge connectors on the rear panel. Connect the gauges using Edwards active gauge cables to each of the six gauge sockets on the rear of the TIC. CAUTION Total user output should be limited to 38 W. -
Page 22: Connecting The Logic Interface
To connect a capacitance manometer gauge to a TIC, a special cable, that includes an identification resistor, is required. These are Edwards part numbers D40003030 for Model 622 and D40003050 for all other models. If the cable is not used, the gauge will be damaged. -
Page 23: Connecting The Serial Interface
4.5. Two types of relay box are available as options from Edwards with either 3 or 6 relay outputs. The relay box has built in relays that can switch external loads and provides a connector to interface to an external system. -
Page 24: Ibm Pc Rs232 Interface - 25-Way
Long links may require the addition of 120 Ω terminating resistors at each end of the link to improve communications reliability. Figure 12 - RS485 TIC network Page 16 © Edwards Limited 2016. All rights reserved. Edwards and the Edwards logo are trademarks of Edwards Limited. -
Page 25: Operation
Abort edit of a selected list item. Move to the previous digit of a numerical value. CYCLE Turn a highlighted gauge on or off. © Edwards Limited 2016. All rights reserved. Page 17 Edwards and the Edwards logo are trademarks of Edwards Limited. -
Page 26: Menu Structure
TIC. They also give an indication as to what buttons will lead where within the menu layout. Figure 14 - View screen shortcuts Page 18 © Edwards Limited 2016. All rights reserved. Edwards and the Edwards logo are trademarks of Edwards Limited. -
Page 27: Navigating The Menu
Refer to Table 10 for a description of the functions that the buttons on the front panel perform. © Edwards Limited 2016. All rights reserved. Page 19 Edwards and the Edwards logo are trademarks of Edwards Limited. -
Page 28: The View Screen
) button will not switch on low pressure gauges. Conversely, if SYSI is opened during the vacuum cycle, all connected controllable components will be switched OFF. Page 20 © Edwards Limited 2016. All rights reserved. Edwards and the Edwards logo are trademarks of Edwards Limited. -
Page 29: Changing List Items
The entry is now complete; use the ( ) button to move to the next list item, or the ‘menu’ ( ) button to return to other menus. © Edwards Limited 2016. All rights reserved. Page 21 Edwards and the Edwards logo are trademarks of Edwards Limited. -
Page 30: Gauge Setup
Figure 18 - Gauge setup screen Note: Active Strain Gauges (ASG) are gas independent. Selection of any gas type will give the same pressure output. Page 22 © Edwards Limited 2016. All rights reserved. Edwards and the Edwards logo are trademarks of Edwards Limited. -
Page 31: Gauge Status Messages
Indicates that there is either a calibration error, or the gauge is faulty. Calibrate the gauge as described in the instruction manual. If the fault persists, replace the gauge. © Edwards Limited 2016. All rights reserved. Page 23 Edwards and the Edwards logo are trademarks of Edwards Limited. -
Page 32: Active Linear Pirani Gauge (Apgx)
) button to return to the display screen. Figure 19 - Gauge setup screen APGX-M APGX has an built-in error monitoring capability. (Refer to Table 15). Page 24 © Edwards Limited 2016. All rights reserved. Edwards and the Edwards logo are trademarks of Edwards Limited. -
Page 33: Active Thermocouple Gauge (Atc-E) Control
There are no additional setup options for ATC-E. (Refer to Default setup options (all gauges) Section 4.8.1. Please refer to Table 17 for the error and diagnostic information for the ATC-E gauge. © Edwards Limited 2016. All rights reserved. Page 25 Edwards and the Edwards logo are trademarks of Edwards Limited. -
Page 34: Active Strain Gauge (Asg) Control
Figure 20 - Gauge setup screen ASG Please refer to Table 19 for the error and diagnostic information for the ASG. Page 26 © Edwards Limited 2016. All rights reserved. Edwards and the Edwards logo are trademarks of Edwards Limited. -
Page 35: Active Inverted Magnetron (Aim) Gauge Control
(D145-45-802 or D146-61-802) as described in the AIM instruction manual. © Edwards Limited 2016. All rights reserved. Page 27 Edwards and the Edwards logo are trademarks of Edwards Limited. -
Page 36: Active Ion Gauge (Aigx-S) Control
Note: There is no facility enabling degas to be manually switched off mid-cycle. Figure 21 - Gauge setup screen AIGX Page 28 © Edwards Limited 2016. All rights reserved. Edwards and the Edwards logo are trademarks of Edwards Limited. -
Page 37: Wide Range Gauge (Wrg)
The WRG will automatically perform a Pirani sensor vacuum setting every time it is pumped down below 1 x 10 mbar (7.5 x 10 Torr). © Edwards Limited 2016. All rights reserved. Page 29 Edwards and the Edwards logo are trademarks of Edwards Limited. -
Page 38: Gauge Setup Screen Wrg
Under Range (Gauge output <0.950 V) Indicates that there is a fault with the gauge and the electronics module should be replaced. Page 30 © Edwards Limited 2016. All rights reserved. Edwards and the Edwards logo are trademarks of Edwards Limited. -
Page 39: Ion Gauge Controller (Igc) - Gauge Type Displayed As 'Ioneb
10 mA 10 MA ‘Scroll’ to ‘Emission’ and press ‘Select’. ‘Scroll’ to change option and press ‘Select’ for change to occur. © Edwards Limited 2016. All rights reserved. Page 31 Edwards and the Edwards logo are trademarks of Edwards Limited. -
Page 40: Setup Screen Igc
22 second period an error message will be generated. N.B. Also see section on restrike. Page 32 © Edwards Limited 2016. All rights reserved. Edwards and the Edwards logo are trademarks of Edwards Limited. -
Page 41: Capacitance Manometer Gauges (D39702000 Only)
Capacitance Manometer gauges are gas independent and are available in a very wide choice of ranges. They are unique in the Edwards range of vacuum gauges in requiring a ± 15 V power supply rather than a +24 V power supply. -
Page 42: Alarms
1. Select the controlled item. Scroll to the item that is to be controlled and press the 'Select' ( ) button as shown Figure Page 34 © Edwards Limited 2016. All rights reserved. Edwards and the Edwards logo are trademarks of Edwards Limited. -
Page 43: Parameters/Units
Lock - 509, unlock - 824. The 0 - 10 V analogue output on the logic interface can be set to follow any gauge pressure. © Edwards Limited 2016. All rights reserved. Page 35 Edwards and the Edwards logo are trademarks of Edwards Limited. -
Page 44: Screen Options
5 and 6 will not be shown when returning to the main view screen. Page 36 © Edwards Limited 2016. All rights reserved. Edwards and the Edwards logo are trademarks of Edwards Limited. -
Page 45: Relay Setpoint Outputs
downloaded to the TIC in the future. Serial Number - The Serial number of the TIC is used when contacting Edwards about the product. Analogue O/P - The analogue output value (internal units) is used when contacting Edwards about the ... - Page 46 D397-01-880 Issue E This page has been intentionally left blank. Page 38 © Edwards Limited 2016. All rights reserved. Edwards and the Edwards logo are trademarks of Edwards Limited.
-
Page 47: Maintenance
There are no serviceable parts on the TIC. Do not open. Return to the nearest Edwards Service Centre for repairs. The Edwards return of equipment forms can be found at the rear of this manual. -
Page 48: Cleaning The Controller
Edwards Service Centre. Software updates The software within the controller and the TIC PC monitor program will be updated as part of Edwards on-going development program. The updates and associated instruction manual can be found by visiting www.upgrades.edwardsvacuum.com. -
Page 49: Storage And Disposal
The controller and associated cables are within the scope of the European Directive on Waste Electrical and Electronic Equipment, 2002/96/EC. Edwards offer European customers a recycling service for the controller/cables at the end of the product’s life. Contact Edwards for advice on how to return the controller/cables for recycling. © Edwards Limited 2016. All rights reserved. - Page 50 D397-01-880 Issue E This page has been intentionally left blank. Page 42 © Edwards Limited 2016. All rights reserved. Edwards and the Edwards logo are trademarks of Edwards Limited.
-
Page 51: Service, Spares And Accessories
When maintaining this product, Edwards recommends using only Edwards maintenance and service kits. Order spare parts and accessories from the nearest Edwards company or distributor. When ordering, please state for each part required: Model and Item Number of the equipment ... - Page 52 2 m USA plug D400-13-120 2 m Northern European plug D400-13-120 Other accessories and supporting products TIC updates, software and manuals www.upgrades.edwardsvacuum.com Page 44 © Edwards Limited 2016. All rights reserved. Edwards and the Edwards logo are trademarks of Edwards Limited.
- Page 53 This page has been intentionally left blank.
- Page 54 This page has been intentionally left blank.
- Page 55 Download the latest documents from www.edwardsvacuum.com/HSForms/, follow the procedure in HS1, fill in the electronic HS2 form, print it, sign it, and return the signed copy to Edwards. Note: If we do not receive a completed HS2 form, we will not accept the return of the...
- Page 56 edwardsvacuum.com...
Need help?
Do you have a question about the D397-01-880 and is the answer not in the manual?
Questions and answers