Table of Contents
Advertisement
Quick Links
Advertisement
Table of Contents

Related Manuals for CNA Group GCLED60SS


Summary of Contents for CNA Group GCLED60SS
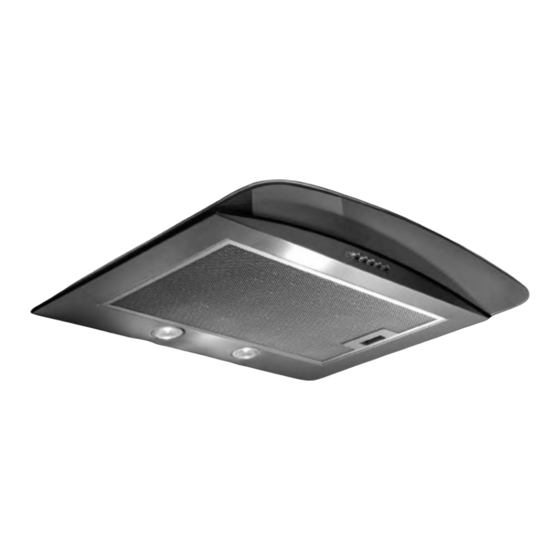
- Page 1 GCLED60/ 70/ 90 SS/ BK GCLED60W Curved Glass LED Hood...
- Page 2 [01] x 1 [02] x 1 [03] x 1 [04] x 2 [05] x 1 [06] x 1...
- Page 3 [08] x 4 [09] x 4 [10] x 1 [11] x 6 1 : 1 [12] x 4 [13] x 6 (3.9 x 32mm) [14] x 4 (3.4 x 10mm)
- Page 4 GCLED60/ 70/ 90 SS /BK GCLED60W Curved Glass Cooker Hood Installation...
-
Page 5: Table Of Contents
Let's get started... started... Getting Before you start Safety more detail... Product functions Operation Care and maintenance Troubleshooting Recycling and disposal Technical and legal information Guarantee CE Declaration of conformity Appendix Installation... -
Page 6: Getting Started
Getting Started... Before you start Safety... -
Page 7: Before You Start
Before you start Before you start To avoid the risks that are always present when you use an electrical appliance it is important that this appliance is installed correctly and that you read the safety instructions carefully to avoid misuse and hazards. Please keep this instruction booklet for future reference and pass it on to any future owners. - Page 8 Before you start Tools required Ø6mm Accessories not supplied Recirculation Extraction CARBFILT4 (UK & IE) Ø125mm or Ø150mm OR CARBFILT4CL (FR) VENT PACK 2 (UK & IE) SELF ADHESIVE ALUMINIUM TAPE CARBON FILTER ORDERING HOTLINE 0844 800 1128 (UK) 01 4475261 (IE)
- Page 9 Safety These instructions are for your safety. Please read through them thoroughly prior to installation and retain them for future reference. • All installation work must be carried out by a competent person or qualified electrician. • This appliance must be installed correctly by a suitably qualified person, strictly following the manufacturer’s instructions.
- Page 10 Safety We also recommend that great care be taken during use and cleaning. Read the cleaning and maintenance sections for this appliance carefully. A steam cleaner is not to be used. The appliance is not intended to be operated by means of external timer or separated remote-control system.
-
Page 11: In More Detail
more detail... Product functions Operation Care and maintenance Troubleshooting Recycling and disposal Technical and legal information Guarantee CE Declaration of conformity... -
Page 12: Product Functions
Product Functions Product functions This appliance extracts the air of the kitchen to remove the odours and keep an optimum level of the air quality inside the room, it also allows you to illuminate the cooking area. Operation Operation • Switch on the appliance at the switched fused connection unit. The appliance is ready for operation functions. -
Page 13: Care And Maintenance
Care and maintenance Care and maintenance Warning: always switch off the electricity supply before carrying out maintenance work on the hood. In the event of a fault, contact customer services. Bulb replacement fUSE 10’ The Bulb may be hot, leave it 10 minutes before removing it. - Page 14 Care and maintenance Active charcoal filter replacement: CLICK 2 X ACTIVE CHARCOAL FILTER (NOT SUPPLIED). MODEL NUMBER CARBFILT4 (UK & IE).
- Page 15 Care and maintenance Warning Always switch off the electricity supply before performing maintenance work. In the event of a fault, fUSE contact customer services. Metal filter replacement: Exterior cleaning: use non-corrosive, liquid detergent and avoid the use of abrasive cleaning products. 1 MONTH MAX.
-
Page 16: Troubleshooting
Troubleshooting Troubleshooting Fault Cause Solution Excessive The Appliance is not hung Take down the appliance Vibration properly on the brackets. and check it is properly fixed. The fan blade is damaged. Switch off the appliance. Repair to be carried out by The fan motor is not fixed qualified service personnel tightly. -
Page 17: Recycling And Disposal
Recycling and disposal Recycling and disposal Environmental protection Waste electrical products should not be disposed of with household waste. Please recycle where facilities exist. Check with your Local Authority or retailer for recycling advice. The symbol on the product or its packaging indicates that this product cannot be treated as normal household waste. - Page 18 Technical and legal information All installation work must be carried out by a competent person or qualified electrician. Before connecting the mains supply ensure that the mains voltage corresponds to the voltage on the rating plate inside the cooker hood. Warning: THIS APPLIANCE MUST NOT BE EARTHED.
- Page 19 Technical and legal information Electrical Requirements Any permanent electrical installation must comply with the latest I.E.E. Regulations and local electricity company regulations. For your own safety a qualified electrician or contractor who is on the roll of the National Inspection Council for Electrical Installation Contracting (NICEIC) should undertake the electrical installation.
-
Page 20: Guarantee
Guarantee Manufacturer's Guarantee This appliance is covered by a full manufacturer’s 24 month parts and labour guarantee and covers all parts and labour costs associated with the repair of the appliance in a domestic environment. We will repair any defect that arises due to faulty materials or workmanship and use genuine manufacturers parts. - Page 21 Guarantee Exclusions to the guarantee (continued) Claims arising from non-domestic use or commercial environment. If no fault is found then GAA reserves the right to charge for the call out at the going rate of £55.00 plus VAT. In the course of the service work carried out it may be necessary to ppliance is glued, grouted or tiled in such a manner that it cannot be removed, it is the responsibility of the customer/installer to remove and reinstall the appliance...
-
Page 22: Ce Declaration Of Conformity
We hereby certify that the mentioned accessory compliesw ith the essentialr equirementso ft he European Directives applicable, includingt heir modifications and the corresponding transpositions from the national law. MACHINE APPLICATION: GCLED60SS /GCLED70SS / GCLED90SS GCLED60BK / GCLED70BK / GCLED90BK / GCLED60W Decorative Cooker Hood TYPE:... -
Page 23: Appendix
Appendix... Installation... - Page 24 Installation CARBFILT4 (UK & IE) or CARBFILT4CL (FR) VENT PACK 2 (UK + IE) You can choose two type of installation: - Ducted option - Recirculation option...
- Page 25 MAX 935 DIM.B DIM.B MIN.750mm MIN 650mm Electric Mark on the kitchen wall the holes to fix the cooker hood. The Wall Plugs supplied are suitable for solid walls only. When fixing to any other type of wall use suitable alternative fixings.
- Page 26 [13] [11] [11] x 6 [13] x 2 Drill the holes, insert the wall plugs in all 6 holes. Insert the screws in the middle 2 holes in fig.03. Maximum gap between top 2 holes and middle 2 holes can be no more than 935mm, dependant on ceiling height [03] [03] [13] x 2...
- Page 27 Place glass onto the cooker hood frame and connect the two plastic male & female plugs for the LED perimeter lighting. Adjust the glass to suit so the four holes in the glass align with the hood chassis. [08] x 4 [09] x 4 [12] x 4 [10]...
- Page 28 [13] x 2 Position the hood over the top two screw, remove aluminium filter, then fix the bottom screws from inside the hood. Replace the aluminium Filter...
- Page 29 [06] [14] x 1 [14] [06] Fix the Collar and the reducer if required.. Vent Pack 2 (UK + IE) Fix the Ducting Tube 125 or 150 using tape or clamp.
- Page 30 [02] x 1 [02] [14] [14] x 2...
- Page 31 Remove the Protector film For recirculating option refer to Care and maintenance section. Note: For electrical connection see Technical and legal information section.
- Page 32 CNA Trading U.K. Ltd Hillbrow House Hillbrow Road Esher Surrey KT10 9NW...
Need help?
Do you have a question about the GCLED60SS and is the answer not in the manual?
Questions and answers