Table of Contents
Advertisement
Available languages
Available languages
Failure to follow instructions may cause damage or explosion, always shield
eyes. Read entire instruction manual before use.
WARNING: This product can expose you to chemicals, including Vinyl-Chloride, Styrene
and Acrylonitrile, which are known to the State of California to cause cancer. For more
information go to www.P65Warnings.ca.gov.
BATTERY TESTERS
BATTERY TESTERS
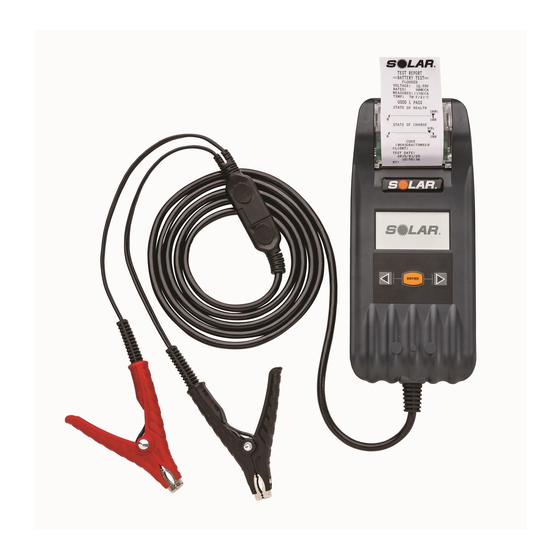
SOLAR Battery and System Tester
with Integrated Printer
Model No. BA327
User Manual
WARNING
Advertisement
Table of Contents

Related Manuals for Solar BA327


Summary of Contents for Solar BA327
- Page 1 BATTERY TESTERS BATTERY TESTERS SOLAR Battery and System Tester with Integrated Printer Model No. BA327 User Manual WARNING Failure to follow instructions may cause damage or explosion, always shield eyes. Read entire instruction manual before use. WARNING: This product can expose you to chemicals, including Vinyl-Chloride, Styrene and Acrylonitrile, which are known to the State of California to cause cancer.
- Page 2 WARNING Read these instructions completely before using the tester and save them for future reference. Before using the tester near a car, truck or boat, read these instructions and the instruction manual/safety information provided by the car, truck, boat or equipment manufacturer. Following all manufacturers’ instructions and safety procedures will reduce the risk of accident.
-
Page 3: Personal Precautions
About Your SOLAR Battery and System Tester with Integrated Printer (Model No. BA327) Battery Tester Model BA327 is designed to test 6 and 12 Volt batteries and 12 and 24 Volt charging systems. It offers quick and accurate assessment of battery condition and starting and charging system performance. - Page 4 (with starting rating) batteries. The tester can test these types of batteries against several battery capacity rating systems. Below is a chart of the operating range of the tester based on the applicable capacity rating systems: Rating System Testing Capacity 40-2000 CCA 25-1300 CCA 30-1500 CCA...
-
Page 5: Loading Printer Paper
Testing, steps 1-3) with internal batteries installed to configure the tester. Upon proper battery connection (with internal batteries installed), the tester display will splash the SOLAR logo for two seconds and then proceed to the Home Screen. The Home Screen shows the battery status by providing the Open Circuit Voltage of the connected battery. -
Page 6: Battery Testing
Using the arrow keys, scroll down to CONFIGURATION and press “ENTER” to go to the CONFIGURATION Screen. To set the date and time, scroll to SET DATE and press “ENTER”. The tester will display the date and time currently set for the tester. The indicator arrow should be on the date line. - Page 7 3. Connect tester leads to the battery, clamping the red clamp to the vehicle positive battery terminal first. Then, clamp the black clamp to the vehicle negative battery terminal second. Note: Whenever possible, connect directly to the terminals/posts of the battery. 4.
- Page 8 GOOD & PASS The tested battery is good and capable of holding a charge. GOOD & RECHARGE The tested battery is good but needs to be charged. RECHARGE & RETEST The tested battery is discharged. The battery condition cannot be determined until it is fully charged. Recharge and retest the battery. BAD &...
- Page 9 • Charging System Test without Loads • Charging System Test under Loads – Ripple Detect • Charging System Test under Loads Please follow the instructions below to run through the above testing steps. 1. Make sure the battery terminals are clean. See Preparing Battery to be Tested. 2.
- Page 10 the battery. Check belts and connection from alternator to battery. HIGH – Charging Voltage is High – Voltage output from alternator to battery exceeds the normal limit. Check alternator connections, including ground connection. Also, check manufacturer specifications, as output requirement may vary by vehicle type and manufacturer (confirm range is, in fact, too high for vehicle).
-
Page 11: Counter Function
14. Press “ENTER” to go to the Print Option Screen. The tester will ask if you would like to PRINT RESULT? Scroll to your preferred choice and press “ENTER”. If you chose YES, the printer will print results. If you chose NO, the tester will once again return you to the Home Screen and once again display the battery’s open circuit voltage. -
Page 12: Maintenance And Care
Maintenance and Care A basic amount of care and maintenance will allow your tester to provide years of valuable service. • After each use, ensure that there is no corrosion on clamps. If there is corrosion on clamps, use a damp cloth to wipe corrosion off of the clamps. •... - Page 13 Instructions for obtaining service under this warranty: To obtain service under this warranty, return your SOLAR Battery Tester to the place of purchase, along with your dated sales receipt, for an exchange. Your product can also be sent back to Clore Automotive for exchange –...
-
Page 16: Precauciones Personales
Precauciones personales Al trabajar cerca de baterías de plomo-ácido, siempre debe haber alguien cerca, para que pueda oírlo y ayudarlo de ser necesario. Tenga a mano abundante agua fresca y jabón, por si el ácido de la batería entra en contacto con la piel, los ojos o la ropa. - Page 17 Acerca del probador para baterías y sistemas SOLAR con impresora integrada (Modelo BA327) El modelo BA327 para probar baterías está diseñado para utilizarse únicamente con baterías de 6 y 12 voltios y con sistemas de carga de 12 y 24 voltios. Este equipo permite hacer una evaluación del estado de las baterías y el rendimiento del...
- Page 18 3. Inspeccione la batería para detectar si la carcasa o la cubierta están agrietadas o rotas. Si la batería está dañada, no utilice el probador. 4. Si no se trata de una batería sellada de las que no requiere mantenimiento, agregue agua destilada en cada celda hasta que el ácido de la batería llegue al nivel especificado por el fabricante.
- Page 19 Tras realizar una conexión correcta de la batería (con baterías internas instaladas), la pantalla del probador mostrará el logo de SOLAR durante dos segundas y luego avanzará hacia la pantalla Principal. La pantalla Principal muestra el estado de la batería mediante un circuito de voltaje abierto de la batería conectada.
- Page 20 presione “ENTER”. Para ajustar el brillo de la pantalla, avance hasta la opción Brightness (Brillo) y luego presione “ENTER”. Con las flechas, ajuste la pantalla al nivel de brillo que desee y luego oprima “ENTER”. Para saber más acerca del funcionamiento del CONTADOR, consulte la sección Función contador de este manual.
- Page 21 5. Presione las flechas para seleccionar el tipo de batería a probar: SLI, AGM Flat Plate, AGM/Spiral, VRLA/GEL o START/STOP. SLI se refiere a baterías inundadas de arranque/iluminación/encendido estándar; AGM/Flat Plate se refiere específicamente a baterías con forma tradicional de batería AGM; AGM/Spiral se refiere específicamente a baterías diseñadas en fibra de vidrio absorbente o con estructura en espiral;...
- Page 22 10. Una vez que haya terminado la prueba, la pantalla mostrará el voltaje determinado de la batería, así como también la capacidad determinada. GOOD & PASS: La batería está en buen estado y puede conservar la carga. GOOD & RECHARGE: La batería está en buen estado pero es necesario cargarla.
- Page 23 13. Tras finalizar la prueba, quite los conductores del probador de los bornes de la batería; siempre quite la pinza negativa primero y la positiva después. Prueba de sistemas: arranque y carga de pruebas de sistemas Durante esta parte del proceso de prueba, el probador realizará las siguientes pruebas en orden: •...
- Page 24 CRANKING VOLTS LOW (VOLTAJE DE ENCENDIDO BAJO) – El sistema de arranque tiene poca fuerza. Revise el arrancador y siga las instrucciones recomendadas por el fabricante. CRANKING VOLTS NOT DETECTED (NO SE DETECTÓ EL VOLTAJE DE ENCENDIDO) – Revise inmediatamente las conexiones, los cables y el encendido.
- Page 25 12. Presione ENTER. El probador mostrará la fluctuación que detecte del sistema de recarga a la batería y ofrecerá una evaluación de esa lectura. FUNCIONAMIENTO NORMAL (SIN FLUCTUACIÓN) – El sistema de recarga está en buen estado ALTO – Se detectó un exceso de fluctuación – Uno o más de los diodos del alternador no está...
- Page 26 Función de contador El probador está equipado con una función de contador que le permite llevar un control del número de pruebas realizadas a lo largo de un periodo determinado de tiempo. Puede tener acceso al contador a través de la pantalla de configuración. Desde la pantalla principal, desplácese hacia la opción CONFIGURATION (Configuración) y presione “ENTER”...
-
Page 27: Mantenimiento Y Cuidados
Mantenimiento y cuidados Un mínimo de cuidados puede mantener el rendimiento y la apariencia de su probador durante años. • Después de cada uso, asegúrese de que no exista corrosión en las pinzas. Si las pinzas muestras señales de oxidación, use un paño húmedo para limpiarlas. •... - Page 28 Esta garantía se aplica al producto solamente y no a los accesorios incluídos con el producto y sujetos a desgaste; el reemplazo o la reparación de dichos accesorios corre por cuenta del comprador. LOS TERMINOS Y CONDICIONES DE ESTA GARANTIA LIMITADA DE CLORE AUTOMOTIVE CONSTITUYEN EL REMEDIO UNICO Y EXCLUSIVO DEL COMPRADOR.
- Page 29 AVERTISSEMENT Lisez entièrement ces instructions avant d'utiliser le testeur. Gardez-les à titre de référence. Avant d'utiliser le produit pour testeur une auto, un camion, un bateau ou pour alimenter un équipement, lisez ces instructions ainsi que le manuel d'instruction ou les informations de sécurité fournis par le fabricant de l'auto, du camion, du bateau ou de l'équipement.
- Page 30 Precautions personnelles Assurez-vous qu’un tiers soit à portée de voix ou à proximité pour vous prêter assistance quand vous travaillez près d’une batterie au plomb-acide. Ayez une réserve d’eau douce et de savon à portée de main au cas où l’acide de la batterie entrerait en contact avec votre peau, vos vêtements ou vos yeux.
- Page 31 SOLAR avec imprimante intégrée (modèle BA327) L’appareil de vérification de batterie BA327 est conçu pour vérifier des batteries de 6 et de 12 volts, ainsi que des systèmes de charge de 12 et de 24 volts. Il évalue rapidement et avec exactitude l’état de la batterie et la performance des...
-
Page 32: Installation Des Batteries
besoin. Veillez à ce qu’aucune particule de corrosion ne se loge dans vos yeux. 3. Vérifiez l’état du boîtier et du couvercle de la batterie. Ne vous servez pas de l’appareil de vérification si la batterie est endommagée. 4. Si la batterie n’est pas une batterie étanche sans entretien, ajoutez de l’eau distillée dans chaque élément jusqu’à... - Page 33 étapes 1 à 3) et muni de piles pour configurer l’appareil de vérification. Lorsque l’appareil est raccordé correctement à la batterie et muni de piles, le logo SOLAR apparaît pendant deux secondes sur l’afficheur avant de passer à l’écran d’accueil. L’écran d’accueil affiche l’état de la batterie en indiquant la tension en circuit ouvert de la batterie raccordée.
- Page 34 (entrée) pour accéder à l’écran de configuration. Pour régler la luminosité de l’afficheur, sélectionnez BRIGHTNESS (luminosité), puis appuyez sur ENTER (entrée). En utilisant les flèches, sélectionnez le niveau de luminosité souhaité, puis appuyez sur ENTER (entrée). Vous revenez à l’écran de fonction. Pour en savoir davantage sur le fonctionnement du COMPTEUR, consultez la section Fonction de compteur de ce manuel.
- Page 35 4. 4. Lorsque l’appareil est raccordé correctement à la batterie, l’écran d’accueil apparaît sur l’afficheur. Sélectionnez BATTERY TEST (vérification de la batterie) en faisant défiler le menu au besoin jusqu’à ce que la flèche soit vis- à-vis BATTERY TEST, puis appuyez sur le bouton ENTER (entrée) au centre. 5.
- Page 36 (à recharger et à vérifier de nouveau). Si vous sélectionnez YES (oui), passez à l’étape 9 ci-dessous. 10. Lorsque la vérification est terminée, l’afficheur indique la tension et la capacité de la batterie. GOOD & PASS (fonctionnelle et garde sa charge) – La batterie vérifiée est fonctionnelle et capable de garder sa charge.
- Page 37 Sélectionnez l’option voulue, puis appuyez sur ENTER (entrée). Lorsque vous sélectionnez YES (oui), les résultats sont imprimés. Lorsque vous sélectionnez NO (non), vous revenez à l’écran d’accueil et l’afficheur indique de nouveau la tension en circuit ouvert de la batterie. 13.
- Page 38 signification de l’évaluation s’établit comme suit : CRANKING VOLTS NORMAL (VOLTAGE DE DÉMARRAGE NORMAL) : Le système de démarrage fonctionne normalement. CRANKING VOLTS LOW (VOLTAGE DE DÉMARRAGE BAS) : Le système de démarrage est faible. Effectuez la révision du démarreur en suivant les instructions recommandées par le fabricant.
- Page 39 Note : Ne mettez pas de charges cycliques sous tension (comme le climatiseur ou les essuie-glaces). 11. Étape facultative déterminée par l’appareil de vérification : Lors de la vérification de modèles moins récents de véhicules à moteur diesel, l’appareil de vérification vous demandera de faire tourner le moteur à...
- Page 40 15. Coupez le moteur et retirez les fils d’essai des bornes de la batterie au terme de la vérification en retirant toujours d’abord la pince négative, puis la pince positive. La fonction de compteur Le testeur est équipé d’une fonction de compteur vous permettant de connaître le nombre total de tests qui ont été...
-
Page 41: Entretien
Entretien Un minimum d’entretien prolongera la durée de vie de votre appareil de vérification. • Après chaque utilisation, assurez-vous que les pinces ne présentent pas de corrosion. Si c’est le cas, utilisez un chiffon humide pour essuyer la corrosion présente sur les pinces. •... - Page 42 La présente garantie s’applique à toute personne ayant fait l’acquisition du produit dans les un an suivant la date d’achat au détail initial, mais elle est nulle et non avenue si le produit a été traité de façon abusive, modifié, mal utilisé ou mal emballé...
-
Page 44: Battery Testers
BATTERY TESTERS BATTERY TESTERS SOLAR Battery and System Tester with Integrated Printer Model No. BA327 User Manual © 2018 Clore Automotive 841-030-327 A...
Need help?
Do you have a question about the BA327 and is the answer not in the manual?
Questions and answers