
Related Manuals for e-ImageData Microfilm ScanPro 1000


Summary of Contents for e-ImageData Microfilm ScanPro 1000
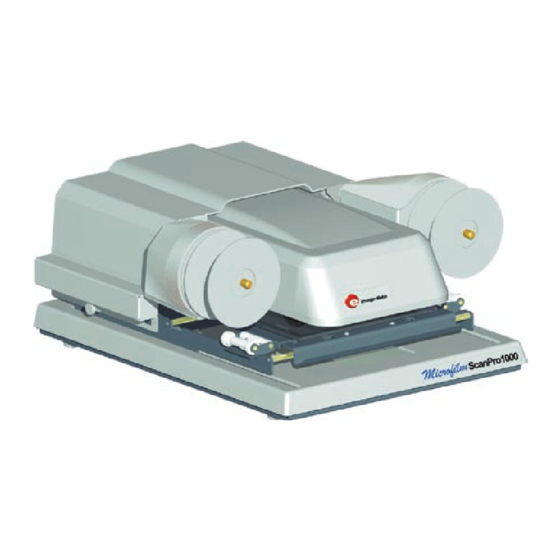
- Page 1 Desktop Compact Film Scanner Operator’s Guide ScanPro 1000 shown with optional combination fiche, aperture card, motorized 16/35mm roll film carrier Microfi lm ScanPro 1000 2/2007...
-
Page 2: Table Of Contents
Contents LIMITED WARRANTY UNBOXING INSTRUCTIONS PRECAUTIONS AND SUGGESTIONS Keep the MICROFILM SCANNER well ventilated. COMPUTER FIREWIRE PORT COMPUTER TO ScanPro1000 CABLE CONNECTING TO A LAPTOP EQUIPMENT OVERVIEW PC SYSTEM REQUIREMENTS CONNECTING THE SCANNER TO THE COMPUTER INSTALLING THE PowerScan SOFTWARE and DRIVER PowerScan SETUP MENU Window PASSWORD is 1234 SETUP... -
Page 3: Limited Warranty
LIMITED WARRANTY LIMITED WARRANTY. The manufacturer warrants to the original purchaser that this product is free from defects in material and workmanship, under normal use, providing that service and maintenance is in accordance with the manufacturer’s instructions. The period of warranty time shall be as follows: - Microfilm ScanPro 1000: One year from the date of shipment from the manufacturer’s factory or warehouse. -
Page 4: Unboxing Instructions
UNBOXING INSTRUCTIONS UNBOXING THE SCANPRO 1000 FROM THE SHIPPING CARTON. A. Slit tape and open outer box flaps, Fig 1. B. Remove ACCESSORIES BOX and REMOVE ALL ITEMS that are inside, Fig1. C. Slit tape and open inner box flaps, Fig 2 INSERTS D. -
Page 5: Precautions And Suggestions
PRECAUTIONS AND SUGGESTIONS Keep the MICROFILM SCANNER well ventilated. Do not block fan ventilation holes at the bottom of the unit. Avoid installation in dusty places. NOTE: PLACE ON FLAT, EVEN, HARD STURDY SURFACE (NOT CARPETED). COMPUTER FIREWIRE PORT We have included a FireWire card with your purchase, we highly recommend that you use this card. -
Page 6: Equipment Overview
EQUIPMENT OVERVIEW COMPACT DESKTOP, MICROFILM SCANNER The ScanPro 1000 microfilm scanner (optional micro opaque capability) uses the latest digital technologies to bring you an exceptional compact viewer/scanner/printer that is sturdy and built for public use applications. This scanner provides many unique options and features that make it easy and efficient to work with all types of microfilm OPTICAL ZOOM LENS Your ScanPro 1000 is equipped with a 7X to 54X ZOOM LENS system. -
Page 7: Pc System Requirements
PC SYSTEM REQUIREMENTS Scanners are capable of inputting large amounts of data in relatively short periods of time. This can push your computer system to the limits of its capabilities. This means that you will need to evaluate the systems capabilities based on your intended scanning requirements. Your evaluation of system capability will need to consider processing speed, computer memory (RAM), and hard disk storage. -
Page 8: Connecting The Scanner To The Computer
FireWire Cable Connection Power Jack Scanner to Computer Local AC Power Switch ON/OFF INSTALLING THE PowerScan SOFTWARE and DRIVER You can download the latest PowerScan software and the ScanPro1000 SOFTWARE and DRIV- ER installation instruction sheet from this web page: http://e-imagedata.com/DRIVERS... -
Page 9: Powerscan Setup Menu
PowerScan SETUP MENU SETUP Window PASSWORD is 1234 The password protected SETUP Window provides control over the following features: 1. Specify which control BUTTONS are available on the PowerScan TOOLBAR. 2. Specify the ORDER of the BUTTONS on the PowerScan TOOLBAR. 3. -
Page 10: Scan To Drive #1 Or Drive #2
SCAN to Drive #1 or Drive #2: When a scan is made it will be saved to the specified location. The path in the window next to Drive #1 and Drive #2 specifies the “save to” location for scans. When you install the PowerScan software, a default folder is placed on your DESKTOP and is labeled My Scans. -
Page 11: Print Offset
Print Offset: Specifies the position a of scan on a printed page (for example printing on a preprinted form). -
Page 12: Graphic Button Controls
CLICK to select the FILM TYPE to match the film you will be scanning. The film types are POSITIVE or NEGATIVE. If you are not sure which film type you have, review the information in the FAQ section at http://e-imagedata.com: FILM TYPE-micro opaque option If you have the micro opaque option, you will have the BUTTON icon shown on the left. -
Page 13: Brightness
BRIGHTNESS When the Auto Brightness is CLICKED When the Auto Brightness is CLICKED When the Auto Brightness is CLICKED , the scanner determines the setting. You can use the buttons to manually adjust brightness. When Auto Bright- ness is active, the brightness value in the BUTTON WINDOW is “Gray”. CONTRAST You can use the BUTTONS to adjust the image contrast. -
Page 14: Resolution
MAGNIFIER MAXIMIZE WINDOW VIEW WINDOW TITLE BAR MAGNIFIER WINDOW A decision should clarify the justices’ ruling upholding BOUNDING BOX testing for athletes. The appeals court majority said that Tecumseh had not demonstrat -ed that there was “an actual drug abuse problem among those subject to the policy”... -
Page 15: Live
LIVE When you move your film, the scanner detects this movement and provides a LIVE video image of your film. If you are using very low contrast film, or film that has large blank areas, the scanner may have difficulty detecting film movement. In this case, CLICK the LIVE BUTTON and leave the mouse pointer on the BUT- Capture TON to maintain a LIVE video image during film movement. -
Page 16: Print
PRINT CLICK to print the area in the CAPTURE WINDOW. The PRINT DIALOG WINDOW will open allowing you to select LASER PRINTER and set printer preferences. MOTORIZED ROLL FILM CON- TROL CLICK and drag the button for low speed film movement. CLICK and hold buttons for fast speed film movement (speed doubles when the film carrier is pulled all the way forward). -
Page 17: Save Settings
SAVE SETTINGS You can give all the settings for an application (zoom, brightness, button selections, etc) a file name. Then, when you return to the same application, CLICK the OPEN SETTINGS folder and a single CLICK of that file name will restore all of the saved settings. -
Page 18: Restore Settings
RESTORE SETTINGS Restores settings that had been previously saved in the SAVE SET- TINGS procedure. Procedure to Restore Settings. Procedure to Restore Settings. 1] Click the “Restore Settings” BUTTON. The “Open” dialog window will open. 2] Click on the name of the desired settings in the file list. This will be the name that you gave the file in the Save Settings procedure. -
Page 19: Specifications
DIMENSIONS (H x W x L): 7.5” x 12” x 16” (190mm x 305mm x 406mm) WEIGHT: 19.5lbs. (9kg) POWER: 100-240VAC 50/60Hz e-ImageData Corp. • 340 Grant Street • Hartford, WI 53027 • (262) 673-3476 • FAX (262) 673-3496 http:\\www.e-imagedata.com...
Need help?
Do you have a question about the Microfilm ScanPro 1000 and is the answer not in the manual?
Questions and answers