Advertisement
DaLLaS KEY rEaDEr
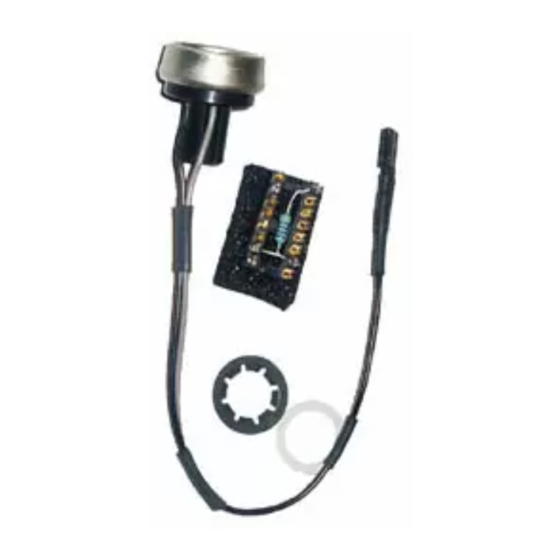
part no 53419
tECHniCaL SpECiFiCationS
Connectors:
1 x 2-pin connector
1 x 16-pin connector
Other:
Reads the fixed serial number of a Dallas key (iButton®)
Mounting:
Chassis, Ø9,5mm hole
NOTE!
The Dallas key reader requires a Keypad software version of at least KP10010RC12!
It this is not done, open the LUBE-Master CD that came with the PC Software & Interface, locate the folder "EXTRA", then "Be-
tas" then "BetaAll". When the latest BetaAll files have been installed the keypads can be flashed with the latest software.
General
The Dallas key reader kit is used to make it possible for a LUBE-Master keypad to
read a Dallas key also called Dallas iButton®.
The iButton® (also known as the Dallas Key) is a mechanical packaging standard
that places a 1-Wire component inside a small stainless steel "button" similar to a
disk-shaped battery. iButtons are connected to 1-Wire bus systems by means of
sockets with contacts which touch the "lid" and "base" of the canister. The connec-
tion can be fleeting, comparable to a thumb being scanned by a fingerprint reader.
www.eurolube.com
1
EUROLUBE EQUIPMENT AB
Advertisement
Table of Contents

Related Manuals for Eurolube 53419

Summary of Contents for Eurolube 53419
- Page 1 DaLLaS KEY rEaDEr part no 53419 General The Dallas key reader kit is used to make it possible for a LUBE-Master keypad to read a Dallas key also called Dallas iButton®. The iButton® (also known as the Dallas Key) is a mechanical packaging standard that places a 1-Wire component inside a small stainless steel ”button”...
- Page 2 DaLLaS KEY rEaDEr part no 53419 MECHaniCaL inStaLLation First disconnect the keypad from the LUBE-Master system. Make sure that the keypad is not powered. Insert the 16-pin adapter into the 16-pin socket on the PCB of the keypad. Make sure that the adapter is oriented correctly and that all pegs are aligned before pressing it in place.
Need help?
Do you have a question about the 53419 and is the answer not in the manual?
Questions and answers