Electrolux E30GC64ESS Use & Care Manual
Electrolux e30gc64ess: user guide
Hide thumbs
Also See for E30GC64ESS:
- Factory parts catalog (6 pages) ,
- Specifications (1 page) ,
- Installation instructions manual (27 pages)
Table of Contents
Troubleshooting

Related Manuals for Electrolux E30GC64ESS


Summary of Contents for Electrolux E30GC64ESS
- Page 1 U s e & C a r e G u i d e U s e & C a r e G u i d e U s e & C a r e G u i d e E30GC64ESS E36GC65ESS E46GC66ESS...
-
Page 2: Finding Information
Finding Information PLEASE READ AND SAVE THIS GUIDE Thank you for choosing Electrolux, the new premium brand in home appliances. Attach your sales This Use & Care Guide is part of our commitment to customer satisfaction and receipt to this product quality throughout the service life of your new cooktop. -
Page 3: Product Registration Card
NOTE Registering your product with Electrolux enhances our ability to serve you. You can register online (at the Internet address below) or by dropping your Product Registration Card in the mail. Complete and mail the Product Registration Card as soon as possible to validate the registration date. -
Page 4: Table Of Contents
Questions ... 3 Table Of Contents ... 4 Safety ... 5 Important Safety Instructions ... 5 General Precautions ... 6 Cooktop Features ... 9 Sealed Burners ... 9 Brass Burner Rings ... 10 Burner Igniters ... 10 Sealed Burner Configurations ... 10 Knobs and Spill Protector Rings ... -
Page 5: Safety
IMPORTANT SAFETY INSTRUCTIONS Safety Precautions Do not attempt to install or operate your unit until you have read the safety precautions in this manual. Safety items throughout this manual are labeled with a Warning or Caution based on the risk type. Definitions This is the safety alert symbol. -
Page 6: General Precautions
Utilize a deep fat frying thermometer to avoid heating the fat to temperatures above the flash point. • Always turn pan handles to the side or back of the cooktop. Do not turn handles towards the room where they are easily hit. Handles should not extend over adjacent burners. - Page 7 IMPORT T T T T ANT IMPOR IMPOR • Always check the positions of the control knobs to make sure the cooktop is off when you are finished cooking. • Before performing any service, turn off the gas supply by closing the gas shut-off valve and turning off the electrical power supply.
- Page 8 Do not use the cooktop for warming or heating the room. • Do not leave children alone or unattended in the area where the cooktop is in use. Never allow children to sit or stand on any part of the cooktop. Do not let children play with the cooktop. •...
-
Page 9: Cooktop Features
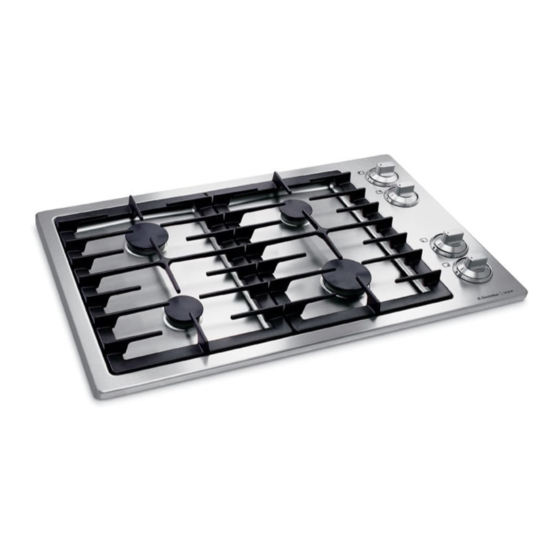
Cooktop Features SEALED BURNERS All Electrolux Icon Cooktops (E30GC64ESS, E36GC65ESS, E46GC66ESS, E46GC67ESS) are equipped with sealed burners. Burner configurations vary by cooktop size. See Figure 1 for a detailed burner layout for your model. Figure 1... -
Page 10: Brass Burner Rings
Burner Assembly SEALED BURNER CONFIGURATIONS On E30GC64ESS Cooktop, there are a total of four burners, including one burner rated at a maximum output of 14,000 BTU/HR, one burner rated at a maximum of 12,500 BTU/HR and two burners rated at a maximum output of 8,500 BTU/HR. The knobs are grouped in twos. -
Page 11: Knobs And Spill Protector Rings
KNOBS AND SPILL PROTECTOR RINGS The control knobs provided with this cooktop are designed for ease of use and longevity. The “D” shaped design of the knob shaft ensures proper orientation when reinstalling the knob. Located beneath each knob is a bezel ring that mounts to the cooktop. -
Page 12: Operation
Operation BEFORE COOKING Ensure that the cooktop has been installed by a qualified individual who has tested the operation of the cooktop in accordance with the Installation Instructions. The brass burner rings, burner caps, grates, knobs and spill protectors must be in place for the cooktop to operate properly. - Page 13 Eliminate the draft or reduce the ventilation blower speed in this case. • When the cooktop is cool and/or more than two burners are in use, the ignitors may continue to spark if the control knob is set to the “LOW” position. This is normal until the burner warms up.
-
Page 14: Setting The Burner Flame Height
Operation SETTING THE BURNER FLAME HEIGHT Setting the proper burner flame height for the desired cooking process and selected utensil will result in superior cooking performance, while also saving time and energy. Follow these recommendations for best results: Use low or medium flame heights when cooking in utensils that are poor conductors of heat, such as glass, ceramic, and cast iron cooking vessels. -
Page 15: Care And Cleaning
WARNING WARNING WARNING WARNING WARNING To avoid electrical shock or burns, turn off all controls and ensure the cooktop is cool before cleaning. IMPOR IMPORT T T T T ANT IMPOR IMPOR... - Page 16 IMPOR • To keep the cooktop looking its best, clean it after every use as soon as all components are cool enough to safely touch. Also, quickly wipe up spills that occur while cooking, being careful not to touch any hot areas. Spills that remain on hot burner components will be very difficult to clean, especially if allowed to burn on.
- Page 17 Treating the porcelain components with care will slow the natural deterioration that takes place with cooktop use. Please follow these guidelines to keep the porcelain parts looking their best: Do not use utensils having rough bottoms, as this can result in permanent damage to the top surfaces of the porcelainized grates.
-
Page 18: Cleaning Stainless Steel Surfaces
IMPOR Never use the cooktop surface as a cutting board. Do not use abrasive cleaners or applicators on the cooktop. Do not try to remove heavy spills with a sharp object such as a knife or metal spatula. Sharp objects may scratch the cooktop. -
Page 19: Cleaning Knobs And Knob Bezels
CLEANING KNOBS AND KNOB BEZELS The control knobs provided with this cooktop are designed for ease of use and longevity. The “D” shaped design of the knob shaft ensures proper orientation when reinstalling the knob. IMPOR IMPOR IMPORT T T T T ANT... -
Page 20: Cleaning Burner Rings
Dry the burner thoroughly Stubborn stains may be removed by applying a metal polishing compound. (If you are unable to locate this type of polishing compound, please phone the Electrolux Customer Service Department for a referral.) -
Page 21: Cleaning Burner Igniters
Test the burners. If erratic clicking is still present, make sure the igniter is completely dry. If the unit still exhibits problems after drying, please phone the Electrolux Customer Service Department for further assistance. CLEANING THE GAS GRILL (E36GC67ESS) Your gas grill will develop greasy areas as a normal result of use. -
Page 22: Troubleshooting
Troubleshooting IF SERVICE IS REQUIRED First, review the recommended checks listed in the Troubleshooting Guide. Then, be certain that the appliance has been installed properly and is being operated correctly. Familiarize yourself with the warranty terms and conditions listed in the Warranty section. If the above checks have been completed and the problem has not yet been remedied, contact the dealer where you purchased the unit. -
Page 23: Troubleshooting Guide
• Remove and carefully re-install burner rings and caps. • Ensure that the type of cooktop matches the gas supply (natural gas or L.P. gas). • Check installation, replace regulator, or set regulator for correct gas type. -
Page 24: Warranty Information
State of Alaska) In the U.S.A., your appliance is warranted by Electrolux Home Products, Inc. We authorize no person to change or add to any of our obligations under this warranty. Our obligations for service and parts under this warranty must be performed by us or an authorized Electrolux Home Products, Inc.
Need help?
Do you have a question about the E30GC64ESS and is the answer not in the manual?
Questions and answers