
Subscribe to Our Youtube Channel
Related Manuals for IntelliSense AWARE


Summary of Contents for IntelliSense AWARE
- Page 1 AWARE Flood Advance Warning Equipment IoT Flood Inundation Sensor Installation Guide Intellisense Systems, Inc. – 1 – Installation Guide 20600 Gramercy Place IG AWARE Flood-11-2019 Torrance, CA 90501-1821 Revision: A (310) 320-1827...
- Page 2 AWARE FLOOD SYSTEM OVERVIEW The AWARE Flood System is a low-cost, Internet-of-Things (IoT)-based early warning flood sensor that provides a full turnkey solution for small and large communities in need of an early warning flood detection system. It can be easily integrated into existing networks for sensor network densification or used by communities without any infrastructure and support framework.
-
Page 3: Hardware Details
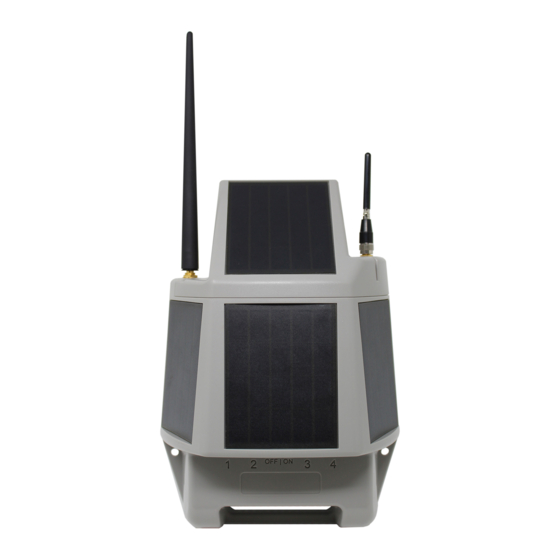
An Internet-of-Things (IoT) module is mounted on the top of the AWARE Flood Node and communicates to the sensor website that displays the data for the user. The IoT module comes preconfigured with either a cellular LTE-M modem or an iridium modem. - Page 4 WLP module can easily be replaced and at a lower cost than replacing the entire system. 4. South Facing Sunlight Availability – The AWARE Flood system was designed to operate for 10 days with our solar recharge on a full battery; however, considerations should be made when installed the AWARE Flood Node where ample sunlight is available year round to maximize solar exposure during winter when the days are at their shortest.
- Page 5 INSTALLATION INSTRUCTIONS – AWARE FLOOD NODE There are a variety of ways to mount the AWARE Flood system, including on T-posts, fence posts, and flat surfaces. Some of these installation steps may require additional commercial off the shelf (COTS) hardware, which are outlined in each subsection below.
- Page 6 3. Position the mounting plate against the T-Post (with the flat side of the plate facing away from the post). 4. Wrap the clamps around the T-Post and secure the mounting plate to the T-Post by tighting the clamps with a flathead screwdriver. Intellisense Systems Inc. Page 5 Installation Guide – AWARE Flood System...
- Page 7 5. Hang the AWARE Flood Node onto the mounting plate using the slots on the back of the AWARE Flood Node. 6. Secure the AWARE Flood Node to the mounting plate using the 2 Torx-head mounting screws provided. NOTE: The Torx T10 Screwdriver pictured above is NOT included in the AWARE Flood package.
- Page 8 Option 2 – Fence Post The fence post installation process is very similar to the T-post mounting process; however, the hardware differs. The recommended COTS hardware for installing the AWARE Flood Node on a fence post appears below: a. Fence Post b.
- Page 9 3. Position the mounting plate against the fence post with the flat side of the plate facing away from the post. 4. Wrap the clamps around the fence post and secure the mounting plate by tighting the clamps with a flathead screwdriver. Intellisense Systems Inc. Page 8 Installation Guide – AWARE Flood System...
- Page 10 5. Hang the AWARE Flood Node onto the mounting plate using the slots on the back of the AWARE Flood Node. 6. Secure the AWARE Flood Node to the mounting plate using the 2 Torx-head mounting screws provided. NOTE: The Torx T10 Screwdriver pictured above is NOT included in the AWARE Flood package.
- Page 11 The universal mounting plate was also designed to be mounted on flat surfaces using standard screws. The mounting plate has four ¼-inch oblong holes that will accommodate screws of almost any size or shape. Regardless of what flat surface onto which the AWARE Flood Node is mounted, the antennae should always be pointed skyward.
- Page 12 2. Slide the AWARE Flood System onto the mounting plate using the slots on the back of the AWARE Flood Node. 3. Secure the AWARE Flood Node to the mounting plate using the two Torx-head mounting screws provided. NOTE: The Torx T10 Screwdriver pictured above is NOT included in the AWARE Flood package.
- Page 13 This section details how to install multiple accessories with the AWARE Flood Node. It describes the installation process for two accessories (the Water Level Pressure Module and the Water-Resistant Camera Sensor) with more accessories coming at a later date. Ensure that the AWARE Flood Node is properly mounted before installing any accessories.
- Page 14 3. Bundle and zip-tie the excess sensor cable to the pole or surface to which the AWARE Flood Node is installed (T-post example pictured below). Additionally, the optional camera module can also be mounted using the same tools and screws as listed in the instructions for installing the AWARE Flood Node on a flat surface.
- Page 15 2. Position the WLP Module cord close to the AWARE Flood Node and run flood sensor down next to the water but keep the sensor dry and out of the water during automatic calibration.
- Page 16 Powering On / Initialization Sequence Now that all the modules are installed and plugged into the node, it’s time to power on the AWARE Flood system. Follow these steps to power on the AWARE Flood Node and begin the initialization sequence 1.
- Page 17 4. Feed the marked fish tape and the WLP Module through the flexible conduit. 5. Remove the marked fish tape from the WLP module and re-spool it through the conduit. Intellisense Systems Inc. Page 16 Installation Guide – AWARE Flood System...
- Page 18 1. Attach the WLP Mounting Plate to the board stake using the horizontally oriented hose clamp and a flathead screwdriver. 7. Secure the WLP module to the mounting plate using the nut and bolt provided. Intellisense Systems Inc. Page 17 Installation Guide – AWARE Flood System...
- Page 19 9. Secure the conduit to the T post/fence post using zip ties. 10. Secure the conduit to the ground using the J hook rebar anchors and the engineer hammer. Intellisense Systems Inc. Page 18 Installation Guide – AWARE Flood System...
- Page 20 4, its pressure readings may be affected. 12. Bundle and zip-tie the excess module cable to the pole or surface to which the AWARE Flood Node is installed (T- post example pictured below). SECURITY / TAMPER DETERRENTS At Intellisense Systems, the security of our customers’...
- Page 21 The app also stores your data using a cloud-based data-logger so that it is always available without trips to the sensor site. Here are the instructions to set up the AWARE Flood Installation App with your AWARE Flood node/sensors.
- Page 22 NOTE: The timer will be cut short if the app receives the GPS data right away. Once done, the user will see all the available data on their screen. Intellisense Systems Inc. Page 21 Installation Guide – AWARE Flood System...
- Page 23 Installation App – Camera Tab Users can request an image from the AWARE Flood Node by pressing the “Request Image” button. An error message box will be shown if no camera module is detected or if there is an issue with the data received from the camera.
- Page 24 Make sure the solar panels are clear of debris/dirt Check for signs of insects on the exterior to the AWARE Flood Node and remove. DO NOT OPEN. Clear the surrounding area of ground foliage and branches that could impact the solar panels ...
Need help?
Do you have a question about the AWARE and is the answer not in the manual?
Questions and answers