Table of Contents
Advertisement
Quick Links
Advertisement
Table of Contents
Troubleshooting

Related Manuals for Mold-Masters TempMaster M3 Series


Summary of Contents for Mold-Masters TempMaster M3 Series
- Page 1 User Manual version 1 Original Instructions...
- Page 2 REMOVE AND RETAIN Every machine leaves our factory with two levels of password protection. We recommend that you remove this sheet in order to establish your own security. User Password - unix System Password - linux...
-
Page 4: Table Of Contents
1.2 Release Details ....................1-1 1.3 Warranty Details ....................1-1 1.4 Returned Goods Policy ..................1-1 1.5 Movement or Resale of Mold-Masters Products or Systems ......1-1 1.6 Copyright ......................1-2 1.7 Units of Measure and Conversion Factors ............1-2 Section 2 - Global Support ..........2-1 2.1 Corporate Offices....................2-1... - Page 5 5.2 Create a New Tool ....................5-2 5.2.1 Cards That May Be Detected ..............5-4 5.3 Configure the Control Cards ................5-5 5.3.1 Set Zone Types ..................5-5 5.4 Set Chillers, Cavities and Water Flow Zones .............5-7 M3 Controller User Manual © 2021 Mold-Masters (2007) Limited. All Rights Reserved.
- Page 6 6.8.1 The Purge Process ..................6-14 6.8.2 Chemical Purge ..................6-17 6.8.3 Mechanical Purge ..................6-18 6.8.4 Print the Purge Results ................6-19 6.9 Turn Zones Off or On ..................6-20 6.10 Rename an Existing Tool ................6-22 M3 Controller User Manual © 2021 Mold-Masters (2007) Limited. All Rights Reserved.
- Page 7 7.4 Add a New User ....................7-8 7.5 Delete a User ....................7-10 7.6 User Admin Settings ..................7-10 7.6.1 Auto Login User ..................7-11 7.6.2 Login Mode ....................7-11 7.6.3 Logout Time ..................... 7-11 M3 Controller User Manual © 2021 Mold-Masters (2007) Limited. All Rights Reserved.
- Page 8 9.3 Beacon and Sounder Extension .................9-2 9.2 System Warning Messages ................9-2 9.4 Fault and Warning Messages ................9-3 9.5 M3 Comm Board Troubleshooting ..............9-6 9.6 TC Module Troubleshooting ................9-6 M3 Controller User Manual © 2021 Mold-Masters (2007) Limited. All Rights Reserved.
- Page 9 11.6 Remote Tool Selection .................. 11-17 11.7 Remote Tool Loading ..................11-17 11.7.1 Static Remote Tool Load ..............11-17 11.7.2 Dynamic Remote Tool Load ..............11-18 Index ..................I M3 Controller User Manual © 2021 Mold-Masters (2007) Limited. All Rights Reserved.
-
Page 11: Section 1 - Introduction
M3 controller with a touchscreen console. This manual is designed to cover most system configurations. If you need additional information specific to your system please contact your representative or a Mold-Masters office whose location can be found in the “Global Support” section. -
Page 12: Copyright
0.069 bar Pound per square inch 6.895 kPa Revolutions per minute Second Degree ° Degree Celsius ° ° 0.556 ( F -32) Degree Fahrenheit ° ° C +32 M3 Controller User Manual © 2021 Mold-Masters (2007) Limited. All Rights Reserved. -
Page 13: Section 2 - Global Support
South Korea El Marques, Queretaro C.P. 76246 fax: +39 049/5019951 tel: +82-31-431-4756 Mexico italy@moldmasters.com korea@moldmasters.com tel: +52 442 713 5661 (sales) tel: +52 442 713 5664 (service) mexico@moldmasters.com M3 Controller User Manual © 2021 Mold-Masters (2007) Limited. All Rights Reserved. -
Page 14: International Representatives
123308 Moscow 2310 Slovenska Bistrica Kemenskoe City Dnipropetrovsk Russia Slovenija Region 51935, Ukraine tel: +7 (495) 199-14-51 +386 59 969 117 tel: +38 (038) 277-82-82 moldmasters@system.com.ru info@picta.si moldmasters@parkgroup.com.ua M3 Controller User Manual © 2021 Mold-Masters (2007) Limited. All Rights Reserved. -
Page 16: Section 3 - Safety
Section 3 - Safety 3.1 Introduction Please be aware that the safety information provided by Mold-Masters does not absolve the integrator and employer from understanding and following international and local standards for safety of machinery. It is the responsibility of the end integrator to integrate... -
Page 17: Safety Hazards
10. Area inside the guards and outside the mold area Front view with guards removed Front View with Guards Removed Figure 3-1 Hazard areas of an injection molding machine M3 Controller User Manual © 2021 Mold-Masters (2007) Limited. All Rights Reserved. - Page 18 Hazards due to reduction in mechanical strength of the plasticizing and / or injection cylinder due to overheating. Feed Opening Pinching and crushing between injection screw movement and housing. See Figure 3-1 area 6 M3 Controller User Manual © 2021 Mold-Masters (2007) Limited. All Rights Reserved.
- Page 19 Crush or impact hazards caused by the movement of the power Gate operated gates. Vapors and Gases Certain processing conditions and / or resins can cause hazardous fumes or vapors. M3 Controller User Manual © 2021 Mold-Masters (2007) Limited. All Rights Reserved.
-
Page 20: Operational Hazards
• Never perform any work on the mold machine unless the hydraulic pump has been stopped. • Check frequently for possible oil leaks / water leaks. Stop the machine and make repairs. M3 Controller User Manual © 2021 Mold-Masters (2007) Limited. All Rights Reserved. - Page 21 Failure to support the machine can result in severe injury or death. • Mold cable from the controller to the mold must be removed before servicing the mold. M3 Controller User Manual © 2021 Mold-Masters (2007) Limited. All Rights Reserved.
-
Page 22: General Safety Symbols
Warning – Slip, Trip or Fall Hazard Do not climb on equipment surfaces. Serious slip, trip, or fall injuries can result from personnel climbing on equipment surfaces. M3 Controller User Manual © 2021 Mold-Masters (2007) Limited. All Rights Reserved. -
Page 23: Wiring Check
• Switching the machinery into Auto mode without having verified the control interlocks and motion sequence are correct, may cause damage to machinery and / or equipment. Failure to do wiring or connections properly will result in equipment failure. M3 Controller User Manual © 2021 Mold-Masters (2007) Limited. All Rights Reserved. -
Page 24: Lockout Safety
• Burns from contact with hot parts, materials or equipment such as furnaces • Fires and explosions • Chemical exposures from gases or liquids released from pipelines M3 Controller User Manual © 2021 Mold-Masters (2007) Limited. All Rights Reserved. -
Page 25: Electrical Lockout
The last lock to be removed should be that of the person supervising the lockout and this responsibility should not be delegated. © Industrial Accident Prevention Association, 2008. 3-10 M3 Controller User Manual © 2021 Mold-Masters (2007) Limited. All Rights Reserved. -
Page 26: Energy Forms And Lockout Guidelines
Shut off, lock (with chains, • Storage tanks and vessels built-in lockout devices, or lockout attachments) and tag valves. • Bleed off excess liquids or gases. • Blank lines as necessary. 3-11 M3 Controller User Manual © 2021 Mold-Masters (2007) Limited. All Rights Reserved. -
Page 27: Ground Connections
Figure 3-2 Example of a ground connection 3.9 Disposal WARNING Milacron Mold-Masters declines any responsibility for personal injury or personal damage arising from reuse of the individual components, if these parts are used other than for the original and proper intended purpose. -
Page 28: M3 Controller Safety Hazards
The controller cabinet and touchscreen console should be installed in a clean dry environment where the ambient conditions do not exceed the following limits: • Temperature +5 to +45°C • Relative Humidity 90% (non-condensing) 3-13 M3 Controller User Manual © 2021 Mold-Masters (2007) Limited. All Rights Reserved. -
Page 29: Cabinet Push / Tip Forces
Table 3-4 Cabinet Push / Tip Forces Small Cabinet Force required to move cabinet on castors 4 kg F (9 lbs) 18° left or right Tipping angle 24° front or back 3-14 M3 Controller User Manual © 2021 Mold-Masters (2007) Limited. All Rights Reserved. -
Page 30: Section 4 - Overview
˚C [Celsius] or ˚F [Fahrenheit] Thermocouple Input Type ‘J’ or type ‘K’ [regular and high temp] Unit Overload Protection Miniature circuit breaker Voltage Bandwidth Stable within [20% supply voltage swing] M3 Controller User Manual © 2021 Mold-Masters (2007) Limited. All Rights Reserved. -
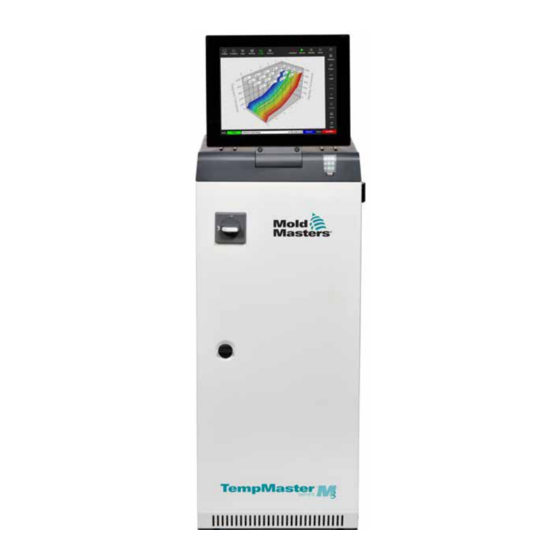
Page 31: Front View Of Controller
OVERVIEW 4.2 Front View of Controller Figure 4-1 Front view of M3 controller M3 Controller User Manual © 2021 Mold-Masters (2007) Limited. All Rights Reserved. -
Page 32: Back View Of Controller
OVERVIEW 4.3 Back View of Controller Figure 4-2 Front view of M3 controller M3 Controller User Manual © 2021 Mold-Masters (2007) Limited. All Rights Reserved. -
Page 33: Screen Layout And Navigation
Navigation bar. The user can access the [Pictures] screen from the [Apps] button. See "4.22.2 Access the Pictures Screen: TS8 Console" on page 4-37 for more information. M3 Controller User Manual © 2021 Mold-Masters (2007) Limited. All Rights Reserved. -
Page 34: Navigation Menu Buttons
The user can touch any of these buttons to return to the main page for that screen. NOTE After an App is selected, the text of the [Apps] button changes to that of the selected App. M3 Controller User Manual © 2021 Mold-Masters (2007) Limited. All Rights Reserved. -
Page 35: Quick Access Buttons
Button Two: • Hold [Run] and the controller enters Startup mode • Hold [Startup] and the controller enters Run mode • Hold [Sequence] and the controller enters Startup mode M3 Controller User Manual © 2021 Mold-Masters (2007) Limited. All Rights Reserved. -
Page 36: The Information Button
"4.6 Modern Theme" on page 4-9. This screen is also used to install software upgrades. For more information on upgrading the software, see "8.1 Upgrade Software" on page 8-1. M3 Controller User Manual © 2021 Mold-Masters (2007) Limited. All Rights Reserved. -
Page 37: Control Action Buttons
2. Choose the required theme or choose [Cancel] to exit without changing the screen theme. A message box opens: 3. Choose [OK] to restart the console or [Cancel] to return to the information screen without changing the theme. M3 Controller User Manual © 2021 Mold-Masters (2007) Limited. All Rights Reserved. -
Page 38: Modern Theme
OVERVIEW Modern Theme This is the default theme for the display, and it is the one used in this manual. 4.6.1 Light Theme M3 Controller User Manual © 2021 Mold-Masters (2007) Limited. All Rights Reserved. -
Page 39: Classic Theme
OVERVIEW 4.6.2 Classic Theme 4-10 M3 Controller User Manual © 2021 Mold-Masters (2007) Limited. All Rights Reserved. -
Page 40: Zone Display Options (Ts8 Console)
The default screen displays up to 36 zones and the following information: • alias name • actual temperature • set temperature • power • current Figure 4-5 TS8 console with 36 zones 4-11 M3 Controller User Manual © 2021 Mold-Masters (2007) Limited. All Rights Reserved. -
Page 41: Ts8 Console: 54 Zones On Screen
Figure 4-6 TS8 console with 54 zones 4.7.3 TS8 Console: 96 Zones on Screen Each zone shows the actual temperature. Figure 4-7 TS8 console with 96 zones 4-12 M3 Controller User Manual © 2021 Mold-Masters (2007) Limited. All Rights Reserved. -
Page 42: Zone Display Options (Ts12 Console)
The default screen displays up to 40 zones and the following information: • alias name • actual temperature • set temperature • power • current Figure 4-8 TS12 console with 40 zones 4-13 M3 Controller User Manual © 2021 Mold-Masters (2007) Limited. All Rights Reserved. -
Page 43: Ts12 Console: 60 Zones On Screen
Figure 4-9 TS12 console with 60 zones 4.8.3 TS12 Console: 96 Zones on Screen Each zone shows alias name, actual temperature and set temperature. Figure 4-10 TS12 console with 96 zones 4-14 M3 Controller User Manual © 2021 Mold-Masters (2007) Limited. All Rights Reserved. -
Page 44: Ts12 Console: 144 Zones On Screen
The default screen displays up to 78 zones and the following information: • alias name • actual temperature • set temperature • power • current Figure 4-12 TS17 console with 78 zones 4-15 M3 Controller User Manual © 2021 Mold-Masters (2007) Limited. All Rights Reserved. -
Page 45: Ts17 Console: 105 Zones On Screen
4.10 Resize Zones The user can resize panels in the TS8, TS12, and TS17 consoles. To resize the panels, do a pinch or pull gesture with your fingers. 4-16 M3 Controller User Manual © 2021 Mold-Masters (2007) Limited. All Rights Reserved. -
Page 46: The User Interface
Mode keys - Auto, Manual and Slave for working modes 4.12 Screensaver The backlight is turned off after a period of inactivity. Touch anywhere on the screen to restore light to the screen. 4-17 M3 Controller User Manual © 2021 Mold-Masters (2007) Limited. All Rights Reserved. -
Page 47: Choose Zones
The range of zones selected will be highlighted in blue. See Figure 4-15. Figure 4-15 Range of zones highlighted You can now set or change parameters or settings for the selected range. 4-18 M3 Controller User Manual © 2021 Mold-Masters (2007) Limited. All Rights Reserved. -
Page 48: Set And Measured Parameters
Power output for a zone % Reynolds Number Indication of the quality of coolant flow in a circuit Watts Wattage of the heater circuit calculated from stated voltage and measured current 4-19 M3 Controller User Manual © 2021 Mold-Masters (2007) Limited. All Rights Reserved. -
Page 49: The Display Screen
Control – users can run or stop the system, choose Standby or Boost mode, or shutdown the system • Set – users can set or alter zone setpoints or run modes Figure 4-16 Display screen 4-20 M3 Controller User Manual © 2021 Mold-Masters (2007) Limited. All Rights Reserved. -
Page 50: Display Screen Options
The Display View box opens. See Figure 4-17. Figure 4-17 Display View box 2. Choose the required view or choose [Cancel] to return to the default zone panel display. 4-21 M3 Controller User Manual © 2021 Mold-Masters (2007) Limited. All Rights Reserved. -
Page 51: Zone Panel Display
This zone has the off switch indicator. Individual zone switched off Lost communications Error message is yellow text Zone has lost communication with the on black background. console 4-22 M3 Controller User Manual © 2021 Mold-Masters (2007) Limited. All Rights Reserved. - Page 52 The status of the zones is indicated by the color of the actual power column. Figure 4-18 shows the actual temperature in red, which indicates an alarm status. Figure 4-18 Display screen - table view 4-23 M3 Controller User Manual © 2021 Mold-Masters (2007) Limited. All Rights Reserved.
-
Page 53: Bar Graph Display
The [Mode] button and the [Print] buttons are available in the right hand menu. Use [Page p] or [Page q] to see the zone types in sequence. Figure 4-19 Display screen - bar graph view 4-24 M3 Controller User Manual © 2021 Mold-Masters (2007) Limited. All Rights Reserved. -
Page 54: Easyview Screen Display
See "5.10 Import a Picture" on page 5-41. and "5.11 Setup the Picture View Screen" on page 5-42 for more information on how to set up the Picture View screen. 4-25 M3 Controller User Manual © 2021 Mold-Masters (2007) Limited. All Rights Reserved. -
Page 55: Modes Of Operation
Standby • Startup • Shutdown • Boost • Stop The user chooses [Cancel] to close the box and return to the Display screen. Figure 4-22 Mode box 4-26 M3 Controller User Manual © 2021 Mold-Masters (2007) Limited. All Rights Reserved. -
Page 56: Mode Window
MASTER-FOLLOW, from raising unnecessary alarms. Once at their set temperature, systems will switch to Run mode and the alarm becomes active. See "Section 9 - Troubleshooting" for more information on alarms and error messages. 4-27 M3 Controller User Manual © 2021 Mold-Masters (2007) Limited. All Rights Reserved. -
Page 57: The Toolstore Screen
Sequence - allows the user to run a series of tools or tool settings in a pre-set sequence for a set time period. If tool sequencing is not used, this value defaults to null. See "6.18 Sequence Tools and Settings" for more information. 4-28 M3 Controller User Manual © 2021 Mold-Masters (2007) Limited. All Rights Reserved. -
Page 58: Side Menu Buttons Of Toolstore Screen
To start a preprogrammed sequence for startup and / or shutdown See "Sequence Tools and Settings" on page 6-36. To search the tool banks for a tool See "6.14 Search for a Tool" on page 6-28. 4-29 M3 Controller User Manual © 2021 Mold-Masters (2007) Limited. All Rights Reserved. -
Page 59: The Apps Screen
The Apps screen opens. See Figure 4-24. Figure 4-24 Apps screen For more information on the icons shown on the Apps screen, see "Table 4-9 Apps Screen Icons" on page 4-31. 4-30 M3 Controller User Manual © 2021 Mold-Masters (2007) Limited. All Rights Reserved. -
Page 60: Apps Screen Icons
To access the Energy screen. See "6.20 Monitor Energy Usage - Energy Screen" on page 6-48. To access the Purge function. See "Purge Function" on page 6-14. 4-31 M3 Controller User Manual © 2021 Mold-Masters (2007) Limited. All Rights Reserved. -
Page 61: The Settings Screen
See "Choose Zones" on page 4-18. To cancel the current selection. To send information to printer or USB memory stick. See "Configure a Printer" on page 5-50. 4-32 M3 Controller User Manual © 2021 Mold-Masters (2007) Limited. All Rights Reserved. -
Page 62: System Settings Icons
See "Section 11 - Quad IO Options" on page 11-10. To configure SVG settings. To access and configure tool settings. See "5.5 Configure the Parameters and Settings" on page 5-10. 4-33 M3 Controller User Manual © 2021 Mold-Masters (2007) Limited. All Rights Reserved. -
Page 63: The Graph Screen
The Graph screen shows graphs of temperature versus time or power versus time for up to 20 zones. 1. Choose [Graph]: The Graph screen opens. See Figure 4-26. Figure 4-26 Graph screen 4-34 M3 Controller User Manual © 2021 Mold-Masters (2007) Limited. All Rights Reserved. -
Page 64: Graph Screen Side Menu Buttons
To move up through the zones. To move down through the zones. To print the graph section in its current display format. See "Configure a Printer" on page 5-50. 4-35 M3 Controller User Manual © 2021 Mold-Masters (2007) Limited. All Rights Reserved. -
Page 65: The Pictures Screen
Imports pictures. See "5.10 Import a Picture" on page 5-41. Displays links between pictures and the currently loaded tool. See "5.11.3 View Linked Pictures" on page 5-44. 4-36 M3 Controller User Manual © 2021 Mold-Masters (2007) Limited. All Rights Reserved. -
Page 66: Access The Pictures Screen: Ts8 Console
The TS8 console can hold up to 20 images. The user is able to link only one image to each tool. See Figure 4-28. Figure 4-28 TS8 console - Configure Picture Link box 4-37 M3 Controller User Manual © 2021 Mold-Masters (2007) Limited. All Rights Reserved. -
Page 67: The Picture View Screen
The lower half is color-coded to indicate the alarm status, as shown below: Table 4-15 Alarm Status Colors Black on green Normal working Black on yellow First stage warning status Yellow on black Lost communications 4-38 M3 Controller User Manual © 2021 Mold-Masters (2007) Limited. All Rights Reserved. -
Page 68: Menu Buttons Of Picture View Screen Top
See "5.11.4 Add a Mini Panel to the Tool Picture" on page 5-45. Remove a label from the linked picture. See "5.11.5 Remove a Mini Panel from the Tool Picture" on page 5-46. Exit the Picture View screen. 4-39 M3 Controller User Manual © 2021 Mold-Masters (2007) Limited. All Rights Reserved. -
Page 69: Zoom Screen
4.22.5 Zoom Screen The Zoom screen displays the Deviation graph, the Output Power graph and a table with zone settings. 1. Choose any zone: 2. Choose [Zoom]: 4-40 M3 Controller User Manual © 2021 Mold-Masters (2007) Limited. All Rights Reserved. -
Page 70: Interpret The Zoom Screen
3. The Output Power graph shows the output power levels that have been measured. Power traces should be fairly similar for similar zones at similar temperatures. 4-41 M3 Controller User Manual © 2021 Mold-Masters (2007) Limited. All Rights Reserved. -
Page 71: Zoom Screen Side Menu Buttons
To move down through the zones. To cancel and return to the previous screen. To send information to printer or USB memory stick. See "Configure a Printer" on page 5-50. 4-42 M3 Controller User Manual © 2021 Mold-Masters (2007) Limited. All Rights Reserved. -
Page 72: Section 5 - Setup
Refer to the serial plate on the controller cabinet for confirmation of the main supply requirements. If the local supply is outside the specified range, please contact Mold-Masters for advice. WARNING - ELECTRIC SHOCK HAZARD It is crucial to comply with these warnings to minimize any personal danger. -
Page 73: Introduction
The user cannot overwrite an existing tool to create a new tool. 1. Choose [ToolStore]: 2. Choose an empty tool slot. 3. Choose [Detect]: 4. Enter password, if required. M3 Controller User Manual © 2021 Mold-Masters (2007) Limited. All Rights Reserved. - Page 74 After a tool has been created, the user must configure the zones, the tool settings and the system settings as required. M3 Controller User Manual © 2021 Mold-Masters (2007) Limited. All Rights Reserved.
-
Page 75: Cards That May Be Detected
4-zone card rated at 15 A with current sensing and ground fault monitoring. HRC-IO5 4-channel digital input / output card for remote signalling and remote Tool Selection input M3 Controller User Manual © 2021 Mold-Masters (2007) Limited. All Rights Reserved. -
Page 76: Configure The Control Cards
From the Display screen: 1. Choose [Settings]: 2. Choose a zone from the Type column. See Figure 5-1. Figure 5-1 Choose zone from the Type column M3 Controller User Manual © 2021 Mold-Masters (2007) Limited. All Rights Reserved. - Page 77 5. Change the color of the header, if required. 6. Choose [OK] to accept the user setting changes or [Cancel] to return to the Settings screen without saving any changes. M3 Controller User Manual © 2021 Mold-Masters (2007) Limited. All Rights Reserved.
-
Page 78: Set Chillers, Cavities And Water Flow Zones
5. Enter the required values using the keypad or choose: • [Add] to increase the current temperature by a set amount • [Subtract] to decrease the current temperature by a set amount M3 Controller User Manual © 2021 Mold-Masters (2007) Limited. All Rights Reserved. - Page 79 6. Choose [Enter] to accept the changes and return to the Display screen, or choose [Esc] to clear the input. The user can return to the Display screen at any time by choosing [Esc] twice. M3 Controller User Manual © 2021 Mold-Masters (2007) Limited. All Rights Reserved.
-
Page 80: Preconfigured Zone Values
Standby and Boost Temp 0ºC or 0ºF blank Startup Stage T/C Offset Value 0ºC or 0ºF blank T/C Open Mode Normal blank Warn Hi and Lo 5ºC or 9ºF blank M3 Controller User Manual © 2021 Mold-Masters (2007) Limited. All Rights Reserved. -
Page 81: Configure The Parameters And Settings
The values set for the settings belong to the tool that is currently loaded. If a new tool is loaded, this new tool will bring its own settings into the Settings screen. 5-10 M3 Controller User Manual © 2021 Mold-Masters (2007) Limited. All Rights Reserved. -
Page 82: Configure Tool Parameters Zone By Zone
7. Repeat steps 2 through 5 for each parameter that requires adjustment. See "Table 5-3 Tool Parameters - Zone by Zone" on page 5-12 for a list of configurable parameters. 5-11 M3 Controller User Manual © 2021 Mold-Masters (2007) Limited. All Rights Reserved. - Page 83 Maximum = 99°C / which will trigger the Warn indication. 178°F. Alarm High Sets the temperature deviation above setpoint Maximum 99°C / 178°F. which will trigger the Alarm indication. 5-12 M3 Controller User Manual © 2021 Mold-Masters (2007) Limited. All Rights Reserved.
- Page 84 Note: if output is too high then the main output fuse will rupture. TC Offset Sets a proportional value to compensate Maximum = ±150°C or between displayed temperature and the Actual ±300°F. temperature. 5-13 M3 Controller User Manual © 2021 Mold-Masters (2007) Limited. All Rights Reserved.
- Page 85 Startup Stage Configures groups of zones into separate Maximum = 16 groups. startup groups. Shutdown Stage Configures groups of zones into separate Maximum = 16 groups. shutdown groups. 5-14 M3 Controller User Manual © 2021 Mold-Masters (2007) Limited. All Rights Reserved.
-
Page 86: Configure Tool Settings For The Whole Tool
They cannot be configured on a zone-by-zone basis. 1. Choose [Settings]: 2. Choose [Config]: 3. Enter the password, if required. 4. Choose [Tool Config]. The Tool Config box opens: 5. Choose a setting. 5-15 M3 Controller User Manual © 2021 Mold-Masters (2007) Limited. All Rights Reserved. - Page 87 The user must save the tool in the ToolStore to save these changes permanently. See "6.11.2 Save Changes as a New Tool" on page 6-25 for more information. 5-16 M3 Controller User Manual © 2021 Mold-Masters (2007) Limited. All Rights Reserved.
- Page 88 STOP if Opened - switches the controller into Stop mode when the remote line is opened and maintains the controller in Stop mode even if the remote input signal is removed. Works only in Run mode. 5-17 M3 Controller User Manual © 2021 Mold-Masters (2007) Limited. All Rights Reserved.
- Page 89 Sets an overall standby temperature, which will override individual Maximum = 260°C or standby temperature settings. 500°F. • Leave this value set to 0, for individual standby values to remain valid. 5-18 M3 Controller User Manual © 2021 Mold-Masters (2007) Limited. All Rights Reserved.
- Page 90 The status bar will display SOAK in the Mode box during this time. Note: a Quad IO output called “soaking” will be active during the soak time. 5-19 M3 Controller User Manual © 2021 Mold-Masters (2007) Limited. All Rights Reserved.
- Page 91 STARTUP to SOAK and STAGE 1, 2, 3 etc. flashing alternatively until all stages reach working temperature. The Mode window will then display RUN. Weight Unit Chooses Imperial (Lbs) or Metric (Kg) as the unit for weight. 5-20 M3 Controller User Manual © 2021 Mold-Masters (2007) Limited. All Rights Reserved.
-
Page 92: Configure System Settings
For options, the user chooses from a list or uses a checkbox. 1. Choose [Settings]: 2. Choose [Config]: 3. Enter password if required. The Settings box opens: 5-21 M3 Controller User Manual © 2021 Mold-Masters (2007) Limited. All Rights Reserved. - Page 93 7. Choose [OK] to accept the new value or choose [Back] to return to the System Config screen without saving. See "Table 5-5 System Settings" on page 5-23 for a list of configurable tool settings. 5-22 M3 Controller User Manual © 2021 Mold-Masters (2007) Limited. All Rights Reserved.
- Page 94 See "8.2 Check the Touchscreen Alignment" for more information. Console Chooses the operating mode that is used Startup after initial switch on. 5-23 M3 Controller User Manual © 2021 Mold-Masters (2007) Limited. All Rights Reserved.
- Page 95 Enter the system supply voltage. It is used to Maximum = 500V. Voltage calculate the “Watts” display. This is normally the phase-neutral voltage on a Star supply and the phase-phase voltage on a Delta supply. 5-24 M3 Controller User Manual © 2021 Mold-Masters (2007) Limited. All Rights Reserved.
- Page 96 Choose [Float] or [Integer] as appropriate. 5-25 M3 Controller User Manual © 2021 Mold-Masters (2007) Limited. All Rights Reserved.
-
Page 97: Set Zone Temperature
This same procedure can be used with the Display screen, Zoom screen, and Settings screen. 1. Choose the required zone or zones: 2. Choose [Set]: 3. Enter password, if required. A keypad opens: 4. Choose [Auto] for the mode. 5-26 M3 Controller User Manual © 2021 Mold-Masters (2007) Limited. All Rights Reserved. -
Page 98: Manual Mode
The user can return to the Display screen at any time by choosing [Esc] twice. 5.7 Manual Mode Manual mode applies a set percentage of power to the zone or range of zones rather than using set temperatures. 5-27 M3 Controller User Manual © 2021 Mold-Masters (2007) Limited. All Rights Reserved. -
Page 99: Set Manual Mode
You can return to the Display screen at any time by choosing [Esc] twice. The zone or zones have a display that flashes “MAN” and the chosen power percentage alternately. See Figure 5-3. 5-28 M3 Controller User Manual © 2021 Mold-Masters (2007) Limited. All Rights Reserved. - Page 100 SETUP Figure 5-3 Alternate zone displays in Manual mode 5-29 M3 Controller User Manual © 2021 Mold-Masters (2007) Limited. All Rights Reserved.
-
Page 101: Melt Leakage Detection
Any other displays such as the status window and the alarm beacon are dependant on the settings in Alarm Active as described immediately above. 5.8.1 Enable Melt Leakage Detection 1. Choose [Settings]: 2. Choose [Config]: 5-30 M3 Controller User Manual © 2021 Mold-Masters (2007) Limited. All Rights Reserved. - Page 102 SETUP 3. Enter the password, if required. 4. Choose [System Config]. The System Config box opens: 5-31 M3 Controller User Manual © 2021 Mold-Masters (2007) Limited. All Rights Reserved.
-
Page 103: Set Automatic Leakage Detection
• [Alarms Active] allows the user to set any actions associated with Alarm Pow. See "Table 5-3 Tool Parameters - Zone by Zone" on page 5-12. 5-32 M3 Controller User Manual © 2021 Mold-Masters (2007) Limited. All Rights Reserved. - Page 104 1. Choose [Settings]: 2. Choose [Config]: 3. Enter the password, if required. The Settings box opens: 4. Choose [System Config] from System Settings. The System Config box opens: 5-33 M3 Controller User Manual © 2021 Mold-Masters (2007) Limited. All Rights Reserved.
- Page 105 SETUP 5. Choose [Leakage Mode] from the menu. A box with three options opens: 6. Choose Automatic. 7. Choose OK. 5-34 M3 Controller User Manual © 2021 Mold-Masters (2007) Limited. All Rights Reserved.
-
Page 106: Set Manual Leakage Detection
These values are entered on the Settings screen under Alarm Pow High(M) and Alarm Pow Low(M). 1. Choose [Settings]: 2. Choose [Config]: 3. Enter password, if required. 4. Choose [System Config]. The System Config box opens: 5-35 M3 Controller User Manual © 2021 Mold-Masters (2007) Limited. All Rights Reserved. - Page 107 SETUP 5. Choose [Leakage Mode] from the menu. 6. Choose Manual. 7. Choose OK. 5-36 M3 Controller User Manual © 2021 Mold-Masters (2007) Limited. All Rights Reserved.
-
Page 108: Set Smart Leakage Detection
Settings menu. 1. Choose [Settings]: 2. Choose [Config]: 3. Enter password, if required. 4. Choose [System Config]. The System Config box opens: 5-37 M3 Controller User Manual © 2021 Mold-Masters (2007) Limited. All Rights Reserved. - Page 109 SETUP 5. Choose [Leakage Mode] from the menu. 6. Choose Smart. 7. Choose OK. 5-38 M3 Controller User Manual © 2021 Mold-Masters (2007) Limited. All Rights Reserved.
-
Page 110: View Or Print Tool Settings
1. Choose [Settings]: 2. Choose [Config]: 3. Enter password, if required. Figure 5-4 4. Choose [Tool Config] from Tool Settings. 5. Choose [View] from the Options list screen: 5-39 M3 Controller User Manual © 2021 Mold-Masters (2007) Limited. All Rights Reserved. - Page 111 [Print] button. No printer settings box will open. See "5.13 Configure a Printer" on page 5-50 for more information. 5-40 M3 Controller User Manual © 2021 Mold-Masters (2007) Limited. All Rights Reserved.
-
Page 112: Import A Picture
2. Insert the USB memory stick with the image into the console and wait about 10 seconds. 3. Choose [Pictures]: 4. Choose [Import]: 5. Enter a password, if required. A picture selection box opens: 5-41 M3 Controller User Manual © 2021 Mold-Masters (2007) Limited. All Rights Reserved. -
Page 113: Setup The Picture View Screen
See "5.10 Import a Picture" on page 5-41 for more information on importing a picture. After the user chooses the required picture from the Pictures screen, the Picture View screen opens. See Figure 5-7. Figure 5-7 Picture View screen 5-42 M3 Controller User Manual © 2021 Mold-Masters (2007) Limited. All Rights Reserved. -
Page 114: Link A Picture In The Picture View Screen
The TS8 console only allows one picture to be linked at any time. 5.11.2 Unlink a Picture in the Picture View Screen 1. Choose the required picture. 2. Choose [Unlink]: 5-43 M3 Controller User Manual © 2021 Mold-Masters (2007) Limited. All Rights Reserved. -
Page 115: View Linked Pictures
The Configure Picture Link box opens: NOTE The picture names are greyed out and unavailable. The user must link or unlink pictures using the Picture View screen. 5-44 M3 Controller User Manual © 2021 Mold-Masters (2007) Limited. All Rights Reserved. -
Page 116: Add A Mini Panel To The Tool Picture
The user can reposition the mini panels at any time on this screen by choosing [Show]. The mini panels can also be repositioned on the EasyView if the user has password access for this function. 5-45 M3 Controller User Manual © 2021 Mold-Masters (2007) Limited. All Rights Reserved. -
Page 117: Remove A Mini Panel From The Tool Picture
If the picture is already saved on the media, the user must confirm whether or not to overwrite it. 3. Remove the USB memory stick after the message disappears. 5-46 M3 Controller User Manual © 2021 Mold-Masters (2007) Limited. All Rights Reserved. -
Page 118: Delete A Picture Using The Picture View Screen
2. Choose [OK] to delete the picture or choose [Cancel] to return to the Picture View screen. For more information on using the Picture View screen, see "6.19 Use the Picture View Screen as the Display Screen" on page 6-41. 5-47 M3 Controller User Manual © 2021 Mold-Masters (2007) Limited. All Rights Reserved. -
Page 119: Set Date And Time
SETUP 5.12 Set Date and Time Mold-Masters recommends that the correct time and time zone are set to fully utilize the timing features of the M3 controller. 1. Choose [Settings]: 2. Choose [Config]: 3. Enter password, if required. 4. Choose [Date/Time]. - Page 120 10. Choose [Enter] to accept the input or choose [Esc] twice to return to the Date/ Time screen. The time automatically updates without the requirement to restart the console. 5-49 M3 Controller User Manual © 2021 Mold-Masters (2007) Limited. All Rights Reserved.
-
Page 121: Configure A Printer
.csv file. 1. Choose [Settings]: 2. Choose [Config]: 3. Enter the password, if required. 4. Choose [Printers] from System Settings. The Printers box opens: 5-50 M3 Controller User Manual © 2021 Mold-Masters (2007) Limited. All Rights Reserved. - Page 122 SETUP 5. Choose [Make]: 6. Choose [Model]: 5-51 M3 Controller User Manual © 2021 Mold-Masters (2007) Limited. All Rights Reserved.
- Page 123 11. Choose [Accept] to set the parameters. 12. Choose [Cancel] to restore all boxes to their previous settings. 13. Choose [Back] to return to the Settings box. 5-52 M3 Controller User Manual © 2021 Mold-Masters (2007) Limited. All Rights Reserved.
-
Page 124: Set The Storage Locations
The user can set where information is stored: Local or Share. The default values are Local. 1. Choose [Settings]: 2. Choose [Config]: 3. Enter the password, if required. 4. Choose [Storage]. The Storage Configuration box opens: 5-53 M3 Controller User Manual © 2021 Mold-Masters (2007) Limited. All Rights Reserved. - Page 125 You can select Share only if your controller is connected to a Share Server, which is set up on the "7.8 Share Files on a Network" on page 7-18. 7. Choose Accept. 5-54 M3 Controller User Manual © 2021 Mold-Masters (2007) Limited. All Rights Reserved.
-
Page 126: Section 6 - Operation
2. After the main cabinet is switched on, press the console switch until it lights up and then release it. See Figure 6-1 for console switch location. The console will start its normal bootup sequence. Figure 6-1 Location of console on / off switch M3 Controller User Manual © 2021 Mold-Masters (2007) Limited. All Rights Reserved. -
Page 127: Mold Heating
6.2 Switch Off the Controller NOTE Mold-Masters recommends that you use the console to shut down the heating load and the main power switch of the controller to shut down a dormant controller. 6.2.1 Shut Down the Console 1. - Page 128 3. Choose [OK] to turn the console off or choose [Cancel] to return to the Information screen without turning the console off. NOTE The cards receive the message to stop outputting power after [OK] is pressed and the console begins the shutdown process. M3 Controller User Manual © 2021 Mold-Masters (2007) Limited. All Rights Reserved.
-
Page 129: Shut Down The Controller
6.2.2 Shut down the Controller Use the main power switch on the controller cabinet to remove power from the entire system. See Figure 6-3. Figure 6-3 Turn the main power switch off M3 Controller User Manual © 2021 Mold-Masters (2007) Limited. All Rights Reserved. -
Page 130: Login Or Logout
OPERATION 6.3 Login or Logout System and user-level passwords are listed on the inside cover of this manual. For security purposes, Mold-Masters recommends that you change these passwords as soon as possible. 6.3.1 Login Choose the login button from the bottom information bar to login from any screen. See Figure 6-4. -
Page 131: Logout
2. Choose [OK] to logout or choose [Cancel] to stay logged in. The [System] or [User] button changes to [Login]. See "Figure 6-4 Login button on the Display screen" on page 6-5. M3 Controller User Manual © 2021 Mold-Masters (2007) Limited. All Rights Reserved. -
Page 132: Quick Start Guide
Access to the quick guide is found on the Information screen. See Figure 6-5. 1. Choose [i]: The Information screen opens: Figure 6-5 Quick start guide button on the Information screen 2. Choose [Guide]: M3 Controller User Manual © 2021 Mold-Masters (2007) Limited. All Rights Reserved. - Page 133 To save the quick guide as a PDF, insert a USB memory stick into the console and choose: To return to the Information screen from the quick start guide, choose: M3 Controller User Manual © 2021 Mold-Masters (2007) Limited. All Rights Reserved.
-
Page 134: Control Modes For All Zones
Shutdown consecutively switches off the zone groups in timed intervals and in the order as nominated by Shutdown Stage configuration. • When the shutdown sequence finishes, the system goes to Stop mode. M3 Controller User Manual © 2021 Mold-Masters (2007) Limited. All Rights Reserved. - Page 135 Mode button Purge Purge Wizard This mode can only be initiated while in Run mode. on Apps screen • Guides the operator through a color change routine. 6-10 M3 Controller User Manual © 2021 Mold-Masters (2007) Limited. All Rights Reserved.
-
Page 136: Boost Mode
The boost command can be received from an external source. See "10.5 Alarm Output / Auxiliary Input" on page 10-6. The display shown in the Mode window is the same as if Boost was chosen locally. 6-11 M3 Controller User Manual © 2021 Mold-Masters (2007) Limited. All Rights Reserved. -
Page 137: Slave Mode
If the lead zone is working at the same temperature but outputting a noticeably different power level, then the slaved zone may not regulate efficiently. 6.7.1 Enter Slave Mode 1. Choose the required zone or zones. 2. Choose [Set]: 6-12 M3 Controller User Manual © 2021 Mold-Masters (2007) Limited. All Rights Reserved. - Page 138 OPERATION 3. Enter the password, if required. A keypad opens: 4. Choose [Slave]. A zone selection box opens: 6-13 M3 Controller User Manual © 2021 Mold-Masters (2007) Limited. All Rights Reserved.
-
Page 139: Purge Function
Run mode, the user will be prompted to enter Run mode by this message: 6.8.1 The Purge Process 1. Choose [Apps]: 2. Choose [Purge Wizard]: 6-14 M3 Controller User Manual © 2021 Mold-Masters (2007) Limited. All Rights Reserved. - Page 140 5. Enter password, if required. The Purge Wizard Settings box opens: NOTE The Purge parameters can be set any time the Purge wizard is on the screen. 6-15 M3 Controller User Manual © 2021 Mold-Masters (2007) Limited. All Rights Reserved.
- Page 141 For more information on the different processes for mechanical and chemical purge processes, see "6.8.2 Chemical Purge" on page 6-17 and "6.8.3 Mechanical Purge" on page 6-18. 6-16 M3 Controller User Manual © 2021 Mold-Masters (2007) Limited. All Rights Reserved.
-
Page 142: Chemical Purge
6. Mould: the programmed number of cycles is completed with the purging material. 7. Quality: the user is asked if the color is acceptable. • Choose [Yes] to leave the purge process. 6-17 M3 Controller User Manual © 2021 Mold-Masters (2007) Limited. All Rights Reserved. -
Page 143: Mechanical Purge
5. Quality: the user is asked if the color is acceptable. • Choose [Yes] to leave the purge process. • Choose [No] to start the process again. 6-18 M3 Controller User Manual © 2021 Mold-Masters (2007) Limited. All Rights Reserved. -
Page 144: Print The Purge Results
[Print] button. No printer settings box will open. See "5.13 Configure a Printer" on page 5-50 for more information. 6-19 M3 Controller User Manual © 2021 Mold-Masters (2007) Limited. All Rights Reserved. -
Page 145: Turn Zones Off Or On
Range function. 1. Choose the required zone or zones: 2. Choose [Set]: 3. Enter password, if required. A keypad opens. Figure 6-11 Keypad - turn zone off 6-20 M3 Controller User Manual © 2021 Mold-Masters (2007) Limited. All Rights Reserved. - Page 146 Figure 6-12 Zone off To turn the zone(s) back on, repeat steps 1 and 2, then choose [On]. The [Off] button on the keypad changes to [On]: 6-21 M3 Controller User Manual © 2021 Mold-Masters (2007) Limited. All Rights Reserved.
-
Page 147: Rename An Existing Tool
2. Choose the tool to be renamed. See Figure 6-13. Figure 6-13 Choose the tool to rename 3. Choose the Tool Name. 4. Choose [Set]: 5. Enter password, if required. A keyboard opens: 6-22 M3 Controller User Manual © 2021 Mold-Masters (2007) Limited. All Rights Reserved. -
Page 148: Save A Tool
Figure 6-14 Unsaved tool in tool bank You can save a tool in two ways: • overwrite the settings of the current tool • save the changes as a new tool 6-23 M3 Controller User Manual © 2021 Mold-Masters (2007) Limited. All Rights Reserved. -
Page 149: Overwrite Tool Settings
3. Press [OK] to continue or [Cancel] to return to the previous screen without saving the new settings. The tool name is now purple in color, as it is the current tool and it has been saved. 6-24 M3 Controller User Manual © 2021 Mold-Masters (2007) Limited. All Rights Reserved. -
Page 150: Save Changes As A New Tool
6.11.2 Save Changes as a New Tool 1. Choose an empty tool slot in the tool bank: 2. Choose [Save]: A message box opens: A keyboard opens: 3. Enter the new tool name. 6-25 M3 Controller User Manual © 2021 Mold-Masters (2007) Limited. All Rights Reserved. - Page 151 This new tool has not been loaded. The original tool is still loaded. The user must load the new tool to use it. For more information, see "6.12 Load a Tool Locally" on page 6-27. 6-26 M3 Controller User Manual © 2021 Mold-Masters (2007) Limited. All Rights Reserved.
-
Page 152: Load A Tool Locally
1. Choose [ToolStore]: 2. Choose the required tool: 3. Press [Load]: 4. Enter password, if required. A message box opens: 6-27 M3 Controller User Manual © 2021 Mold-Masters (2007) Limited. All Rights Reserved. -
Page 153: Load A Tool Remotely
See "11.7 Remote Tool Loading" on page 11-17. 6.14 Search for a Tool You can locate a tool by entering the tool's name. 1. Choose [ToolStore]: 2. Choose [Search]: 6-28 M3 Controller User Manual © 2021 Mold-Masters (2007) Limited. All Rights Reserved. - Page 154 If the search is unsuccessful, this message box opens: 5. Choose the tool required from the list. The user will automatically be taken to the tool bank screen with that tool. 6-29 M3 Controller User Manual © 2021 Mold-Masters (2007) Limited. All Rights Reserved.
-
Page 155: Delete A Tool
A tool that is loaded cannot be deleted. 1. Choose [ToolStore]: 2. Choose the tool to be deleted. See Figure 6-15. Figure 6-15 Choose the tool to delete 3. Choose [Delete]: 6-30 M3 Controller User Manual © 2021 Mold-Masters (2007) Limited. All Rights Reserved. - Page 156 OPERATION 4. Enter password, if required. A message box opens: 5. Choose [OK] to confirm or choose [Cancel] to return to the ToolStore without deleting the tool. 6-31 M3 Controller User Manual © 2021 Mold-Masters (2007) Limited. All Rights Reserved.
-
Page 157: Backup Tool Settings
4. Enter password, if required. NOTE If the picture associated with the tool has been saved previously, the user is asked if the file can be overwritten. Choose [OK] or [Cancel]. 6-32 M3 Controller User Manual © 2021 Mold-Masters (2007) Limited. All Rights Reserved. -
Page 158: Backup The Tool Bank
ToolStore must be backed up individually. 1. Insert a USB memory stick. 2. Choose [ToolStore]: 3. Enter password, if required. 4. Choose [Backup]: After the backup is complete, a message box opens: 6-33 M3 Controller User Manual © 2021 Mold-Masters (2007) Limited. All Rights Reserved. -
Page 159: Restore Tool Settings
1. Insert the USB memory stick with the data and wait about 10 seconds. 2. Choose [ToolStore]: 3. Choose an empty tool slot: 4. Choose [Restore]: 5. Enter password, if required. 6-34 M3 Controller User Manual © 2021 Mold-Masters (2007) Limited. All Rights Reserved. -
Page 160: Restore The Tool Bank
A warning box opens: 5. Choose [OK] to restore all settings or [Cancel] to return to the tool bank without restoring settings. 6. Remove the USB memory stick. 6-35 M3 Controller User Manual © 2021 Mold-Masters (2007) Limited. All Rights Reserved. -
Page 161: Sequence Tools And Settings
All other zones are switched on and allowed to heat up to normal temperature. The sequence timer holds this condition for 15 minutes and then moves to the next step. Step 4: • All zones enter Run mode. 6-36 M3 Controller User Manual © 2021 Mold-Masters (2007) Limited. All Rights Reserved. -
Page 162: Program A Sequence
2. Choose the required tool and the corresponding box in the Sequence column: 3. Choose [Set]: 4. Enter password, if required. A Settings keypad opens: 5. Choose [Sequence Number]. 6-37 M3 Controller User Manual © 2021 Mold-Masters (2007) Limited. All Rights Reserved. - Page 163 11. Enter the required time. The screen returns to the ToolStore. The sequence is shown in the Sequence column. See "Figure 6-17 Programmed sequence shown in ToolStore" on page 6-39. 6-38 M3 Controller User Manual © 2021 Mold-Masters (2007) Limited. All Rights Reserved.
-
Page 164: Start A Sequence - Locally
A tool with a sequence pattern loaded must be chosen. From the Display screen: 1. Choose [ToolStore]: 2. Choose [Sequence]: 3. Enter password, if required. A message box opens: 6-39 M3 Controller User Manual © 2021 Mold-Masters (2007) Limited. All Rights Reserved. -
Page 165: Start A Sequence - Remotely
The user can apply and release input to the IO card, and this action will force the tool sequence to move on to the next step. This procedure can be used to reduce the overall time required for testing and initial settings. 6-40 M3 Controller User Manual © 2021 Mold-Masters (2007) Limited. All Rights Reserved. -
Page 166: Use The Picture View Screen As The Display Screen
2. Move the required mini panel / mini panels. 3. Choose [Lock] to relock the screen: The user can now move the entire image using the touchscreen. The zones stay locked in place. 6-41 M3 Controller User Manual © 2021 Mold-Masters (2007) Limited. All Rights Reserved. -
Page 167: Choose Zones With The Picture View Screen
Figure 6-18 Choose zone on the Picture View screen NOTE The Range function is not available on this screen. To change multiple zones, the user must choose the zones one by one before choosing [Set]. 6-42 M3 Controller User Manual © 2021 Mold-Masters (2007) Limited. All Rights Reserved. -
Page 168: Set Or Change Temperature With The Picture View Screen
For more information on Manual mode, see "5.7.1 Set Manual Mode" on page 5-28. For more information on Slave mode, see "6.7 Slave Mode" on page 6-12. 6-43 M3 Controller User Manual © 2021 Mold-Masters (2007) Limited. All Rights Reserved. -
Page 169: Set Manual Mode With The Picture View Screen
The user can return to the Picture View screen at any time by choosing [Esc] twice. The mini panel / panels now have a display that alternately flashes “MAN” and the temperature. 6-44 M3 Controller User Manual © 2021 Mold-Masters (2007) Limited. All Rights Reserved. -
Page 170: Set A Zone To Slave On The Picture View Screen
6.19.5 Set a Zone to Slave on the Picture View Screen 1. Choose the required zone or zones: 2. Choose [Set]: 3. Enter password, if required. A keypad opens: 4. Choose [Slave] for the mode. 6-45 M3 Controller User Manual © 2021 Mold-Masters (2007) Limited. All Rights Reserved. - Page 171 The mini panel now displays the chosen zone as a slaved zone. See Figure 6-19. Figure 6-19 Picture View screen with a slaved zone The user can return to the Picture View screen at any time by choosing [Esc] twice. 6-46 M3 Controller User Manual © 2021 Mold-Masters (2007) Limited. All Rights Reserved.
-
Page 172: Open The Zoom Screen From The Picture View Screen
1. Choose the required zone or zones: 2. Choose [Zoom]: The Zoom screen opens. See "4.22.5 Zoom Screen" on page 4-40 for more information on the Zoom screen. 6-47 M3 Controller User Manual © 2021 Mold-Masters (2007) Limited. All Rights Reserved. -
Page 173: Monitor Energy Usage - Energy Screen
1. Choose [Apps]: 2. Choose [Energy]: 3. Enter password, if required. The Energy screen opens. See Figure 6-20. Figure 6-20 Energy screen - time scale 5 minutes 6-48 M3 Controller User Manual © 2021 Mold-Masters (2007) Limited. All Rights Reserved. -
Page 174: Configure The Energy Screen
1. Choose [Config]: The Energy Settings box opens: 2. Choose [Part Weight (grams)]: 3. Enter part weight or choose [Esc] to return to the Energy Settings box. 6-49 M3 Controller User Manual © 2021 Mold-Masters (2007) Limited. All Rights Reserved. - Page 175 6. Press [OK] to accept or [Cancel] to return to the Energy screen. The user can reset the total energy used back to 0 with the [Reset] button. 6-50 M3 Controller User Manual © 2021 Mold-Masters (2007) Limited. All Rights Reserved.
-
Page 176: Print The Graphs From The Energy Screen
1. Insert a USB memory stick into one of the USB ports on the console. 2. Choose [Apps]: 3. Choose [Export]: 4. Enter password, if required. 6-51 M3 Controller User Manual © 2021 Mold-Masters (2007) Limited. All Rights Reserved. - Page 177 The Export screen opens. See Figure 6-21. Figure 6-21 Export screen 5. Choose [Start Date] and [End Date] from the dropdown menus: 6. Choose [First Zone] and [Last Zone] from the dropdown menus: 6-52 M3 Controller User Manual © 2021 Mold-Masters (2007) Limited. All Rights Reserved.
- Page 178 In the event that the controller is not working properly and cannot be fixed with the manual, then it is necessary to contact Mold-Masters for additional assistance. Mold-Masters recommends that a copy of the controller’s configuration is exported and sent to help@moldmasters.com.
-
Page 179: Monitor Controller Changes - Actions Screen
3. Choose the Tool # header to filter the actions for the currently selected tool. You can move through the list of actions on a particular screen by using the scrollbar on the right side of the screen. 6-54 M3 Controller User Manual © 2021 Mold-Masters (2007) Limited. All Rights Reserved. - Page 180 You can move through the pages of actions by using the [Page p] or [Page q] buttons. 4. Choose [Filter]: The Filter Settings box opens: 5. Choose [Start Date] and [End Date] to filter by date: 6-55 M3 Controller User Manual © 2021 Mold-Masters (2007) Limited. All Rights Reserved.
- Page 181 7. Choose [User] to filter by user: 8. Choose [Zone] to filter by zone: NOTE Choose [Reset Filters] to return all filter options to “All” if required. 6-56 M3 Controller User Manual © 2021 Mold-Masters (2007) Limited. All Rights Reserved.
- Page 182 [Print] button. No printer settings box will open. See "5.13 Configure a Printer" on page 5-50 for more information. 6-57 M3 Controller User Manual © 2021 Mold-Masters (2007) Limited. All Rights Reserved.
-
Page 183: Monitor Alarms - Alarms Screen
You can move through the pages of actions by using the [Page p] or [Page q] buttons. 3. Choose the Tool # header to filter the alarms for the currently selected tool. 4. Choose [Filter]: 6-58 M3 Controller User Manual © 2021 Mold-Masters (2007) Limited. All Rights Reserved. - Page 184 OPERATION The Filter Settings box opens: 5. Choose [Start Date] and [End Date] to filter by date: 6. Choose [Action] to filter by action: 6-59 M3 Controller User Manual © 2021 Mold-Masters (2007) Limited. All Rights Reserved.
- Page 185 7. Choose [User] to filter by user: 8. Choose [Zone] to filter by zone: NOTE You can choose [Reset Filters] to return all filter options to “All”.. 6-60 M3 Controller User Manual © 2021 Mold-Masters (2007) Limited. All Rights Reserved.
- Page 186 [Print] button. No printer settings box will open. See "5.13 Configure a Printer" on page 5-50 for more information. 6-61 M3 Controller User Manual © 2021 Mold-Masters (2007) Limited. All Rights Reserved.
-
Page 187: Connect Remotely - Remote Screen
2. Choose [Remote]: 3. Enter password, if required. The Remote screen with the VNC settings box opens. See Figure 6-26. Figure 6-26 Remote screen with VNC Settings box 6-62 M3 Controller User Manual © 2021 Mold-Masters (2007) Limited. All Rights Reserved. -
Page 188: Stop The Vnc
If window mode is selected: choose [Stop VNC] to return to the Remote screen with the VNC Settings box. If Full screen mode is selected: the user must wait for the Viewer timeout to complete. 6-63 M3 Controller User Manual © 2021 Mold-Masters (2007) Limited. All Rights Reserved. -
Page 190: Section 7 - User Access And Networking
Only users who have the Access Level Page permission are able to access this screen. 1. Choose [Settings]: 2. Choose [User Access]: 3. Enter password, if required. The User Access screen opens. See Figure 7-1. Figure 7-1 User Access screen M3 Controller User Manual © 2021 Mold-Masters (2007) Limited. All Rights Reserved. -
Page 191: Configure User Limitations
Many functions are restricted according to their job title. A user with Supervisor level access can add or remove functions from other users. 7.2.1 Add a Function for a User Choose the box where the function intersects with the required user: M3 Controller User Manual © 2021 Mold-Masters (2007) Limited. All Rights Reserved. -
Page 192: Remove A Function From A User
7.2.2 Remove a Function from a User To remove a function from a user, choose the box with the green checkmark, where the function intersects with the required user: M3 Controller User Manual © 2021 Mold-Masters (2007) Limited. All Rights Reserved. -
Page 193: Import System Security Settings
3. Choose [Import] to import user security settings. A message box opens: 4. Choose [OK] to import settings or choose [Cancel] to return to the System Security Settings box. M3 Controller User Manual © 2021 Mold-Masters (2007) Limited. All Rights Reserved. -
Page 194: Export System Security Settings
IMPORTANT The 12 user levels share over 100 different functions. Mold-Masters recommends that any changes made to the default settings are exported and saved for backup purposes. Security settings can be exported from the M3 controller onto a USB memory stick. -
Page 195: User Admin Screen
1. Choose [Settings]: 2. Choose [User Admin]: 3. Enter password, if required. The User Admin screen opens. See Figure 7-2. Figure 7-2 User Admin screen M3 Controller User Manual © 2021 Mold-Masters (2007) Limited. All Rights Reserved. -
Page 196: View User Details
4. Choose [OK] to accept the user setting changes or [Cancel] to return to the User Admin screen without saving any changes. 5. Choose [Back] at any point to return to the previous screen. M3 Controller User Manual © 2021 Mold-Masters (2007) Limited. All Rights Reserved. -
Page 197: Add A New User
The Add User box opens: 2. Choose [User ID] and use the keypad to enter a value: 3. Enter the user’s name: [First Name - Middle Name (not required) - Last name] M3 Controller User Manual © 2021 Mold-Masters (2007) Limited. All Rights Reserved. - Page 198 6. Choose [OK] to create the new user or [Cancel] to return to the User Admin screen without creating the user. NOTE Choose [Esc] twice at any point to return to the previous screen. M3 Controller User Manual © 2021 Mold-Masters (2007) Limited. All Rights Reserved.
-
Page 199: Delete A User
7.6 User Admin Settings Login settings and user lists are managed in this section. 1. Choose [User Admin Settings]: The User Admin Settings box opens: 7-10 M3 Controller User Manual © 2021 Mold-Masters (2007) Limited. All Rights Reserved. -
Page 200: Auto Login User
1. Insert the USB memory stick into the console and wait about 10 seconds. 2. Choose [Import]. A warning box opens: 3. Choose [OK] to continue or [Cancel] to return to the User Admin Settings screen. 7-11 M3 Controller User Manual © 2021 Mold-Masters (2007) Limited. All Rights Reserved. -
Page 201: Export User List
1. Insert the USB memory stick into the console and wait about 10 seconds. 2. Choose [Export]. A message box opens: 3. Remove the USB memory stick after the message disappears. 7-12 M3 Controller User Manual © 2021 Mold-Masters (2007) Limited. All Rights Reserved. -
Page 202: Configure A Network Connection
Figure 7-4 TS8 console Network boxes 7.7.1 Configure a Wired Connection For connection using an Ethernet cable. 1. Choose [Settings]: 2. Choose [Config]: 3. Enter password, if required. 4. Choose [Network]: 7-13 M3 Controller User Manual © 2021 Mold-Masters (2007) Limited. All Rights Reserved. - Page 203 5. Enter [Machine Name]: 6. Enter [Domain Name]: NOTE The controller may not be linked to a network. In that case the controller is identified as “Local.” 7-14 M3 Controller User Manual © 2021 Mold-Masters (2007) Limited. All Rights Reserved.
-
Page 204: Configure A Wireless Network
Network Settings boxes. 1. Choose the Interface [Wireless]. 2. Choose [Wireless SSID]. A message box opens: 7-15 M3 Controller User Manual © 2021 Mold-Masters (2007) Limited. All Rights Reserved. - Page 205 7. Choose [Accept] to connect or [Cancel] to return to the network box. NOTE If the network is connected, the address in the Wireless SSID box is green. If the network is not connected, the address is red. 7-16 M3 Controller User Manual © 2021 Mold-Masters (2007) Limited. All Rights Reserved.
-
Page 206: Add A Hidden Wireless Ssid
5. Choose [Accept] to connect or [Cancel] to return to the network box. NOTE If the network is connected, the address in the Wireless SSID box is green. If the network is not connected, the address is red. 7-17 M3 Controller User Manual © 2021 Mold-Masters (2007) Limited. All Rights Reserved. -
Page 207: Share Files On A Network
The user can connect to a Network Share to access files, tools, and pictures from linked controllers. 1. Choose [Settings]: 2. Choose [Config]: 3. Enter password, if required. 4. Choose [Network Share]. The Network Share box opens: 7-18 M3 Controller User Manual © 2021 Mold-Masters (2007) Limited. All Rights Reserved. - Page 208 6. Choose [Share Name] and enter the share name: 7. Choose [Workgroup] and enter the share workgroup. 8. Choose [Username] and enter the username: 9. Choose [Password] and enter the password: 7-19 M3 Controller User Manual © 2021 Mold-Masters (2007) Limited. All Rights Reserved.
-
Page 209: Linked Controllers
A 60 zone cabinet and 30 zone cabinet can be configured to work as a single 90 zone controller. A single console can be connected to either controller, and it would display all 90 zones. 7-20 M3 Controller User Manual © 2021 Mold-Masters (2007) Limited. All Rights Reserved. -
Page 211: Section 8 - Maintenance
CAUTION Put controller into Stop mode before any updates are installed. Mold-Masters has a policy of continuous improvement. A notification to existing customers is sent out in the instance of software upgrades available. It may be possible to apply system upgrades to your own controller depending on the type and age of your equipment. - Page 212 An information box will open: After the upgrade is installed, the user is prompted to restart the console to complete the upgrade: 6. Choose the information button once the console has restarted: M3 Controller User Manual © 2021 Mold-Masters (2007) Limited. All Rights Reserved.
- Page 213 MAINTENANCE 7. Check the screen to see that the latest version has been installed. See Figure 8-1. Figure 8-1 Check software version M3 Controller User Manual © 2021 Mold-Masters (2007) Limited. All Rights Reserved.
-
Page 214: Check The Touchscreen Alignment
The Calibration routine places a crosshair target at four different positions on the screen. The use of a stylus increases the precision of the alignment. 1. Choose [Settings]: 2. Choose [Config]: 3. Enter password, if required. The Settings box opens: M3 Controller User Manual © 2021 Mold-Masters (2007) Limited. All Rights Reserved. - Page 215 5. Choose [Calibrate Touch] from the Options list: 6. Choose [Enable]. A warning box opens: 7. Choose [OK] to continue with the calibration routine or [Cancel] to return to the Options list without calibrating. M3 Controller User Manual © 2021 Mold-Masters (2007) Limited. All Rights Reserved.
- Page 216 The calibration screen will open. See Figure 8-2. Figure 8-2 Calibration screen IMPORTANT Mold-Masters recommends the use of a stylus pen for precision. 9. Touch the center point of the crosshairs. • When you stop touching the screen, the crosshair target will move to another position.
-
Page 217: Self Diagnostic Tests
The controller can perform three types of diagnostic tests: • fast test • full test • power only test From the Display screen, 1. Choose [Apps]: The Apps screen opens: 2. Choose [Testing]: M3 Controller User Manual © 2021 Mold-Masters (2007) Limited. All Rights Reserved. - Page 218 Test Stage - the point at which the test is at during its operation 3. Choose [First Zone] and [Last Zone] to open a dropdown menu, and choose the first zone and the last zone: M3 Controller User Manual © 2021 Mold-Masters (2007) Limited. All Rights Reserved.
- Page 219 Choose [Skip] to skip the test for any zone. During testing, the zone display or displays show test. See Figure 8-3. Figure 8-3 Zone display - Testing mode M3 Controller User Manual © 2021 Mold-Masters (2007) Limited. All Rights Reserved.
-
Page 220: Fast Test
The Full test information boxes show the same data as the fast test. Figure 8-5 Full test - information boxes 8-10 M3 Controller User Manual © 2021 Mold-Masters (2007) Limited. All Rights Reserved. -
Page 221: Power Test
The Power Test does not check for issues such as zone wiring errors. The Power test criteria boxes also show Target and Power %. Figure 8-6 Power Test - information boxes 8-11 M3 Controller User Manual © 2021 Mold-Masters (2007) Limited. All Rights Reserved. -
Page 222: Interpret The Test Results
Deviation – shows the difference between the current readings and readings that have been saved • Leakage – shows if any leakage current to ground was measured 8-12 M3 Controller User Manual © 2021 Mold-Masters (2007) Limited. All Rights Reserved. - Page 223 "Table 8-1 System Diagnosis Error Messages" on page 8-14. Results can also been seen on the Display screen. See Figure 8-9. Figure 8-9 Zone error messages during testing 8-13 M3 Controller User Manual © 2021 Mold-Masters (2007) Limited. All Rights Reserved.
-
Page 224: System Diagnosis Error Messages
User Skipped The test for this zone was skipped while it was being tested. Test User Stopped The test was aborted. Test 8-14 M3 Controller User Manual © 2021 Mold-Masters (2007) Limited. All Rights Reserved. -
Page 225: Print The Test Results
[Print] button. No printer settings box will open. See "5.13 Configure a Printer" on page 5-50 for more information. 8-15 M3 Controller User Manual © 2021 Mold-Masters (2007) Limited. All Rights Reserved. -
Page 226: Training And Demonstration Mode
Graph screen is selected. NOTE The controller will not communicate with the associated controller cabinet when in Demo mode. Mold-Masters recommends that the system is idle when Demo mode is in use. 8.7.1 Enter or Leave Demo Mode 1. Choose [ToolStore]: 2. - Page 227 6. Choose [Demo Mode]. A warning box opens: To leave Demo mode, repeat steps 1 to 4, and choose [Serial Port]. 8-17 M3 Controller User Manual © 2021 Mold-Masters (2007) Limited. All Rights Reserved.
-
Page 228: Remove Or Reconnect The Console
8.8.2 Reconnect the Console 1. Plug in the power connector. 2. Make sure that the correct tool is selected: 3. Plug in the USB data link cable. 8-18 M3 Controller User Manual © 2021 Mold-Masters (2007) Limited. All Rights Reserved. -
Page 229: Service And Repair The Controller
Only use ceramic body fuses on control cards. Never use glass-bodied fuses. 8.9.1 Replacement Parts Mold-Masters does not expect that you will need to repair any controller parts at board level other than fuses. In the unlikely event of any board failure then we provide an excellent repair and exchange facility for all our customers. -
Page 230: Replacement Fuses
If the thermocouple (TC) LED indicator shows an open thermocouple circuit, then the input fuse may have ruptured. Table 8-3 TC Input Fuse Specifications Input Fuse Type Surface mount Fuse Nano Ceramic Very Fast Rating 62mA 8-20 M3 Controller User Manual © 2021 Mold-Masters (2007) Limited. All Rights Reserved. -
Page 232: Section 9 - Troubleshooting
To remove a card from its slot, pull the white handles forward and gently pull out the card. It is not necessary to switch off the main power supply. M3 Controller User Manual © 2021 Mold-Masters (2007) Limited. All Rights Reserved. -
Page 233: Beacon And Sounder Extension
TEST Displayed when the zone is in Diagnostic Test mode. Displayed if a temperature interaction is found between zones during a WARN test. M3 Controller User Manual © 2021 Mold-Masters (2007) Limited. All Rights Reserved. -
Page 234: Fault And Warning Messages
HTR! The heater resistance is not what is expected • Check heater resistance is correct or the heater is open circuit. with a meter. M3 Controller User Manual © 2021 Mold-Masters (2007) Limited. All Rights Reserved. - Page 235 99°C. not been fitted. RTD circuits can only read from 0-99°C so a fault is likely and needs to be investigated. Note: no control zones are affected. M3 Controller User Manual © 2021 Mold-Masters (2007) Limited. All Rights Reserved.
- Page 236 (RTD is open circuit) broken connection. USB4 The M3 Comms board has been • Check the connection between the M3 disconnected from the console. Comms board and the console. M3 Controller User Manual © 2021 Mold-Masters (2007) Limited. All Rights Reserved.
-
Page 237: M3 Comm Board Troubleshooting
Blinking green No CAN communication between the module and the M3 controller. Solid red TC is not connected to the module. TC is connected. Blinking green CPU Error—Contact MoldMasters. M3 Controller User Manual © 2021 Mold-Masters (2007) Limited. All Rights Reserved. -
Page 239: Section 10 - Controller Wiring
CAUTION Incorrect connection to a Star / Delta configuration can damage the controller. The following standards only apply to controllers wired to Mold-Masters standard. Other specifications may have been stated when the controller was ordered. Please refer to the supplied specification details. -
Page 240: Connect The Star / Delta Option
MP on the terminal block. Figure 10-1 Connect the neutral - position shown by blue arrow Output to busbars Figure 10-2 Install the 3-way link 10-2 M3 Controller User Manual © 2021 Mold-Masters (2007) Limited. All Rights Reserved. -
Page 241: Star Supply Wiring
IMPORTANT Use only a 5 core supply cable for Star connection. Neutral Earth Note: five core cable only. Neutral line wired. Figure 10-3 Star supply wiring 10-3 M3 Controller User Manual © 2021 Mold-Masters (2007) Limited. All Rights Reserved. -
Page 242: Set Power Rail To Delta Configuration
Figure 10-4 Remove the neutral - position shown by blue arrow Output to busbars Figure 10-5 Install the three 2-way links 10-4 M3 Controller User Manual © 2021 Mold-Masters (2007) Limited. All Rights Reserved. -
Page 243: Delta Supply Wiring
A power cable can use a multicore cable or a conduit with individual conductors. Refer to Table 10-3 for more color information. Table 10-3 Power Cable Conductor Colors Three Phase Supply Return Type Star or Delta Brown Yellow 10-5 M3 Controller User Manual © 2021 Mold-Masters (2007) Limited. All Rights Reserved. -
Page 244: Alarm Output / Auxiliary Input
A male 9 way D panel connector can be provided for an RS-232 serial port, which is used to communicate with a remote computer for data collection. Figure 10-8 RS-232 serial port 10-6 M3 Controller User Manual © 2021 Mold-Masters (2007) Limited. All Rights Reserved. -
Page 245: Usb Port
Table 10-6 USB Port Pin Connections Connection Figure 10-9 USB port 10.8 Filter Option In countries where noise across power lines is a concern, Mold-Masters recommends that an inline filter is fitted. Please contact Mold-Masters for details. 10-7 M3 Controller User Manual... -
Page 246: Touchscreen Schematic
Control Control Control Mains Power Card Card Card Card Distribution Voltage Free alarm Contacts Heater Thermocouple Supply Outputs Inputs from to Tool Tool Figure 10-10 Touchscreen schematic 10-8 M3 Controller User Manual © 2021 Mold-Masters (2007) Limited. All Rights Reserved. -
Page 248: Section 11 - Quad Io Options
[Run], [Standby], [Startup] or [Stop] when a trigger is applied via the IO card. The delay time is set in minutes. 2. Choose the [Delay time], if required. 11-10 M3 Controller User Manual © 2021 Mold-Masters (2007) Limited. All Rights Reserved. - Page 249 A selection box opens: NOTE The [Accept] and [Cancel] boxes become available and the parameter(s) turn blue in color after any change is made by the user. See Figure 11-1. 11-11 M3 Controller User Manual © 2021 Mold-Masters (2007) Limited. All Rights Reserved.
-
Page 250: Quad Io Card Reset Timer
Warning settings are to monitor temperature. above and below set temperature. State of inputs. Read left to right. State of outputs. Read left to right. 11-12 M3 Controller User Manual © 2021 Mold-Masters (2007) Limited. All Rights Reserved. - Page 251 5. Choose [Time (Secs.)]. A keypad opens: 6. Choose [OK] to accept the new value or choose [Back] to return to the System Config screen without saving. 11-13 M3 Controller User Manual © 2021 Mold-Masters (2007) Limited. All Rights Reserved.
-
Page 252: Quad Io - Inputs
The sequence can be forced through its stages in a reduced time if the user applies and removes input in quick succession. Shutdown Puts the controller into Shutdown mode. 11-14 M3 Controller User Manual © 2021 Mold-Masters (2007) Limited. All Rights Reserved. -
Page 253: Quad Io - Outputs
Output is produced when a tool fails to load from remote input Fail Pressure Output is produced if any pressure sensor gives a pressure reading that Alarm deviates from its setpoint enough to generate a second stage alarm. 11-15 M3 Controller User Manual © 2021 Mold-Masters (2007) Limited. All Rights Reserved. -
Page 254: Quad Io - Default Connections
NC Contact 3 Input 4 Input 4 Go to Stop Mode Input 4 NO Contact 4 Output 4 Spare / Inactive MC Contact 4 NC Contact 4 11-16 M3 Controller User Manual © 2021 Mold-Masters (2007) Limited. All Rights Reserved. -
Page 255: Remote Tool Selection
Load Tool 10 – connect, “load pin”, and “tool id pins” to ground - connect pins 1, 3, and 5 to 14 Load tool 19 – connect pins 1, 2, 3 and 6 to 14 11-17 M3 Controller User Manual © 2021 Mold-Masters (2007) Limited. All Rights Reserved. -
Page 256: Dynamic Remote Tool Load
13 go “Closed”) Process Sees “Tool Loaded” Console loses the “Change Tool” command. ends. signal from console and disconnects pins 1, 3 and 5 from ground (pin 14). 11-18 M3 Controller User Manual © 2021 Mold-Masters (2007) Limited. All Rights Reserved. -
Page 258: Index
Serial Port Pin Connections 10-7 Service and Repair 8-21 Settings Screen 4-32 SmartMold Screen 7-20 Melt Leakage Detection Star / Delta Option 10-2–10-4 Auto Leakage Detection 5-34–5-35 Status Window Display 4-27 M3 Controller User Manual © 2021 Mold-Masters (2007) Limited. All Rights Reserved. - Page 259 Warn High / Low 5-12 Tool Settings - Whole Tool Display Mode 5-17 Flow Units 5-17 Input Signal 5-17 Input Timer 5-17 Power Alarm Display 5-18 Power Mode 5-18 Pressure Units 5-18 M3 Controller User Manual © 2021 Mold-Masters (2007) Limited. All Rights Reserved.
- Page 261 +65 6261 7793 tel: +82 31 431 4756 tel: +86 512 86162882 e: singapore@moldmasters.com e: korea@moldmasters.com e: china@moldmasters.com JAPAN tel: +81 44 986 2101 e: japan@moldmasters.com www.moldmasters.com © 2021 Mold-Masters (2007) Limited. All Rights Reserved. M3 User Manual...
Need help?
Do you have a question about the TempMaster M3 Series and is the answer not in the manual?
Questions and answers