Advertisement
Quick Links
OWNERS MANUAL
FOR MEC MODELS 100E
CAUTION: ANY MEC CLAY TARGET MACHINE MUST BE IN THE
DISARMED STATE WITH THE BATTERY DISCONNECTED PRIOR TO
MAKING ANY ADJUSTMENTS, LOADING THE CLAY TARGETS OR
TRANSPORTATION OF MACHINE.
Step 1 – Securely set the machine on level ground, either on the optional T Cart
with hardware supplied or a pallet. If using a pallet, please make sure that it is
fastened with clamps to keep machine from tipping.
IF NOT FASTENED
SECURELY, SERIOUS INJURY OR DAMAGE TO MACHINE CAN OCCOUR!!!
DO NOT CONNECT THE BATTERY. Ensure that the machine is in the
DISARMED/SAFE
position.
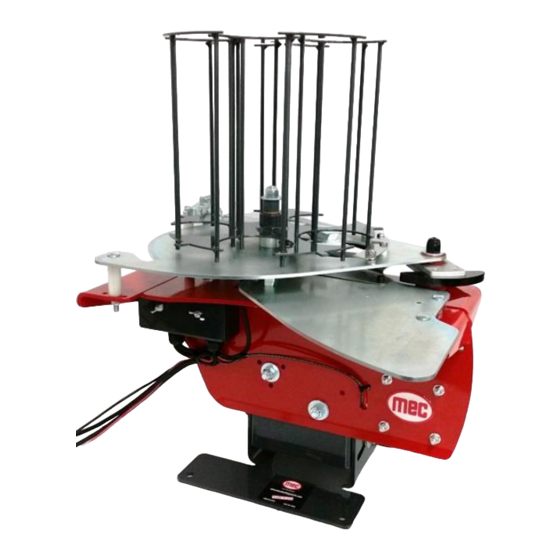
Step 2 – In most cases, your machine has been supplied to you ready to fire. If
so, please proceed to Step 3. If your machine is supplied in a box without its
carousel (shown below) fitted, you will need to attach it to the machine. Simply
slide the carousel weldment onto the top plate shaft. If no grease is present,
please add a little bit to the shaft. You may have to spin/rotate the carousel for it
to slide on. Next, place the gray plastic collar over the shaft and onto the flange
bearing in the carousel. Now place the large washer and nut onto the threads
and tighten. Do not over tighten. You want a little bit of resistance there, but not
too much. You shouldn't be able to spin the carousel with one finger.
Page 1
Version 4
Advertisement

Related Manuals for Mec 100E


Summary of Contents for Mec 100E
- Page 1 OWNERS MANUAL FOR MEC MODELS 100E CAUTION: ANY MEC CLAY TARGET MACHINE MUST BE IN THE DISARMED STATE WITH THE BATTERY DISCONNECTED PRIOR TO MAKING ANY ADJUSTMENTS, LOADING THE CLAY TARGETS OR TRANSPORTATION OF MACHINE. Step 1 – Securely set the machine on level ground, either on the optional T Cart with hardware supplied or a pallet.
- Page 2 Step 3 – The machine comes set to White Flyer “BIO” clays. If using something different you will need to check the height / clearance of the knife-edges by placing a clay in the carousel. Rotate the carousel so that the clay starts to pass underneath the inner and outer knife separator blades.
- Page 3 Step 5 – Check that the ON/OFF/DISARM toggle switch on the grey control box in the OFF position. Connect the terminals from the wire harness to the battery. A fully charged good quality deep cycle marine battery is recommended. It is imperative that the Red Wire goes to positive (+) and Black Wire goes to...
- Page 4 Step 8 – Adjust the machines elevation by loosening the ¾” nut on the side of the machine. Tip machine backwards to the desired angle and then retighten the nut securely. Step 9 – Adjust the machines tilt by loosening the ¾” nut on the front and rear on the base of the machine, as shown below.
- Page 5 Step 13 – To check for clay flight and direction, fire the trap using the ON/OFF/DISARM toggle switch exactly as before, and press and release the DISARM toggle. This will fire one clay and will not rearm itself. Note – holding the disarm toggle will continually fire clay targets.
- Page 6 Step 15 – The pull cord or optional radio release can now be connected to the machine. Step 16 – The machine is now ready for use by pressing the ARM/OFF/DISARM toggle switch, down to the “ARM” position. Step 17 – With the machine pointed in a safe direction, press the fire button on the pull cord or radio release.
- Page 7 FAULT FINDING MECHANICAL CAUTION: ANY MEC MACHINE MUST BE IN THE DISARMED STATE WITH THE BATTERY DISCONNECTED PRIOR TO MAKING ANY ADJUSTMENTS, LOADING WITH CLAYS OR TRANSPORTING 1. The Machine breaks clays - Check loading cycle first: Check that clay in the carousel is intact, not chipped or cracked. If in doubt, remove suspect clays and refill with ones known to be intact.
- Page 8 Check throwing cycle next: Check that the bolt holding the arm to its clamp block is tight. Check arm for chunks missing from the black arm rubber or any other physical damage to the arm. If damage has occurred the black arm rubber should be replaced. Check for damage to the throwing plate, in case it has been dented, bent or burred.
- Page 9 3. Carousel does not rotate. Check the following: The Carousel pusher arm is not jammed with broken clays or dirt. The pusher return spring is broken or missing. With the pusher arm withdrawn, the carousel should be free to rotate with a small amount of friction.
- Page 10 FAULT FINDING ELECTRICAL CAUTION: ANY MEC MACHINE MUST BE IN THE DISARMED STATE WITH THE BATTERY DISCONNECTED PRIOR TO MAKING ANY ADJUSTMENTS, LOADING WITH CLAYS OR TRANSPORTING 1. Machine does not Arm Check: Battery is charged and that connections are tight.
- Page 11 Check the above items. (c) If your machine has a Gray Arm / Dis-arm box. Make sure the wires inside are in good shape, free of corrosion and not pinched on the bottom of the box. Green to White would by-pass the switch and arm the machine. This would indicate a faulty switch. 3.
-
Page 12: Customer Service
Website: www.mecinc.com Thanks for choosing MEC! Every machine is hand set and tested prior to leaving our shop to ensure quality. We take pride in our products, so you can have a better experience in the field. Your patronage is very much appreciated!
Need help?
Do you have a question about the 100E and is the answer not in the manual?
Questions and answers