Advertisement
Quick Links
Advertisement

Subscribe to Our Youtube Channel
Related Manuals for Axor Citterio 27831 Series


Summary of Contents for Axor Citterio 27831 Series
- Page 1 Installation Instructions / Warranty Citterio Terrano Carlton 27831XXX 27834XXX Phoenix 27835XXX...
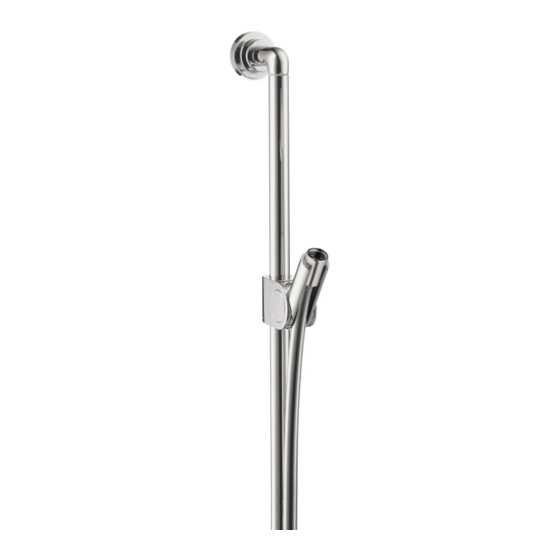
- Page 2 Axor Citterio Wallbar Set 27831XXX Axor Terrano Wallbar Set 27834XXX Axor Carlton / Phoenix Wallbar Set 27835XXX 27831XXX 27834XXX 27835XXX This wallbar set contains the wallbar and a 63” Techniflex handshower hose. It is compatible with any Hansgrohe handshower.
- Page 3 Axor Citterio Wallbar Installation Mark the positions for the screw holes (1). The center of the top hole should be 36” from the center of the bottom hole. Drill the holes with a 6 mm bit suitable for the wall surface (2).
- Page 4 Axor Terrano / Carlton / Phoenix Wallbar Installation Mark the positions of the screw holes, using the holes on the mounting pieces as a template. When positioning the support element on the wall, make sure that the notch is at the bottom.
- Page 5 Install the anchors. Seal the wall around the anchors with waterproof sealant. Screw the support elements to the wall with the screws. Note: the gold deco-rings shown in the diagram are included only with Carlton model 27835090 (chrome with gold accents). They are not used with other models. Deco ring Position the wallbar over the support elements.
-
Page 6: Angle Adjustment
Slider Adjustment Vertical adjustment easier harder To adjust the resistance of the slider, use a screwdriver to turn the adjustment screw on the back of the slider. Turning the screw clockwise makes the slider harder to move, counter-clockwise makes it easier. Angle adjustment To change the resistance of the angle adjustment of the handshower holder, use a 3 mm Allen wrench to turn the... - Page 7 Install the handshower (not included) Remove the protective cap from the handshower. Place a black rubber hose washer in the shorter hose end connection. Screw this end to the wall supply (not included). Place the screen washer in the longer hose end connection.
- Page 8 Replacement Parts 27831XXX mounting set 40916000 slider 96505XXX mounting piece 97597000 cylinder screw 97661000 set screw 97660000 wall support 97696XXX hose 28276XXX Replacement Parts 27834XXX mounting set 96179000 support element 96341000 hexagon screw 97661000 97546000 slider 96505XXX hose 28276XXX...
- Page 9 Replacement Parts 27835XXX mounting set 96179000 slider 96505XXX support element 96341000 97546000 hexagon screw 97661000 hose 28276XXX...
-
Page 10: Limited Lifetime Consumer Warranty
If you purchased the product for use primarily for any other purpose, including, without limitation, a commercial purpose, this warranty extends only (i) for 1 year, with respect to Hansgrohe and Commercial products, and (ii) for 5 years, with respect to AXOR products. - Page 11 THIS WARRANTY DOES NOT COVER, AND HANSGROHE WILL NOT PAY FOR: Conditions, malfunctions or damage not resulting from defects in material or workmanship. Conditions, malfunctions or damage resulting from (1) normal wear and tear, improper installation, improper maintenance, misuse, abuse, negligence, accident or alteration, or (2) the use of abrasive or caustic cleaning agents or “no-rinse”...
- Page 12 Hansgrohe, Inc. • 1490 Bluegrass Lakes Parkway • Alpharetta, GA 30004 Tel. 770 360-9880 • Fax 770 360 9887 www.hansgrohe-USA.com...
Need help?
Do you have a question about the Citterio 27831 Series and is the answer not in the manual?
Questions and answers