
Subscribe to Our Youtube Channel
Related Manuals for Edimax EW-7317LDg


Summary of Contents for Edimax EW-7317LDg
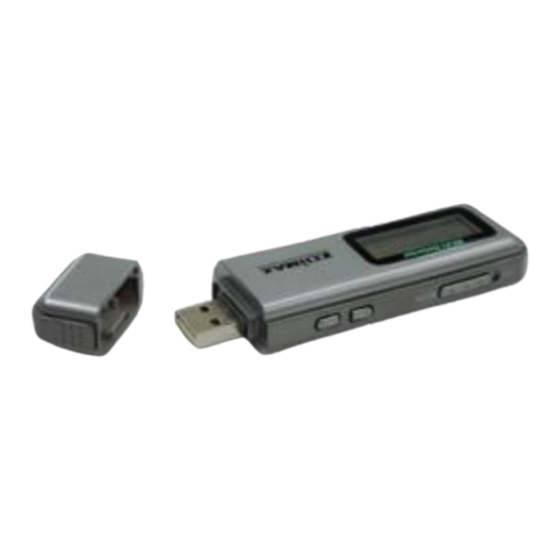
- Page 1 802.11g Wireless LAN Wi-Fi Detector / USB 2.0 Adapter Version 1.0 March, 2006...
- Page 2 Č Č Anglického průvodce rychlou instalací naleznete ý : ý na přiloženém CD s ovladači Finden Sie bitte das englische QIG beiliegend in der Treiber CD (German) ñ ñ Incluido en el CD el QIG en Ingles. ç Veuillez trouver l’anglais QIG ci-joint dans le CD ç...
- Page 3 *How to Charge the Wi-Fi Detector: 1. Remove the cap from the Wi-Fi Detector, slide the power switch to the “ON” position and carefully insert the USB connector into any available USB port on your computer. You will see the recharging screen. The battery strength indicator will be animated while the Wi-Fi detector is being recharged.
- Page 4 *How to use the Wi-Fi Detector: 1. Slide the power switch to the “ON” position, and a welcome screen will greet the user. 2. After the welcome screen is displayed the Wi-Fi detector will automatically enter scanning mode to detect Wi-Fi signals. In scanning mode the LCM will display the total number of both non-encrypted and encrypted Wi-Fi signals detected.
- Page 5 The Icons on the LCM are displayed as follows: 1. Operating Channel: Indicates the current operating channel of the detected Wi-Fi signal. 2. Number of AP’s Detected: the left digit indicates which detected Wi-Fi signal is currently displayed and the right digit indicates the total amount of Wi-Fi signals detected.
- Page 6 4. If the user wishes to detect a signal with a dedicated SSID, the user simply has to hold down the “scan” button for 4 seconds to enter “lock mode”. When the detector is in “lock mode” an icon with a capitalized “L” appears in the upper middle corner of the display.
- Page 7 *Windows 98SE/Me/2000/XP: The following installation operates under Windows XP. Procedures are similar for Windows 98SE/Me/2000/2003 Server. Please do not install the USB adapter into your computer before installing the software program from the CD. A. Install the Configuration Utility Insert the Installation CD to your CD-ROM drive, the setup programs will appear.
- Page 8 Execute the “setup” program then click “Next” to continue If you want to install the software program in another location, click “Browser” and select an alternative destination. Then, click “Next” to continue...
- Page 9 Click “Continue Anyway” to finish the installation. B. Install the USB Adapter Plug the USB Adapter into the USB port of your computer.
- Page 10 The “Found New Hardware Wizard” is displayed, select “Install the software automatically (Recommended)” and click “Next”. Click “Continue Anyway” and the system will start to install the USB adapter.
- Page 11 Click “Finish” to complete the installation. C. Using the Configuration Utility To setup the USB adapter, double-click the icon in the system tray. For Windows XP, there is a “Windows Zero Configuration Tool” by default for you to setup wireless clients. If you want to use the Utility of the USB adapter, please follow one of the ways as below.
- Page 12 Click “Yes” to use the utility of the USB adapter Double-click the “Windows Zero Configuration Tool” icon Click “Advance”.
- Page 13 Uncheck “Use Windows to configure my wireless network settings” and click “OK”. D. Wireless Connection Status When you open the Configuration Utility, the system will scan all the channels to find all the access points/stations within the accessible range of your card and automatically connect to the wireless device with the highest signal strength.
- Page 14 Available Network: Display the available networks and the signal strength information nearby. To connect to one of the network, double-click the network. Current Network Information: Display the information of the network which the adapter is connecting to. Link Status: Show the link status, signal strength and link quality of the network for you to adjust the best location for wireless connection.
Need help?
Do you have a question about the EW-7317LDg and is the answer not in the manual?
Questions and answers