
Related Manuals for AXEM Technology AT880

Summary of Contents for AXEM Technology AT880
- Page 1 File : PDAUHF1350-UG-v1.0 Version : V1.0 AT880 User guide 1/45 – info@axemtec.com – +33 (0)1 41 94 11 85 – www.axemtec.com TEIL 450711403 - N° TVA intracom : FR05450711403 - Capital : 500 000,00 €...
-
Page 2: Table Of Contents
WARNIING ........................5 CAUTION ........................5 NOTICE ......................... 5 How to use battery correctly ................... 5 Caution when using AT880 .................... 5 Caution when using AT880 ..................6 Product composition ....................6 Name of each part ....................7 Function of each part ....................8 Basic Function ........................ - Page 3 File : PDAUHF1350-UG-v1.0 Version : V1.0 Volume and sounds setting ..................20 5.10 Data and time setting .....................20 5.11 Using keypad ......................22 5.12 Inputting Data ......................22 5.13 Using <Fun> Button ....................23 5.14 Use of stylus......................23 5.15 Connecting PDA to PC ...................23 5.16 Data transfer ......................26 5.17 Firmware upgrading ....................27 Optional modules ......................28...
-
Page 4: Background
File : PDAUHF1350-UG-v1.0 Version : V1.0 1 Background Description Date Version Author Auditor First parution 27/05/2020 V1.0 4/45 – info@axemtec.com – +33 (0)1 41 94 11 85 – www.axemtec.com TEIL 450711403 - N° TVA intracom : FR05450711403 - Capital : 500 000,00 €... -
Page 5: Before Using At880
A caution alerts you that you must observe strictly when you operate procedure, practice, configure. NOTICE A notice provides you the information while using AT880. 3 How to use battery correctly • In case you drop the main body or battery in water, please do not put into the stove or heater for drying. -
Page 6: Caution When Using At880
If you have any other questions on use of device, please contact our customer service center. 4.1 Caution when using AT880 The mobile computer is a small, ergonomically designed PDA, which is built on the Microsoft window CE 5.0 Operating System. -
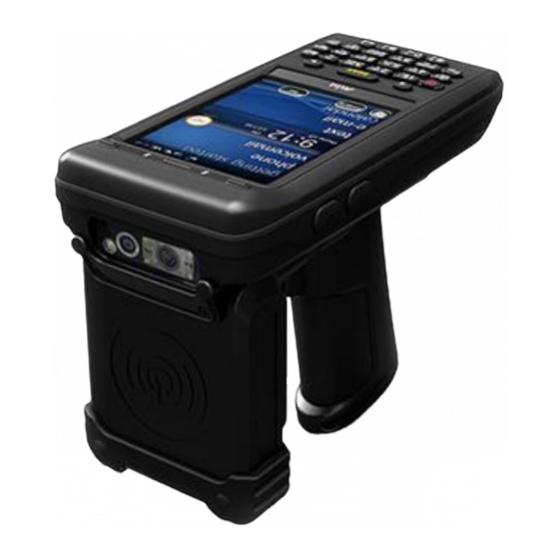
Page 7: Name Of Each Part
File : PDAUHF1350-UG-v1.0 Version : V1.0 4.3 Name of each part 7/45 – info@axemtec.com – +33 (0)1 41 94 11 85 – www.axemtec.com TEIL 450711403 - N° TVA intracom : FR05450711403 - Capital : 500 000,00 €... -
Page 8: Function Of Each Part
File : PDAUHF1350-UG-v1.0 Version : V1.0 4.4 Function of each part 8/45 – info@axemtec.com – +33 (0)1 41 94 11 85 – www.axemtec.com TEIL 450711403 - N° TVA intracom : FR05450711403 - Capital : 500 000,00 €... -
Page 9: Basic Function
File : PDAUHF1350-UG-v1.0 Version : V1.0 5 Basic Function PDA battery is composed of a main battery and a backup battery. A main battery supplies the power to the system and RAM which could keep save the data. A backup battery could keep save the data of RAM when the main battery discharged completely. -
Page 10: Attaching And Detaching The Battery
File : PDAUHF1350-UG-v1.0 Version : V1.0 5.1.2 Attaching and Detaching the battery 5.1.2.1 Battery detachment These images show the back bottom of the PDA. Slide the battery latch to the right (UNLOCK side), and then lift the main battery out of the compartment along both sides of groove. -
Page 11: Power On And Off
File : PDAUHF1350-UG-v1.0 Version : V1.0 3. “Power LED” is Red while charging. Caution: You must charge the battery by using dedicated adapter, which provided from factory, or your device might get damage. 5.2 Power On and Off Press <Power> button one time, the device will enter low-Power mode (Sleep Mode). The following window is displayed on the desktop or other programs is running in the system. -
Page 12: Power Off
File : PDAUHF1350-UG-v1.0 Version : V1.0 5.2.1 Power Off: 1. When the system is in booting status, press <Power> button for a couple of seconds, then the backlight will be turned off and enter the low-power mode (sleep mode). 2. You can also press <Start Button> -> <Suspend> button to turn the device off. 5.2.2 Power On 1. -
Page 13: Battery Discharging
File : PDAUHF1350-UG-v1.0 Version : V1.0 5.2.4 Battery Discharging If the main battery discharges completely, the system will not turn on, the device will get into low-power mode (sleep mode) automatically. Even if you press the <Power> button, the system will not be turned on. In this case, you should charge the main battery or connect the adaptor to the adaptor connecting jack of main body, then press the <Power>... -
Page 14: Battery Replacement
File : PDAUHF1350-UG-v1.0 Version : V1.0 5.2.7 Battery replacement You need to purchase a new one if the battery is damaged or has reached its end of life. ■ Warning! Please dispose the used batteries in a designated place. If there is no response from the system or an application is locked up and stops responding, and when you want to upgrade the firmware, reset the system is maybe necessary. -
Page 15: Initializing System
File : PDAUHF1350-UG-v1.0 Version : V1.0 [Result of Hard Reset] • System will restart • Operating System (Windows CE) will be loading and restarting. • Desktop will appear in about ten seconds. • Time and date window will be popped up and need to reset it. 5.5 Initializing System Enter [Boot Menu] and do what you want, when in the situations as below: •... - Page 16 File : PDAUHF1350-UG-v1.0 Version : V1.0 16/45 – info@axemtec.com – +33 (0)1 41 94 11 85 – www.axemtec.com TEIL 450711403 - N° TVA intracom : FR05450711403 - Capital : 500 000,00 €...
-
Page 17: Attaching Micro Sd Card
File : PDAUHF1350-UG-v1.0 Version : V1.0 The image below is battery compartment, and there are 1EA SIM Card Slot, 1EA SAM Card Slot and 1EA Micro SD Card Slot. 5.6 Attaching Micro SD card 17/45 – info@axemtec.com – +33 (0)1 41 94 11 85 – www.axemtec.com TEIL 450711403 - N°... -
Page 18: Attaching Sim Card And Sam Card
File : PDAUHF1350-UG-v1.0 Version : V1.0 You can find the Micro SD Memory Card icon when executing the -le explorer, after having inserted the Micro SD card. 5.7 Attaching SIM Card and SAM Card SIM Card and SAM Card can easily insert and pull out along arrow direction. 18/45 –... -
Page 19: Screen Settings
File : PDAUHF1350-UG-v1.0 Version : V1.0 5.8 Screen settings 5.8.1 Screen brightness setting Brightness is already set 80% at the factory, and brightness is the biggest consume part of the power, so you might need to adjust it to your actual need. [Setting the screen brightness] [Start Button] ->... -
Page 20: Volume And Sounds Setting
File : PDAUHF1350-UG-v1.0 Version : V1.0 5.9 Volume and sounds setting Volumes is already set 80% at the factory, and you can readjust you need volume at control panel -> ”Volume and Sounds” Setting Volume and Sounds [Start Button] –> [Setting] -> [Control Panel] -> [Volume and Sounds] 5.10 Data and time setting [Start Button] ->... - Page 21 File : PDAUHF1350-UG-v1.0 Version : V1.0 Keypad enables you to input numbers, alphabets and special symbols. And can also execute other set function with <Fun> button. 21/45 – info@axemtec.com – +33 (0)1 41 94 11 85 – www.axemtec.com TEIL 450711403 - N° TVA intracom : FR05450711403 - Capital : 500 000,00 €...
-
Page 22: Using Keypad
File : PDAUHF1350-UG-v1.0 Version : V1.0 5.11 Using keypad If you want to change the current input language, press <1 ALP> button as below steps: [Numeric] -> [Lowercase] –> [Uppercase] 5.12 Inputting Data Numeric Keypad Mode: Press<1 ALP > button or keypad icon on the taskbar to change to the numeric mode and directly press number on the keypad. -
Page 23: Using
File : PDAUHF1350-UG-v1.0 Version : V1.0 5.13 Using <Fun> Button Press <Fun> button and other buttons simultaneously to activate functions as below: Use of stylus 5.14 You can tie the stylus to the hand strap hole, in order to use the stylus like a mouse on a PC Use of stylus: •...Button - Page 24 File : PDAUHF1350-UG-v1.0 Version : V1.0 Caution: You must use ActiveSync v3.7 version or above. 24/45 – info@axemtec.com – +33 (0)1 41 94 11 85 – www.axemtec.com TEIL 450711403 - N° TVA intracom : FR05450711403 - Capital : 500 000,00 €...
- Page 25 File : PDAUHF1350-UG-v1.0 Version : V1.0 Setting PDA [Start Button] -> [Setting] -> [Control Panel] -> [PC Connection] 25/45 – info@axemtec.com – +33 (0)1 41 94 11 85 – www.axemtec.com TEIL 450711403 - N° TVA intracom : FR05450711403 - Capital : 500 000,00 €...
-
Page 26: Data Transfer
File : PDAUHF1350-UG-v1.0 Version : V1.0 Setting PDA [Start Button] -> [Setting] -> [Control Panel] -> [PC Connection] 5.16 Data transfer Use the USB cable to connect PC and the device. Connecting state Disconnecting state You can check the ActiveSync connecting state on the taskbar. Start button/Programs/Microsoft ActiveSync 26/45 –... -
Page 27: Firmware Upgrading
File : PDAUHF1350-UG-v1.0 Version : V1.0 5.17 Firmware upgrading [Start Button] -> [Setting] -> [Control Panel] -> [Firmware Upgrade] 27/45 – info@axemtec.com – +33 (0)1 41 94 11 85 – www.axemtec.com TEIL 450711403 - N° TVA intracom : FR05450711403 - Capital : 500 000,00 €... -
Page 28: Optional Modules
File : PDAUHF1350-UG-v1.0 Version : V1.0 6 Optional modules The optional modules are the following: 1) Barcode reader -. 1D Laser Barcode Scanner -. 2D Imager Barcode Scanner (2D Long Range Barcode Option) 2) Wireless LAN – IEEE 802.11 a/b/g/n (Option) 3) Bluetooth 4) UHF 900MHz –... - Page 29 File : PDAUHF1350-UG-v1.0 Version : V1.0 Executing Barcode Emulator [Start Button] -> [Programs] -> [Scanner] -> [BarcodeEmulator] 29/45 – info@axemtec.com – +33 (0)1 41 94 11 85 – www.axemtec.com TEIL 450711403 - N° TVA intracom : FR05450711403 - Capital : 500 000,00 €...
- Page 30 File : PDAUHF1350-UG-v1.0 Version : V1.0 30/45 – info@axemtec.com – +33 (0)1 41 94 11 85 – www.axemtec.com TEIL 450711403 - N° TVA intracom : FR05450711403 - Capital : 500 000,00 €...
-
Page 31: Barcode Symbology Setting
File : PDAUHF1350-UG-v1.0 Version : V1.0 6.2.1 Barcode symbology setting [Start Button] -> [Program] -> [Scanner] -> [BarcodeSetup] 31/45 – info@axemtec.com – +33 (0)1 41 94 11 85 – www.axemtec.com TEIL 450711403 - N° TVA intracom : FR05450711403 - Capital : 500 000,00 €... -
Page 32: Barcode Scanning
File : PDAUHF1350-UG-v1.0 Version : V1.0 Warning! Please do not look directly into the laser beam of barcode, or it may do harm to your vision. 6.2.2 Barcode scanning 1. Remove the protective film from the window of barcode. 2. Execute the Barcode Demo program. 3. - Page 33 File : PDAUHF1350-UG-v1.0 Version : V1.0 [Incorrect barcode reading] The laser beam must across the barcode. 33/45 – info@axemtec.com – +33 (0)1 41 94 11 85 – www.axemtec.com TEIL 450711403 - N° TVA intracom : FR05450711403 - Capital : 500 000,00 €...
-
Page 34: Wlan Connection And Termination
File : PDAUHF1350-UG-v1.0 Version : V1.0 6.3 WLAN connection and termination 34/45 – info@axemtec.com – +33 (0)1 41 94 11 85 – www.axemtec.com TEIL 450711403 - N° TVA intracom : FR05450711403 - Capital : 500 000,00 €... -
Page 35: Bluetooth Connection And Termination
File : PDAUHF1350-UG-v1.0 Version : V1.0 Warning! The Wlan LED will changed to green and the Wlan icon on the taskbar will be lighted on if failed the Wlan icon will be light off 6.4 Bluetooth connection and termination [WinCE Start] -> [Programs] -> [Demo Apps] -> [Bluetooth] 1. -
Page 36: Bluetooth Pairing
File : PDAUHF1350-UG-v1.0 Version : V1.0 6.4.1 Bluetooth Pairing [WinCE Start] -> [Settings] -> [Control Panel] -> [Bluetooth Device Properties] 36/45 – info@axemtec.com – +33 (0)1 41 94 11 85 – www.axemtec.com TEIL 450711403 - N° TVA intracom : FR05450711403 - Capital : 500 000,00 €... - Page 37 File : PDAUHF1350-UG-v1.0 Version : V1.0 37/45 – info@axemtec.com – +33 (0)1 41 94 11 85 – www.axemtec.com TEIL 450711403 - N° TVA intracom : FR05450711403 - Capital : 500 000,00 €...
-
Page 38: Gps Demo Program Execution
File : PDAUHF1350-UG-v1.0 Version : V1.0 6.5 GPS demo program execution [Start Button] -> [Program] -> [DEMO Apps] ->[GPS-Demo] Execute GPSDemo Program. 38/45 – info@axemtec.com – +33 (0)1 41 94 11 85 – www.axemtec.com TEIL 450711403 - N° TVA intracom : FR05450711403 - Capital : 500 000,00 €... - Page 39 File : PDAUHF1350-UG-v1.0 Version : V1.0 Start: Start to receive GPS data Stop: Stop to receive GPS Data Exit: Exit the GPS Demo program Con-rm GPS receiving Data: 1. Find an open place to check your GPS signals. 2. According to the actual environment, the time to receive data is dierent (about 3~10min), After receiving GPS data once, it is faster to receive GPS data than the first attempt.
-
Page 40: Use Of Camera
File : PDAUHF1350-UG-v1.0 Version : V1.0 6.6 Use of camera [Start Button] -> [Program] -> [DEMO Apps] -> [CameraDemo] 40/45 – info@axemtec.com – +33 (0)1 41 94 11 85 – www.axemtec.com TEIL 450711403 - N° TVA intracom : FR05450711403 - Capital : 500 000,00 €... -
Page 41: Hf13.56 Demo Program Execution
File : PDAUHF1350-UG-v1.0 Version : V1.0 6.7 HF13.56 demo program execution [Start Button] -> [Program] -> [DEMO Apps] -> [RF13.56Demo] 6.8 Mifare tag recognition Click MF_UID button to read a Mifare Tag 41/45 – info@axemtec.com – +33 (0)1 41 94 11 85 – www.axemtec.com TEIL 450711403 - N°... -
Page 42: Iso15693 Tag Recognition
Version : V1.0 6.9 ISO15693 tag recognition AT880 enables to read and write RFID Tag which supported protocol of GEN2, ISO/IEC 18000- 6C. The Frequency range is CE 865MHz ~ 868MHz, FCC 902MHz ~ 928MHz. Click UID button to read ISO 15693 Tag 6.10 UHF 900MHz Program... -
Page 43: Modem
File : PDAUHF1350-UG-v1.0 Version : V1.0 6.11 Modem 6.11.1 Modem ON/OFF 43/45 – info@axemtec.com – +33 (0)1 41 94 11 85 – www.axemtec.com TEIL 450711403 - N° TVA intracom : FR05450711403 - Capital : 500 000,00 €... -
Page 44: Modem Resetting
File : PDAUHF1350-UG-v1.0 Version : V1.0 6.11.2 Modem Resetting 44/45 – info@axemtec.com – +33 (0)1 41 94 11 85 – www.axemtec.com TEIL 450711403 - N° TVA intracom : FR05450711403 - Capital : 500 000,00 €... -
Page 45: Appendix
File : PDAUHF1350-UG-v1.0 Version : V1.0 7 Appendix Product specification 45/45 – info@axemtec.com – +33 (0)1 41 94 11 85 – www.axemtec.com TEIL 450711403 - N° TVA intracom : FR05450711403 - Capital : 500 000,00 €...
Need help?
Do you have a question about the AT880 and is the answer not in the manual?
Questions and answers