
Related Manuals for Colzer CFT4.0D


Summary of Contents for Colzer CFT4.0D
- Page 1 Colzer Dehumidifier User Manual Model No.: CFT4.0D Please read this User Manual before operating and keep safe for future reference.
- Page 2 From breathing easier in your office to upgrading your kitchen appliances, we hope you trust COLZER to help you every step of the way.
-
Page 3: Table Of Contents
CONTENTS SAFETY INFORMATION............................... 1 PARTS IDENTIFICATION............................. 2 OPERATION INSTRUACTIONS............................ 3 1. Install the Handle............................3 2. Position Your Dehumidifier..........................4 3. Set Up the Drainage............................4 4. Plug in Electrical Cord............................5 5. Understand the Control Panel........................5 (1) What is on the LCD Screen?......................... 5 (2) Understand the Control Buttons...................... -
Page 4: Safety Information
SAFETY INFORMATION • Install the dehumidifier on flat surface to minimize vibration and or noise. • Inspect the power cord before use. Never operate the dehumidifier when the power cord or plug is damaged. • Insert the three-prong plug on the power cord into a matching electrically grounded outlet (115V/ 60 Hz, 16 A at least). -
Page 5: Parts Identification
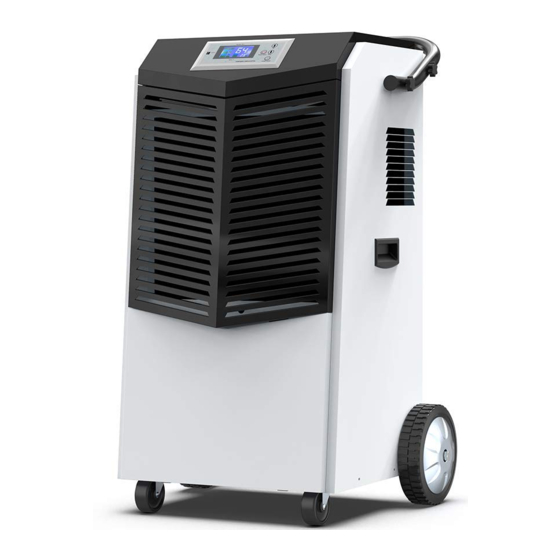
PARTS IDENTIFICATION 1. Handle 2. Air Inlet 3. Power Cord 4. Drain Outlet 5. Control Panel 6. Air Outlet 7. Wheel NOTE: DO NOT OBSTRUCT THE AIR INLET OR OUTLET. -
Page 6: Operation Instruactions
OPERATION INSTRUACTIONS 1. Install the Handle 1) Unscrew the pre-installed hand screws on both sides of the handle to take the handle off. 2) Install the handle as illustrated below, please note to align the holes on the handle with the holes on the dehumidifier. -
Page 7: Position Your Dehumidifier
2. Position Your Dehumidifier For best results, operate your dehumidifiers in an enclosed area. Close all doors and windows. Place your dehumidifier away from obstructions, and keep it away from anything that could block airflow into and out of the dehumidifier. 3. -
Page 8: Plug In Electrical Cord
4. Plug in Electrical Cord IMPORTANT Please let the dehumidifier stand upright for 24 hours before the first time plugging in. The dehumidifiers may have been tilted or placed upside down during shipping. Leave the dehumidifier to stand upright for 24 hours so the oil in the compressor can settle from the move, not doing so can affect the performance or lifespan of the dehumidifier. - Page 9 inlet air which is similar to the room temperature. However, if the timer function is being set or has been activated, the small font digital number will turn to display the timer setting value or time remaining. Running Icon:Running icon flickers typically because the compressor has not kicked in. It usually happens 1) when the dehumidifier is under the 3-minute compressor delay status;...
-
Page 10: Understand The Control Buttons
Timer Icon: Timer icon illuminates when the timer function is enabled. (2) Understand the Control Buttons Power Switch: Press to turn the dehumidifier ON or OFF. Up Button: Press ⬆ to increase the set-point of humidity level or timer. Down Button: Press ⬇ to decrease the set-point of humidity level or timer. Timing/Function Button: Press once to check the settings. -
Page 11: Smart Functions
The TIMER function enables you to either Delay AUTO-ON or Delay AUTO-OFF the dehumidifier in the choice from 1 hour to 24 hours. · Setting an AUTO-ON timer: When the dehumidifier is off, selecting Timer will turn the dehumidifier on in the hours that will be set. ·... - Page 12 When the room temperature is lower than 40°F,the dehumidifier will automatically enter into LOW-TEMPERATURE PROTECTION SYSTEM where the LCD screen displays an "LL" message and the dehumidifier stops working. Note: When you see HH or LL message under normal circumstances, please contact the customer service at service@colzer.com to get technical support.
-
Page 13: Maintenance
MAINTENANCE Ensure the dehumidifier is turned OFF and the plug is removed from the power socket before cleaning or maintenance is carried out. (1) Cleaning the Dehumidifier Clean the dehumidifier body with a soft damp cloth. Do not submerge or place water on the dehumidifier or control panel. -
Page 14: When Not Using Dehumidifier For Long Periods Of Time
Follow the steps below to clean the filter: • Use a vacuum cleaner with a soft brush attachment to remove any large debris or dust build-up from the air filter. • Wash the filter in lukewarm, soapy water, below 40°C (104°F), or use a neutral cleaning agent. -
Page 15: Trouble Shooting Guide
The below chart will help you solve common problems that may occur. If the problem you come across can not be fixed after troubleshooting or the problem is not listed in the below troubleshooting chart, please contact COLZER customer service to obtain professional support at... - Page 16 Problem Possible Cause Solution No power dehumidifier Plug it into a working outlet turned Turn the dehumidifier on Dehumidifier does not Has not set it properly Make sure the set humidity level operate is at 3% lower than the inlet...
-
Page 17: Warranty
These are our general terms for warranty service, but we always urge our customers to reach out to us with any issue, regardless of warranty terms. If you have an issue with a COLZER product, please contact us at service@colzer.com, and we will do our best to resolve it for you.
Need help?
Do you have a question about the CFT4.0D and is the answer not in the manual?
Questions and answers