
Related Manuals for Colzer TR160D


Summary of Contents for Colzer TR160D
- Page 1 Colzer Dehumidifier User Manual Model No.: TR160D Please read this User Manual before operating and keep safe for future reference.
- Page 2 Although greatly appreciated, product registration is not required to activate any warranty. To access customer support, please email to service@colzer.com with your purchase order ID to help us address the problem faster. Need Help? Before you request for customer support, here are a few things you can do to help us serve you better.
-
Page 3: Table Of Contents
Operation Instructions................4 Install the Handle.................4 Position Your Dehumidifier............4 Set up Drainage................5 Plug the Dehumidifier in...............5 Understand the Control Panel............6 Smart Functions..................8 Maintenance..................8 Clean the Dehumidifier..............8 Clean the Air Filter................9 Store the Dehumidifier..............9 Trouble Shooting.................10 Warranty Information.................11 Contact Colzer Customer Service............11... -
Page 4: Safety Information
SAFETY INFORMATION • Install the dehumidifier on flat surface to minimize vibration and or noise. • Inspect the power cord before use. Never operate the dehumidifier when the power cord or plug is damaged. • Insert the three-prong plug on the power cord into a matching electrically grounded outlet (115V/ 60 Hz, 15 A at least). -
Page 5: Product Specifications
PRODUCT SPECIFICATIONS Colzer Dehumidifier Model No. TR160D Power Source AC 110-120V, 60 Hz Input Power 735 W (80°F, RH 60%) Input Current 7.0 A Moisture Removal 93 Pints/Day Input Power 835 W (86°F, RH 80%) Input Current 8.0 A Moisture Removal... -
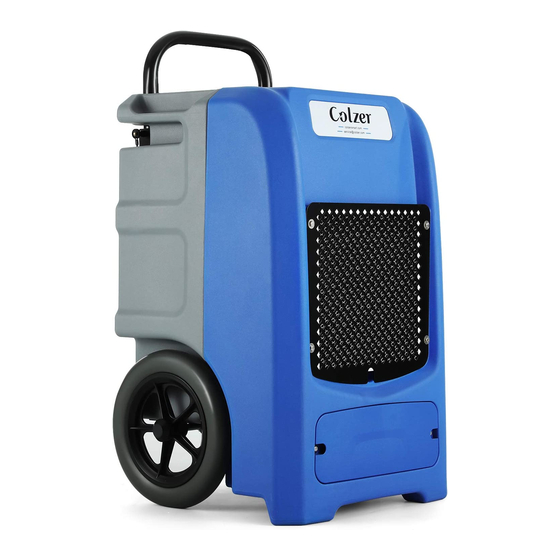
Page 6: Parts Identification
PARTS IDENTIFICATION Integrated Handle (Foldable) Colzer Info Air-inlet Grille Wheel Remove to Access Pump Control Panel Air Outlet Wire Nail Handle Latch Power Cord Winder Drain Hose Label Area NOTE: DO OBSTRUCT THE AIR INLET OUTLET. -
Page 7: Operation Instructions
OPERATION INSTRUACTIONS 1. Install the Handle 1) Remove the handle from the buckle and flip the handle up 180° to align the hole position of the handle and the handle holder; 2) Insert the corded bolts into the holes of the handle holder and the handle by pressing and holding the metal button on the top of the bolt. -
Page 8: Set Up Drainage
windows that open to efficiency. Place your dehumidifier away from obstructions, and keep it away from anything that could block airflow into and out of the dehumidifier. 3. Set Up the Drainage The dehumidifier pump connects to a plastic drainage hose. The hose, stored on the back of the dehumidifier, is equipped with a quick-connect fitting for easy attachment to the drain outlet. -
Page 9: Understand The Control Panel
5. Understand the Control Panel Display Screen - The first line of the display shows the total number of hours the dehumidifier has been in operation. It will also countdown the timer on the right if the timer function has been activated. - The second line of the display shows current temperature and humidity of inlet and outlet. - Page 10 Water Full Indicator: When the water pump is full of water, the indicator light turns on to remind the user to drain. Purge Button: Press to empty water from the condensate pump reservoir. Use "PURGE" before moving the dehumidifier to avoid water spillage. During normal operation, the pump purges automatically when the reservoir is full.
-
Page 11: Smart Functions
Smart Functions Auto Drainage Thanks to the built-in pump, the dehumidifier will drain the condensation water automatically. Wait 3 Minutes before Resuming Operation To avoid any damage to the dehumidifier, the dehumidifier will not start operation following a complete cycle until after 3 minutes. Operation will automatically start after 3 minutes. -
Page 12: Clean The Air Filter
Cleaning the Air Filter The working performance of the dehumidifier will be greatly reduced if the filters become blocked. To Clean the Filter 1) Pull out the air filter from the top side gently. 2) Vacuum any debris from the filter using the vacuum hose and nozzle attachment. 3) Immerse the filter into lukewarm water (about 40°C) with a mild detergent, and then wash it and allow it to dry. -
Page 13: Trouble Shooting
Water pump failure or Water tank of water Replace it or check the pump is full water pump 4-way valve failure Replace it If the problem you are experiencing is not listed here, contact our Service Team at service@colzer.com for further assistance. -
Page 14: Warranty Information
Warranty Information Colzer offers a limited 1-year warranty on all of our products, with original proof of purchase and where a defect has arisen, wholly or substantially, as a result of faulty manufacture, parts or workmanship during the warranty period.
Need help?
Do you have a question about the TR160D and is the answer not in the manual?
Questions and answers