Table of Contents
Advertisement
Quick Links
Advertisement
Table of Contents

Related Manuals for SCIFIT Intelli-fit


Summary of Contents for SCIFIT Intelli-fit
- Page 1 Intelli-Fit Rotary Touchscreen User Manual...
- Page 3 United Kingdom All Other EMEA Countries and Distributor Business EMEA* North America Life Fitness UK LTD Bijdorpplein 25-31 SCIFIT Queen Adelaide 2992 LB Barendrecht Ely, Cambs, CB7 4UB 5151 S. 110th E. Avenue THE NETHERLANDS Telephone: General Office (+44) 1353.666017 Tulsa, OK, 74146 U.S.A...
- Page 4 User and Service Documents Link https://lfworld.lifefitness.com Additional information is available online using the link above. أعلاه الرابط باستخدام الإنترنت على إضافية معلومات تتوفر 点击上面的链接可在线获取更多信息。 Flere oplysninger er tilgængelige online gennem linket ovenfor. Bijkomende informatie is online beschikbaar via bovenstaande link. Vous trouverez plus d'informations en ligne à...
-
Page 5: Table Of Contents
© Copyright 2019, Life Fitness, LLC. All Rights Reserved. Life Fitness, Hammer Strength, Cybex, ICG and SCIFIT are registered trademarks of Life Fitness, LLC and its affiliated companies and subsidiaries. Brunswick and related trademarks used under license from Brunswick Corporation. - Page 6 © Copyright 2019, Life Fitness, LLC. All Rights Reserved. Life Fitness, Hammer Strength, Cybex, ICG and SCIFIT are registered trademarks of Life Fitness, LLC and its affiliated companies and subsidiaries. Brunswick and related trademarks used under license from Brunswick Corporation.
-
Page 7: Introduction
If warnings are missing or damaged, please contact customer service immediately for replacement warning labels. Warning labels are shipped with every product and should be installed before the product is used. SCIFIT is not responsible for missing or damaged warning labels. - Page 8 • This machine is not intended for use by persons with reduced physical sensory or mental capabilities, or lack of experience and knowledge, unless they have been given supervision or instruction concerning use of the machine by a person responsible for their safety.
-
Page 9: Service And Technical Data
Service and Technical Data Maintenance COMPONENT ACTION WHEN Console Clean with mild soap and water Weekly Page 7 of 32... -
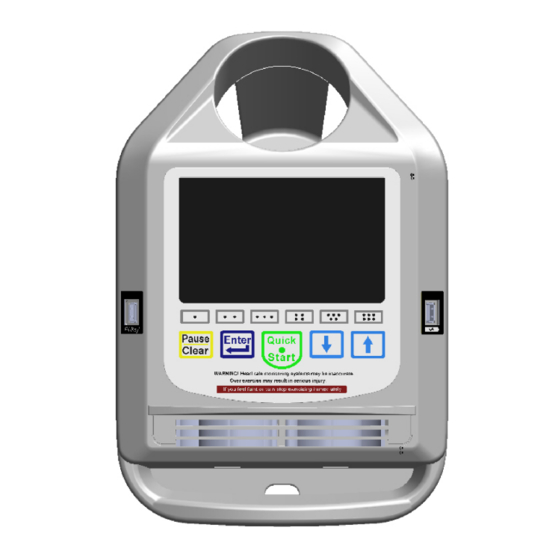
Page 10: Console-Tactile Key Overview
Console-Tactile Key Overview Console/Tactile Key Overview Console Overview Water bottle holder USB charging port Active tactile key area Fan vents Personal item compartment Fit-Key connecting port Active touchscreen area Tactile Key Overview Selects workout programs or activates a special feature. Use during the data entry process or during a workout to increase/decrease the workout level. -
Page 11: Machine Program Menus
Machine Program Menus Machine Program Menus Model Series: PRO1 * PRO2 * PRO1000 * SXT7000 * ISO Upright Bikes * ISO Recumbent Bikes * REX7000 Model Series: StepOne Recumbent Stepper Model Series: Latitude Lateral Stability Trainer Page 9 of 32... -
Page 12: Data Entry Screen
Data Entry Screen Data Entry Screen Numerical keypad to directly enter data information. Returns the screen to the previous category. Removes the last digits entered from right to left when using the numerical keypad. Alternate way to enter user data information. Accepts the user information entered and advances to the next category. -
Page 13: Workout Programs
Workout Programs QUICK START Description: Allows the user to get on and go! The workout has no time limit and the intensity level is manually controlled. Changing Intensity Touch the key or the tactile key to activate the screen pop-up menu OR press the tactile keys. -
Page 14: Iso-Strength
CONSTANT WORK Description: Workout resistance is automatically adjusted to compensate for any change in speed (RPM), thus the amount of work will remain constant at any given (Watts or METs) setting. Screen 1: Select target to either show “Watts” or “METs”. Screen 2: Enter the time length of workout. -
Page 15: Hills
HILLS Description: Allows the user to select from 7 profiles set at various pre-programmed intensities and intervals. Profiles available: Course, Sprints, Twin Peaks, Peak, Progressive, Multi-Peaks and Ramp. Screen 1: Select 1 of 7 course profiles. Screen 2: Enter the time length of workout. Screen 3: Enter the level intensity (Max. -
Page 16: Fit-Quik
FIT-QUIK Description: Allows the user to select a two stage program of cardiovascular work with ISO-strength (Isokinetic). Work loads and time durations are preset within the Set-Up mode. Screen 1: Enter the user weight. COMMENCE WORKOUT MORE Description: Touching this key will show a second menu screen (machine dependent) of additional pre-programmed workouts. RANDOM Description: Random workout profiles each with its own level of difficulty are shown for the user to choose. -
Page 17: Stress Test
STRESS TEST Description: A designed stress test to be used as a training program or used with other diagnostic devices (if applicable). The user sets a target wattage with timed intervals and preset wattage increments. Screen 1: Enter the watts target. Screen 2: Enter the the number of column increments. -
Page 18: Heart Fit Training
HEART FIT TRAINING Description: Designed training programs based on the user’s evaluated Heart Fit test. A training schedule with retesting is recommended. The user has three program profiles and four level intensities to choose from. ATTENTION: A heart rate transmitter chest strap is required. See page ?? for instructions. If you are not wearing a transmitter belt or the belt is not sending a signal correctly, after a short period of time a warning message will appear. -
Page 19: Training
POWER FIT TRAINING Description: Specifically designed preset watts training programs based off the user’s Power Fit test evaluation. Three program profiles and four level intensities to choose from. Screen 1: Select 1 of 3 program profiles. Screen 2: Select 1 of 4 level intensities (Beginner, Intermediate, Advanced and Sports Performance). Screen 3: Enter the user weight. -
Page 20: Additional Key Features
Additional Key Features POP-UP MENU Once a workout commences a pop-up sub menu may be access to show additional keys by touching the icon or pressing the tactile key. CHANGE VIEW Description: Allows the user to change the viewing format of the workout profile and data displayed on the screen during the workout. -
Page 21: Continue/Stop
CONTINUE/STOP CONTINUE: Restarts the workout program at the point where the user had paused it. STOP: Touch the [Stop] icon or press the [Pause/Clear] tactile key to exit the workout and return to the main screen. Activates two 3-speed cooling fans (Low, Medium, High) at anytime during the workout. Each touch of the icon will change the fan airflow speed. -
Page 22: Set-Up Mode Access
Set-Up Mode Access Touchscreen Access Method 1: Touching the screen in sequence 1. Touch the upper left corner of the screen. 2. Then touch the left side of the “Quick Start” icon. 3. Finally touch the upper left corner of the screen again. Tactile Access Method 2: Touching the tactile keys in sequence 1. -
Page 23: Set-Up Mode
Set-Up Mode 1. Category Selection 2. NOTE: There will be times the screen will change to a data entry view to make adjustments. After making the adjustments touch the “Accept” key to return to the “Set-Up Mode” screen. Changing Parameters Page 21 of 32... -
Page 24: Categories
3. NOTE: [Accept] to save and return to the main menu screen. [Cancel] to not save and return to the main menu screen. Saving The Changes Rotary Set Up Mode Categories When the “Set-Up Mode” is accessed it will show categories for both rotary and treadmill. The following information will only list categories concerning the rotary machines. -
Page 25: Serial Protocol
Serial Protocol Default: CSAFE This gives the user a choice between “CSAFE” or “ERGOLINE” protocol. Watts Scalar Default: 1.000 This is a multiplication factor to change the power (Watts) of the machine. The machine will be harder to operate if the ‘Watt Scalar” is greater than 1 and easier to operate if it is less than 1 Watt Offset Default: 0.000... -
Page 26: Fit-Quik Watts Target
Fit-Quik Watts Target (Watts) Default: 20 A preset wattage target is selected here when the Fit-Quik program is set for Constant Work. Fit-Quik Profile Cardio Default: Course When the Fit-Quik program is preset for the Hills program the user may select 1 of 7 workout contours: Course, Sprint, Twin peaks, Peak, Progressive, Multi-Peaks and Ramp. -
Page 27: Iso Banner
ISO Banner Default: Disabled Allows the option to enable or disable the banners “Fast Forward”, “Slow” and Reverse Fast” to be shown during an ISO-Strength workout. ISO Fast Time Default: 00:15 Sets the time interval before the phrases “Fast Forward” and “Reverse Fast” appear on the screen during an ISO-Strength workout. Default: Every 15 seconds. -
Page 28: Heart Rate Transmitter
Heart Rate Transmitter Heart Rate Transmitter WARNING: Heart Rate monitoring systems may be inaccurate. If you feel faint, stop exercising immediately. Over exercising may result in serious injury or death. CAUTION: Always follow manufacturers instructions for proper care and use. Failure to follow manufacturers instructions may result in injury to yourself. -
Page 29: Battery Check
Battery Check Access Touching the screen in sequence 1. Touch the left side of the “Quick Start” icon. 2. Then touch the upper left corner of the screen. 3. Finally touch the left side of the “Quick Start” icon again. Verify If the battery voltage is below 10.5V, then replace the battery. -
Page 30: Information Screens
Information Screens Main Information Screen Touch the [More] key on the main menu screen until the information screen is shown (see below), then touch the information icon you wish to access. Product Information This screen will show the following: 1. Domestic website. 2. -
Page 31: Intelli-Fit Information
Intelli-Fit Information This screen will show the following: 1. A description summary of the console programs available (Machine dependent). Page 29 of 32... -
Page 32: Warranty
Who Pays Transportation and Insurance For Service If the Product or any covered part must be returned to a service facility for repairs, We, SCIFIT, will pay all transportation and insurance charges for the first year. You are responsible for transportation and insurance charge after the first year. - Page 33 Warranty coverages and terms may differ outside the United States. Please contact the SCIFIT office servicing your country (contact information found at the front of this manual) or visit the applicable local SCIFIT website to receive the specific warranty information for your country.
- Page 34 A6802B 2019 www.scifit.com...
Need help?
Do you have a question about the Intelli-fit and is the answer not in the manual?
Questions and answers
How to get an average summary of your workout when finished