Table of Contents
Advertisement
Quick Links
SS-256 LCD Smart Soldering Station
Thank you for purchasing the
Station. Please read this manual before operating the SS-256.
Please store the manual in a safe, easily accessible place for future
reference.
Features
Large screen with backlight, LCD contrast and brightness are
adjustable.
Designed with functional manual and shuffle knob for easy setting, more
convenient and user friendly.
Comes with high end quad-wire heating element for heat fast recovery.
Microprocessor controlled provide best performance and accurate
temperature control.
Temperature calibration function.
Auto sleep and wake up function, system lock, tip calibration and low
consumption.
3 data memories store and recall frequently used temperature values.
Built-in DC 5V/1A USB port for power supply.
Complies with CE and ESD standard, conform to RoHS.
Comes with UL Certified Wires.
Silicone handpiece cord wire heat-resistant up to 200°C.
Resettable fuse protection design.
Packing List
Please check the contents of the soldering station package and confirm
that all the items listed below are included.
Soldering Station..........................1
Iron Stand(with cleaning sponge).1
Soldering Iron..............................1
Power Cord.................................1
Alligator Clip Grounding Wire...........1
User's Manual..............................1
Specifications
Model No.
Input Voltage (ACV)
Control system
Power consumption
Output voltage
LCD Display
Temperature range
Temperature calibration
Temperature stability
Heating element
Plug
Sleep mode
Temperature of sleep mode
USB port output
Memory setting
Temperature lock function
Replacement heater
Replacement soldering iron
Tip-to-ground resistance
potential
Size (mm)
Weight
Package
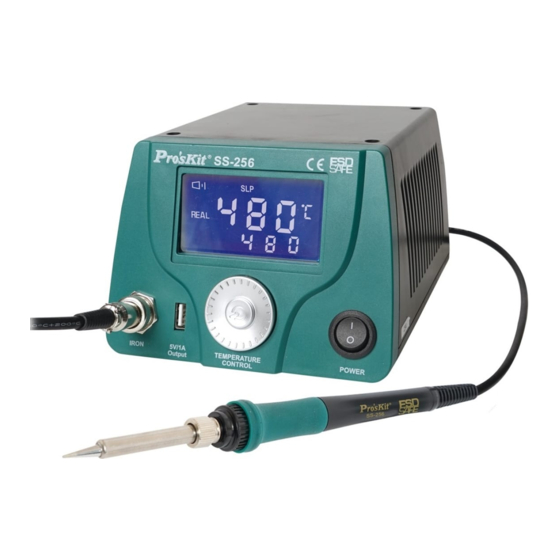
Soldering
Iron Holder
Sponge
Soldering
Iron Port
5V/1A
USB port
Shuffle Knob
SS-256 LCD Smart Soldering Iron
SS-256E
SS-256EU
SS-256B
SS-256H
110~120V
220~240V
220~240V
60Hz
50Hz
50Hz
Microprocessor-controlled
60W
24 VAC
73mmX40mm, Backlight
200~480°C /392℉~ 896℉
100~699℃(212~1290℉),Adjustment
±2℃/±36℉ (no load)
Alumina ceramic heater
E
B
H
OFF & 1~240min adjustment
200℃/ 392℉
DC 5V/1A
3set
yes
9SS-900N-HT
9SS-256-SI
≦2Ω/≦2mV
180 x 150 x 106mm
2.1kg
Color Box
Power
LCD Display function description
1. Current beep on or off
3. Current sleep mode
5. Temperature unit
6. Current Temperature
7. Temperature memory setting
Setting up & operating the soldering station
Start to use
Turn on the soldering station, LCD screen will display main menu (see fig.1)
after three seconds, last set temperature will display. (see fig.2)
Temperature setting
In the main menu, rotate around the
increase
temperature, counter clockwise direction to decrease temperature
Temperature memory choose
In the main menu, press the center of shuffle knob, CH1/CH2/CH3 will
SS-256C
twinkling (see fig.3), rotate around the
temperature needed, press the center of shuffle knob again to save.
240V
50Hz
Function setting menu
Press 3 seconds of shuffle knob into the function setting menu. (see fig.4)
The first function setting is TEMP , rotate around the shuffle knob in
clockwise direction can be converted into the other function setting.
Function order of priority :
TEMP→UNIT→SLP→BEEP→LIGH→CODE→EXIT→back to TEMP
C
Press shuffle knob again, choose the function needed.
TEMP:Temperature memory setting (Fig.5)
Choose the "TEMP" function setting. Press knob into channel selection
mode. Rotate around the
knob again to the temperature setting , rotate around the
clockwise direction to increase temperature,
decrease temperature. Press knob to the next menu, rotate around the
shuffle knob and choose the " Exit" save the temperature and exit the
menu.
UNIT: Fahrenheit and Centigrade Selection (Fig.6)
Choose the "UNIT" function setting. Press knob into temperature unit
selection mode, rotate around the
unit, Press knob to the next menu, rotate around the shuffle knob and
choose the " Exit" save the temperature unit and exit the menu.
Soldering
Iron
2. Temperature lock
4. Power display
Fig.1
shuffle knob
in
clockwise direction to
shuffle knob to
choose the
Fig.3
Fig.4
shuffle knob
to choose CH1/CH2/CH3, press
counter clockwise direction to
Fig.5
knob
, select "Fahrenheit" or "Centigrade"
Fig.6
Fig.2
shuffle knob
in
Advertisement
Table of Contents

Related Manuals for Pros'Kit SS-256E

Summary of Contents for Pros'Kit SS-256E
- Page 1 In the main menu, rotate around the shuffle knob clockwise direction to Specifications increase temperature, counter clockwise direction to decrease temperature Temperature memory choose SS-256E Model No. In the main menu, press the center of shuffle knob, CH1/CH2/CH3 will SS-256EU SS-256B SS-256H SS-256C twinkling (see fig.3), rotate around the...
- Page 2 and record tip real temperature, enter the real temperature in the “CALl” SLP:Auto sleep mode setting (Fig.7) state ,soldering iron station will calculate temperature. 1 Choose the “SLP” function setting. Press knob into sleep selection mode. rotate around the shuffle knob to setting, sleep timer is adjustable from 1~240 minutes or setting “OFF”...
- Page 3 • ESD(防靜電)安全設計,使用更安全. 操作介紹 • 自恢復保險功能,確保發熱芯短路時不燒變壓器 1.開機 包裝清單: 請檢查產品包裝,以證實所列清單專案正確無誤: 機器通電後,打開電源開關(圖1),LCD屏顯示開機畫面約3秒後進入主畫面, 電焊台………………………………………1 顯示的溫度為上次關機前設定的溫度(圖2)。 烙鐵座(包含清潔海綿)…………………1 烙鐵…………………………………………1 使用說明書…………………………………1 電源線………………………………………1 香蕉頭接地線………………………………1 圖1 圖2 產品規格 2.溫度設定: SS-256E 產品型號 SS-256EU SS-256B SS-256H SS-256C 主畫面模式,旋轉飛梭旋鈕,順時針方向旋轉增加溫度,逆時方向旋轉降低溫 AC110~120 AC220~240 AC220~240 度。 AC240V V 60Hz V 50Hz V 50Hz 3.快捷溫度選取: 輸入電壓...
- Page 4 3 溫度校準狀態說明 6.睡眠時間設定(SLP): 3.1當CALI狀態顯示”- - -“(見圖13),表示焊台溫度未被校準過,出廠時通過 6.1 主畫面模式下進入 SLP 設置介面(如圖 7)後”SLP”閃爍,輕按飛梭旋鈕進 物理方法(校溫電位器)達到最佳狀態。 入睡眠時間調整,旋轉飛梭旋鈕可將睡眠時間設置為 OFF 或 1~240 分鐘,設 置完成後輕按飛梭旋鈕退出,使用旋鈕選擇“Exit”介面保存並退出功能表 6.2 焊台進入睡眠狀態(如圖 7), 同時溫度會逐漸下降到 200℃進入休眠狀 態。當需要進行焊接時,按任意鍵喚起焊台,焊台會升溫到之前設置的溫度 後即可開始工作。 圖13 3.2當CALI狀態顯示“H”或”HH” (見圖14),表示焊台溫度已被校準調高過。例: 設置溫度350℃,實際溫度320℃,如圖12進行溫度校準後,溫度將由320℃調 升到350℃。 3.3當CALI狀態顯示“L”或”LL”(見圖15),表示焊台溫度已被校準過,溫度已向 圖 7 下調整。 7.蜂鳴開關設置 (BEEP) :主畫面模式下進入 BEEP 設置介面(如圖 8)BEEP 閃爍,輕按飛梭旋鈕進入蜂鳴器設置,旋轉飛梭旋鈕可選擇蜂鳴器”ON”開啟...
- Page 5 包装清单: 请检查产品包装,以证实所列清单项目正确无误: 道(当前信道 CH1 或 CH2 或 CH3 闪烁),再次轻按飞梭选择通道,若无进行 电焊台………………………………………1 任何操作 3 秒后则自动退出。 烙铁座(包含清洁海绵)…………………1 烙铁…………………………………………1 使用说明书…………………………………1 电源线………………………………………1 香蕉头接地线………………………………1 图 3 产品规格 设置菜单模式 SS-256E 长按飞梭旋钮约 3 秒进入设置菜单接口(如图 4) 产品型号 SS-256EU SS-256B SS-256H SS-256C 顺时针旋转飞梭旋钮可以依次切换以下设置接口:TEMP→UNIT→SLP→ AC110~120 AC220~240 AC220~240 AC240V BEEP→LIGH→CODE→EXIT→回到 TEMP 。转动飞梭旋钮切换到下一个...
- Page 6 图 8 图 16 图 17 8.屏幕亮度设置(LIGH) :主画面模式下进入 LIGH 设置接口(如图 9)LIGH 12.恢复出厂设定(REST) 主画面模式下长按飞梭旋钮(9 秒)进入恢复出厂设置接口(如图 18) 此时 闪烁,轻按飞梭旋钮进入屏幕亮度调整,旋转飞梭旋钮可选择屏幕亮度 0~9(暗 显示默认为“NO”(如图),旋转飞梭旋钮选择为“YES”后,按压旋钮确认退出到 ~亮),设置完成后轻按飞梭旋钮退出,使用旋钮选择“Exit”接口保存并退出菜单 主画面模式 图 9 图 18 9.温度锁定功能(CODE) 9.1 密码设定及修改: 主画面模式下进入 CODE 设置接口(如图 10)CODE 闪 恢复出厂设定时,机器设定将全部恢复到出厂设定状态,请谨慎操作。 烁,轻按飞梭旋钮进入密码设定状态,转动飞梭旋钮输入当前密码(原始为 13.密码重设 当所设定密码忘记时,关机状态下按住飞梭旋钮不放手,同时按下电源开关开 “000”亦代表无密码状态),轻按飞梭旋钮输入新密码,轻按飞梭旋钮再次输入 新密码,设置完成后轻按飞梭退出 启焊台,进入 ADMI 接口,输入密码“888”即可将密码恢复为“000”(即无密码状 态)。...
Need help?
Do you have a question about the SS-256E and is the answer not in the manual?
Questions and answers