Advertisement
ACCESSORY SETUP INSTRUCTION
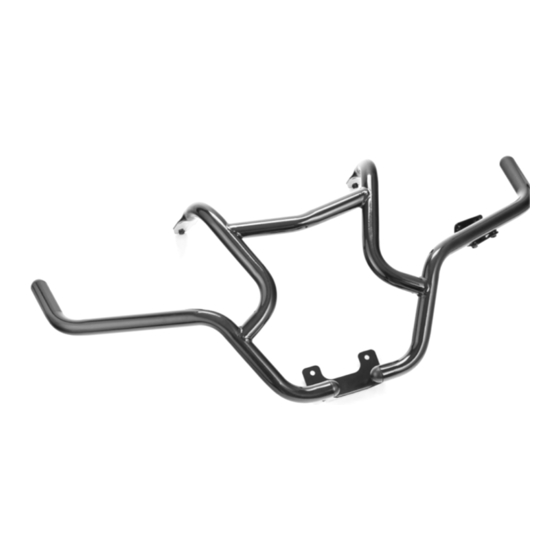
FRONT BUMPER ASSEMBLY -- PN 9AW#-801100-2000
VALID FOR: CF800/CF850XC/CF1000
BEFORE YOU BEGIN: Read and understand the instructions before starting any work. Make sure that all parts are
ready and that you have all the tools required for assembly.
NOTE: CFMOTO shall not be liable for any damage caused by incorrect assembly. CFMOTO recommends that all
original accessories be assembled by an authorized CFMOTO dealer.
Before assembly, park the vehicle on a flat surface, put the transmission gear into Park (P) and turn off the key switch.
Zhejiang CFMOTO Power Co., Ltd.
permitted only with the express written permission of the copyright owner.
MEANING OF SYMBOLS
i
- Indicates information with more details or tips.
!
- Indicates information of warning or danger.
PARTS LIST:
ITEM
1
FRONT BUMPER ASSEMBLY
2
FRONT BUMPER
3
MOUNTING BRACKET, LH
4
MOUNTING BRACKET, RH
5
BRACKET, LICENSE PLATE
6
7
BOLT M8X16
TOOL LIST:
ITEM
1
2
3
4
All rights reserved. Reproduction of this document, even in part, as well as copying of all kinds, is
PART NAME
PLUG 38
DESCRIPTION
13mm SOCKET
10mm SOCKET
RUBBER HAMMER
PROTECTIVE GLOVES
PART NUMBER
9AW#-801100-2000
9AW#-801110-2000
9AW#-801101-2000
9AW#-801102-2000
9AW#-801130-2000
9DS#-801200-6000-20
30006-080016870
QTY.
1
1
Recommended tools
1
1
QTY.
REMARK
1
1
1
1
1
4
4
REMARK
Advertisement
Table of Contents

Subscribe to Our Youtube Channel
Related Manuals for CF MOTO 9AW-801100-2000


Summary of Contents for CF MOTO 9AW-801100-2000
- Page 1 ACCESSORY SETUP INSTRUCTION FRONT BUMPER ASSEMBLY -- PN 9AW#-801100-2000 VALID FOR: CF800/CF850XC/CF1000 BEFORE YOU BEGIN: Read and understand the instructions before starting any work. Make sure that all parts are ready and that you have all the tools required for assembly. NOTE: CFMOTO shall not be liable for any damage caused by incorrect assembly.
- Page 2 ASSEMBLY and INSTALLATION ∥ Use a rubber hammer to install the plugs (6) into the front bumper (2). ∥ Install the license plate bracket (5) to the front bumper (2) with bolt (7). BOLT M8x16 30006-080016870 8-16N.m ∥ Turn the winch quick release knob to the 'FREESPOOL' position and release the winch cable.
- Page 3 ASSEMBLY and INSTALLATION ∥ Remove the bolts (B) and take down the left cover (C), center cover (E), right cover (D) in turn. ∥ Remove bolts (H) and loosen bolts (G). ∥ Lift the front rack assembly (F). ∥ Install the left mounting bracket (3) and right mounting bracket (4) to the front rack with bolts (H).
- Page 4 ASSEMBLY and INSTALLATION ∥ Align the winch fairlead and lower bumper mount to the mounting holes, then install the previously removed M10x20 bolts (A). ∥ Tighten all bolts to the specified torque value. ∥ Retract the winch rope. NOTE: Winch fairlead is placed on top of the bumper. BOLT M10x20 30006-0100020810...
Need help?
Do you have a question about the 9AW-801100-2000 and is the answer not in the manual?
Questions and answers