Table of Contents
Advertisement
Available languages
Available languages
Quick Links
Advertisement
Table of Contents

Subscribe to Our Youtube Channel
Related Manuals for Makita XSU03


Summary of Contents for Makita XSU03
- Page 1 XSU03 Cordless Garden Sprayer INSTRUCTION MANUAL ESMX Fumigador Inalámbrico para Jardín MANUAL DE INSTRUCCIONES IMPORTANT: Read Before Using. IMPORTANT: Lire avant usage. IMPORTANTE: Lea antes de usar.
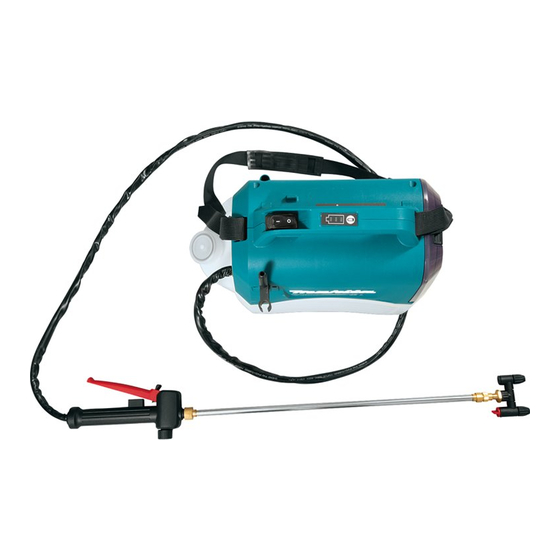
- Page 2 English (Original instructions) 1 Head switch cock 2 Extension nut 3 Handle 4 Measuring cup 5 Spray wand bracket 6 Shoulder strap 7 Battery cover 8 Adjustable spray head 9 Spray wand 10 Lever 11 Hose 12 5L tank 13 Indicator lamps 14 On/off switch 15 Spray wand holder 16 Locking lever...
-
Page 3: Specifications
SPECIFICATIONS Model XSU03 Rated voltage D.C. 18 V Tank capacity 5 L (1.3 Gal.) Hose length 1.7 m (67") Total extendable length 50 - 70 cm (19-3/4" - 27-1/2") Nozzle type 2-Head (Switchable to 1 head) Max. working pressure 0.3 MPa Max. - Page 4 Cordless Garden Sprayer Important safety instructions Safety Warnings WARNING: When using electric gardening appliances, basic safety precautions should WARNING: Risk of fire or explosion. Do not always be followed to reduce the risk of fire, spray flammable liquids such as gasoline. Look electric shock, and personal injury, including the for this symbol reference on the container.
- Page 5 ■ Risk of injection. Do not discharge directly against ■ Do not use battery-operated appliance in rain. skin. ■ Do not use battery-operated appliance in rain. Exercise care in handling batteries in order not ■ To reduce the risk of electric shock, do not put to short the battery with conducting materials the sprayer into water or other liquid.
- Page 6 It will The battery cartridge can explode in a fire. also void the Makita warranty for the Makita tool and Do not nail, cut, crush, throw, drop the battery charger.
- Page 7 CORDLESS GARDEN SPRAYER USE AND CARE 1. The cordless garden sprayer can work by Makita lithium-ion battery cartridge. Use of any other batteries may create a risk of fire. Recharge batteries only with the specified charger. A charger that may be suitable for one type of battery may create a risk of fire when used with another battery.
- Page 8 ASSEMBLY CAUTION: Always be sure that the machine is switched off and the battery cartridge is removed before carrying out any work on the machine. CAUTION: Make sure that the all parts are securely assembled so that the liquid does not leak when operating the machine. Assembly of the spray wand 1.
-
Page 9: Functional Description
FUNCTIONAL DESCRIPTION CAUTION: Always be sure that the machine is switched off and the battery cartridge is removed before adjusting or checking function on the machine. Installing or removing the battery cartridge CAUTION: • Always switch off the machine before installing or removing of the battery cartridge. •... - Page 10 Indicating the residual battery capacity Press the check button on the machine to indicate residual battery capacity. The indicator lamps light up for few seconds. Refer to Figure 5. Indicator lamps Residual battery capacity Lighted 50 % to 100 % 30 % to 50 % 0 % to 30 % NOTE:...
- Page 11 Press the check button on the battery cartridge to indicate the remaining battery capacity. The indicator lamps light up for a few seconds. Indicator lamps Remaining capacity Lighted 75 % to 100 % 50 % to 75 % 25 % to 50 % 0 % to 25 % NOTE: Depending on the conditions of use and the ambient temperature, the indication may differ slightly from the actual capacity.
- Page 12 Mixture WARNING! Always follow the chemical manufacturer’s instructions printed on their product labeling for use, cleaning, and storage. Clean thoroughly after each use, following the instructions in the Maintenance and cleaning section of this manual. Chemicals should be stored out of the reach of children.
- Page 13 1. Remove the battery prior to adding chemical liquid to the tank. 2. Hold the tank firmly and rotate it anti-clockwise so as to separate the motor housing from the tank. Refer to Figure 7. 3. Unscrew and remove the measuring cup. 4.
-
Page 14: Operation
OPERATION WARNING! Risk of fire or explosion. Spray area must be well-ventilated and away from sparks or flames. CAUTION: When operating the machine, be sure to put the shoulder belt on your shoulder firmly. Turning the machine on/off 1. Before operating the machine, put on safety goggles and other safety gear. 2. -
Page 15: Maintenance And Cleaning
To maintain product SAFETY and RELIABILITY, repairs, any other maintenance or adjustment should be performed by Makita Authorized or Factory Service Centers, always using Makita replacement parts. MAINTENANCE WARNING! To avoid serious personal injury, always remove the battery pack from the machine when cleaning or performing any maintenance. - Page 16 DRAINING THE TANK If there is any liquid left in the tank after spraying, the tank should be drained before cleaning. • Remove the battery pack. • Remove the motor housing from the tank. • Drain the contents through the fill area. NOTE: Drain the liquid back into the original container.
-
Page 17: Optional Accessories
OPTIONAL ACCESSORIES CAUTION: These accessories or attachments are recommended for use with your Makita product specified in this manual. The use of any other accessories or attachments might present a risk of injury to persons. Only use accessory or attach- ment for its stated purpose. - Page 18 Español (Instrucciones originales) 1 Cabezal de ajuste 2 Tuerca de extension 3 Manija 4 Copa de medición Cabezal ajustable del 5 Soporte del rociador 6 Tirantes 7 Tapa de la batería rociador 9 Varilla de rociar 10 Gatillo para rociar 11 Manguera 12 Tanque de 5 litros Botón de encendido y...
-
Page 19: Especificaciones
ESPECIFICACIONES Modelo XSU03 Tensión nominal D.C. 18 V Capacidad del tanque 5 litros (1,3 galones) Longitud de la manguera 1,7 m (67") Longitud total de la manguera 50 cm - 70 cm (19-3/4" - 27-1/2") Tipo de boquilla De doble cabezal (ajustable a uno solo) Máxima presión de trabajo... -
Page 20: Lea Todas Las Instrucciones
Advertencias de Seguridad INSTRUCCIONES DE SEGURIDAD IMPORTANTES del Rociador de Jardín Inalámbrico. ADVERTENCIA: Cuando utilice equipo de jardinería eléctrico, deben tomarse medidas pre- ADVERTENCIA: Riesgo de incendio o cautorias de seguridad a fin de reducir el riesgo explosión. No rocíe líquidos inflamables como la de incendio, descarga eléctrica o daño persona, gasolina. - Page 21 ■ Riesgo de inyección. No realice descargas direc- ■ No use un dispositivo de batería bajo la lluvia. tas sobre la piel. ■ No use un dispositivo de batería bajo la lluvia. Utilice las baterías cuidadosamente para evitar ■ Para reducir el riesgo de descargas eléctricas, no cortocircuitos con materiales conductores como ponga el rociador dentro de agua o de algún otro aretes, brazaletes y llaves.
- Page 22 PRECAUCIÓN: Use únicamente las baterías esté gravemente dañado o esté completamente originales Makita. El uso de baterías Makita no origi- desgastado. El cartucho de la batería puede nales, o de baterías que hayan sido alteradas, puede explotar en caso de incendio.
- Page 23 USO Y CUIDADO DEL ROCIADOR DE JARDINERÍA INALÁMBRICO. 1. El Rociador de Jardinería Inalámbrico puede trabajar con cartuchos de baterías de litio marca Makita. El uso de otras baterías puede causar riesgo de fuego. Recargue las baterías únicamente con su cargador especial. Un cargador útil para cierto tipo de batería podría causar riesgo de incendio al utilizarse en otra batería.
- Page 24 ENSAMBLE. PRECAUCIÓN: Siempre esté pendiente de que el equipo está apagado y de que el cartucho de baterías ha sido removido antes de ajustar o revisar el funcionamiento de este equipo. PRECAUCIÓN: Asegúrese de que todas las partes están correctamente ensambladas a fin de evitar fugas de líquido durante la operación de este equipo.
-
Page 25: Descripción Funcional
DESCRIPCIÓN FUNCIONAL PRECAUCIÓN: Siempre asegúrese de que el equipo está apagado y de que el cartucho de la batería ha sido removido antes de ajustar o revisar el funcionamiento del mismo. Instalación o extracción del cartucho de la batería. PRECAUCIÓN: •... - Page 26 Indicador de la capacidad restante de la batería. Oprima el botón de revisión del equipo para conocer la capacidad restante de la batería. Las luces indicadoras se encienden durante unos segundos. Ver Dibujo 5. Lámparas indicadoras Capacidad restante de la batería. Iluminado Apagado 50 % a 100 %...
- Page 27 Pulse el botón de verificación del cartucho de batería para indicar la capacidad restante de la batería. Las luces indicadoras se encienden durante unos segundos. Lámparas indicadoras Capacidad restante Iluminado Apagado 75 % a 100 % 50 % a 75 % 25 % a 50 % 0 % a 25 % NOTA: Dependiendo de las condiciones de uso y la temperatura ambiente, la indicación puede diferir levemente...
- Page 28 Mezcla. ADVERTENCIA! Siga siempre las indicaciones impresas del fabricante en su etiquetado para uso, limpieza y almacenaje. Limpie el equipo a profundidad después de cada uso, siguiendo las instrucciones que aparecen en las secciones de mantenimiento y limpieza de este manual. Los químicos deberán resguardarse fuera del alcance de los niños.
- Page 29 1. Quite la batería antes de introducir químicos líquidos en el tanque. 2. Sujete el tanque con firmeza y rótelo en sentido contrario a las manecillas del reloj a fin de separar la carcasa del motor del tanque. Ver Dibujo 7. 3.
-
Page 30: Operación
OPERACIÓN ADVERTENCIA! Riesgo de incendio o explosión. El área que vaya a rociar deberá estar bien ventilada y alejada de flamas o chispas. PRECAUCIÓN: Cuando opere el equipo, asegúrese de colocar con firmeza la correa sobre su hombro. Encendido y apagado del equipo. 1. -
Page 31: Mantenimiento Y Limpieza
Para mantener la SEGURIDAD y la CONFIABILIDAD del producto, las reparaciones y cualquier otro mantenimiento o ajuste deben ser realizados por los Centros autorizados o de Servicio de fábrica de Makita, siempre usando piezas de reemplazo de Makita. - Page 32 VACIADO DEL TANQUE Si quedara algún líquido en el tanque después de usar el rociador, el tanque deberá ser vaciado antes de empezar a limpiarlo. • Vuelva a instalar el cartucho de la batería. • Remueva la carcasa del motor del tanque. •...
-
Page 33: Accesorios Opcionales
ACCESORIOS OPCIONALES PRECAUCIÓN: Estos accesorios y refacciones son los recomendados para su uso con su rociador Makita tal como está especifi- cado en este manual. El uso de cualquier otro accesorio o elemento anexo podría presentar un riesgo de lesiones para las personas. - Page 34 Para reducir la exposición a estos productos químicos: trabaje en un área bien ventilada y póngase el equipo de seguridad indicado, tal como las máscaras contra polvo que están especialmente diseñadas para filtrar partículas microscópicas. Makita Corporation 3-11-8, Sumiyoshi-cho, Anjo, Aichi 446-8502 Japan XSU03-NA2-2009 EN, ESMX www.makita.com...
Need help?
Do you have a question about the XSU03 and is the answer not in the manual?
Questions and answers