Table of Contents
Advertisement
Available languages
Available languages
Quick Links
Advertisement
Table of Contents

Related Manuals for Scell-it ELEMENT 5


Summary of Contents for Scell-it ELEMENT 5
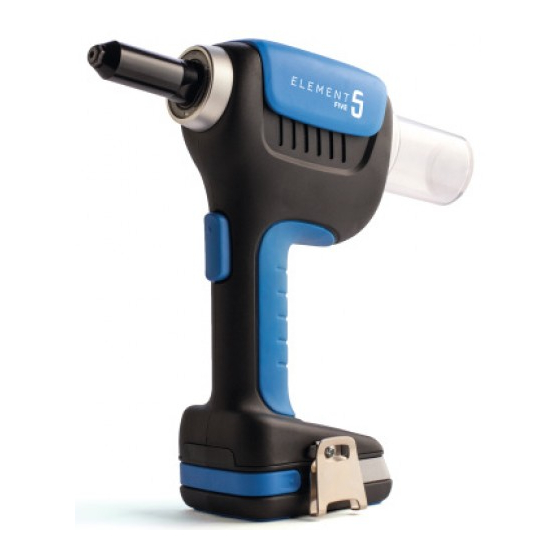
- Page 1 USER MANUAL BATTERY TOOL FOR BLIND RIVET Ø2.4mm - 5.0mm...
-
Page 2: Specifications
SPECIFICATIONS TOOL Battery tool for blind rivet Ø2.4mm-5.0mm Tool net weight: 2,15kgs / 4,73 lbs (including battery) Stroke: 21mm / 0,827’’ Power: DC motor 18V Trigger Traction power: 12000N / 2640 lbs min. Nosepiece Mandrel container Belt hook Battery CHARGER BATTERY Rated Voltage: Input Voltage:... -
Page 3: Important Safety Information
IMPORTANT wrench before turning the power tools is maintained. on. A wrench or wrench left attached SAFETY part of the power tool may result in Specific warnings personal injury. 1.Hold power tool insulated INFORMATION 5.Do not overreach. Keep proper gripping surfaces, when performing footing and balance at all times. - Page 4 reduce this risk. will start when the lithium battery is pack may be short circuited causing used the first time. Please charge the damage to the battery pack, burns or 12. Never recharge a fully charged lithium battery to prevent battery from a fire.
- Page 5 OPERATING INSTRUCTIONS RIVETING 1- Choose the nosepiece according to the diameter of the rivet to set. Please refer to the adjacent table to find the right nosepiece. CAUTION NOSEPIECES the use of the wrong nosepiece can damage the tool. Nosepiece Rivet Ø...
- Page 6 BATTERY LEVEL INDICATOR 4 lights on the battery panel allows you to check the 100% remaining power. Press and hold the blue button to check the battery level : 4 lights on : 100% remaining 3 lights on : 75% remaining 2 lights on : 50% remaining 1 light on : 25% remaining The information on the battery panel can vary...
-
Page 7: Maintenance
MAINTENANCE Special wrench supplied Wrench SW14 with the tool REPLACING NOSE PIECE Use the special wrench Remove the nosepiece unscrew the nosepiece. Screw the nosepiece pressing the Activate the trigger trigger Use the special wrench to screw the nosepiece. • 7 ELEMENT FIVE - User Manual... - Page 8 REPLACING JAW SETS Use the special wrench to unscrew the front nozzle. Use the special wrench + the SW14 wrench to unscrew the clamping sleeve Push the mandrel discharge Lubricate the discharge Remove the set of wom tube to check the presence of tube clamping jaws and lubricate the spring...
- Page 9 Put the clamping jaws inside the clamping sleeve Tighten the clamping sleeve with the Screw the clamping sleeve on the tool special wrench Screw the front nozzle on the tool Tighten the front nozzle with the special wrench CAUTION If the broken mandrel is not ejected in the mandrel container, it is due to an excess of grease.
-
Page 10: Troubleshooting
TROUBLESHOOTING The mandrel is stuck. Where Cause Solution Nosepiece Wrong nosepiece Mount a correct nosepiece according to the mounted NOSEPIECES table §1 p.5. Worn nosepiece Replace by a new one Jaws set Mandrel blocked in jaws Clean/replace the jaw set by the additionnal set provided in the pack or order a new jawset Mandrel collecter full... -
Page 11: Declaration Of Conformity
DECLARATION OF CONFORMITY EC DECLARATION OF CONFORMITY – EC DIRECTIVE 2006/42/EC ANNEX II 1A The manufacturer: SCELL-IT 28 RUE PAUL DUBRULE 59810 LESQUIN FRANCE +33(0) 320 329 818 declares hereby that the following product: Product designation: • E-5 / E-6 / E-T / E-7 / E-8 / E-SP / E-12 / E-HC •... -
Page 12: Caractéristiques
CARACTÉRISTIQUES OUTIL Riveteuse sur batterie pour rivet aveugles Ø2.4mm-5.0mm Poids : 2,15kgs (avec batterie) Course : 21mm / 0,827’’ Moteur : DC motor 18V Gâchette Force de traction : 12 000N Bol récupérateur Attache ceinture Batterie CHARGEUR BATTERIE Voltage : Tension en entrée : 100-240VAC/50-60Hz Type de batterie :... -
Page 13: Instructions De Sécurite
INSTRUCTIONS DE ou mettre sous tension la machine si adaptée peut conduire à une situation la gâchette est actionnée peut entraîner dangereuse. SÉCURITE des accidents. Entretien 4. Retirer toute clé de réglage avant AVERTISSEMENT : mise sous tension de la machine. Elle 1. - Page 14 fiche endommagés. Les remplacer b. Après utilisation, la température risque de surchauffe. Ne pas placer immédiatement. de la batterie Li-ion peut continuer près d’une source de chaleur. d’augmenter. Lorsque la température 10. Ne pas utiliser un chargeur de 22. Ne pas démonter le chargeur. de la batterie dépasse le seuil limite, batterie qui est tombé...
- Page 15 INSTRUCTIONS DE POSE POSE DE RIVETS 1- Choisir le nez de pose en fonction du diamètre du corps du rivet gravé sur le nez en se reportant au tableau ci-contre. ATTENTION la machine peut être endommagée si un nez non approprié est utilisé. Ø...
-
Page 16: Éclairage (Led)
VOYANT DE CHARGE BATTERIE 4 voyants lumineux indiquent le taux de charge de 100% la batterie. Appuyer et maintenir le bouton bleu pour vérifier le taux de charge : 4 voyants allumés : taux de charge de 100%. 3 voyants allumés : taux de charge de 75%. 2 voyants allumés : taux de charge de 50%. - Page 17 MAINTENANCE Clé spéciale fournie avec la Clé de 14 machine REMPLACEMENT DES NEZ Utiliser la clé spéciale fournie pour dévisser le nez dévisser le nez Visser le nouveau nez en maintenant l’appui sur la gâchette Actionner la gâchette Utiliser la clé spéciale fournie pour visser le nez •...
- Page 18 REMPLACEMENT DU JEU DE MORS Utiliser la clé spéciale fournie pour dévisser la buse avant Utiliser la clé spéciale fournie et la clé de 14 (qui reste fixe) pour dévisser le porte-mors Appuyer sur le tube éjecteur Ajouter de la graisse à Retirer le jeu de mors usé...
- Page 19 Insérer les mors dans le porte-mors Visser le porte-mors sur la machine Serrer le porte-mors avec la clé spéciale fournie Visser la buse avant sur la machine Serrer la buse-avant avec la clé spéciale fournie ATTENTION Si le clou de rivet n’est pas éjecté dans le bol récupérateur, c’est à cause d’un excès de graisse. Taper doucement sur le bol récupérateur ou utiliser de l’air comprimé...
-
Page 20: Résolution Des Problèmes
RÉSOLUTION DES PROBLÈMES L’anomalie : le clou de rivet est bloqué Où Cause Solution Nez de pose Le nez n’est pas Mettre en place le nez qui convient selon adapté au rivet le tableau §1 «instructions de pose» Le nez est usé Remplacer le nez usé... -
Page 21: Déclaration De Conformité
DÉCLARATION DE CONFORMITÉ CERTIFICAT DE CONFORMITÉ CE – DIRECTIVE CE 2006/42/CE ANNEXE II 1A Le fabricant : SCELL-IT 28 RUE PAUL DUBRULE 59810 LESQUIN FRANCE +33(0) 320 329 818 déclare, par la présente, que le produit suivant : Désignation du produit : •... - Page 22 SPECYFIKACJA NARZĘDZIE akumulatorowe narzędzie do nitów Ø2.4mm-5.0mm Waga netto: 2,15kgs (łącznie z baterią) Włącznik/wyłącznik 21mm / 0,827’’ Skok: Nosek DC motor 18V Silnik: Pojemnik na trzpienie Siła osadzania: 12 000N Blokada akumulatora Akumulator ŁADOWARKA AKUMULATOR Napięcie znamionowe: Napięcie na wejściu: 100-240VAC/50-60Hz Typ akumulatora: litowo-jonowy...
- Page 23 ZASADY zasilającej i/lub baterii. Trzymanie niedoświadczonych użytkowników. palców blisko przełącznika podczas BEZPIECZEŃSTWA 5. Zwracaj uwagę na sposób przenoszenia elektrycznego przechowywania urządzenia. urządzenia lub podłączanie go OSTRZEŻENIE: Sprawdź, czy ruchome części do prądu, gdy przełącznik jest działają zarzutu Proszę zapoznać włączony może doprowadzić do zacinają...
- Page 24 pomocy ładowarki zatwierdzonej przechowywania akumulatora: Przepłucz oczy czystą wodą przez przez producenta. Istnieje ryzyko co najmniej 10 minut i natychmiast Gdy nie używasz akumulatora pożaru w przypadku używania poszukaj pomoc medycznej. trzymaj go z daleka od spinaczy innego urządzenia przeznaczonego Powiadom personel medyczny,...
-
Page 25: Instrukcja Obsługi
INSTRUKCJA OBSŁUGI NITOWANIE 1-Wybierz odpowiedni nosek pasujący do rozmiaru nitu. Sprawdź odpowiedni rozmiar noska w załączonej tabeli. UWAGA NOSKI Użycie niewłaściwego noska może spowodować Noski Ø Nit (mm) uszkodzenie narzędzia. Ø2.4 2-Umieść trzpień nita w nosku. Ø3.0/3.2 3-Umieścić korpus nitu w otworze części montażowej. Ø4.0 4-Uruchomić... - Page 26 WSKAŹNIK POZIOMU BATERII 4 światła na panelu akumulatora pozwalają sprawdzić pozostałą moc. Naciśnij i przytrzymaj 100% niebieski przycisk, aby sprawdzić poziom naładowania akumulatora: 4 światła włączone: 100% pozostało 3 światła włączone: 75% pozostało 2 światła włączone: 50% pozostało 1 światło włączone: 25% pozostało Informacje na panelu akumulatora mogą...
- Page 27 KONSERWACJA Specjalny klucz jest dostarczany razem Klucz SW14 z narzędziem. WYMIANA NOSKA Użyj specjalnego klucza Wyjmij nosek aby odkręcić nosek. Wkręć nosek naciskając spust Aktywuj spust Użyj specjalnego klucza aby wkręcić nosek. • 27 ELEMENT FIVE - Instrukcja Obsługi...
- Page 28 WYMIANA SZCZĘK Użyj specjalnego klucza aby odkręcić przednią dyszę. Użyj specjalnego klucza + klucza SW14 aby odkręcić tuleję zaciskową. Naciśnij tuleję Nasmarować Zdejmij zestaw wyładowczą trzpienia tuleję wyładowczą szczęk zaciskowych aby sprawdzić i nasmaruj wewnątrz obecność sprężyny tulei zaciskowej 28 • ELEMENT FIVE - Instrukcja Obsługi...
- Page 29 Umieścić szczęki zaciskowe wewnątrz tulei zaciskowej Dokręcić tuleję zaciskową Wkręć tuleję zaciskową na narzędzie specjalnym kluczem Wkręć przednią dyszę do narzędzia Dokręć przednią dyszę specjalnym kluczem UWAGA Jeśli złamany trzpień nie zostanie wyrzucony do pojemnika na trzpienie, jest to spowodowane nadmiarem smaru. Ostrożnie, uderz pojemnik na trzpienie lub użyj sprężonego powietrza aby spróbować...
-
Page 30: Rozwiązywanie Problemów
ROZWIĄZYWANIE PROBLEMÓW Trzpień zostaje zablokowany. Gdzie Przyczyna Rozwiązanie Nosek Zamontowano Zamontuj właściwy nosek zgodnie z niewłaściwy nosek NOSEK tabela §1 Zużyty nosek Zastąp go nowym Szczęki Trzpień zablokował Wyczyść / wymień zestaw szczęk się w szczęce za pomocą dodatkowego zestawu znajdującego się... -
Page 31: Deklaracja Zgodności
DEKLARACJA ZGODNOŚCI DEKLARACJA ZGODNOŚCI WE - DYREKTYWA WE 2006/42 / WE ZAŁĄCZNIK II 1A Producent: SCELL-IT 28 RUE PAUL DUBRULE 59810 LESQUIN FRANCE +33(0) 320 329 818 Niniejszym oświadcza, że następujący produkt: Oznaczenie produktu: • E-5 / E-6 / E-T / E-7 / E-8 / E-SP / E-12 / E-HC •... - Page 32 SPECIFIKACE NÝTOVACÍ KLEŠTĚ bezkabelové nýtovací kleště pro trhací nýty Ø2.4mm-5.0mm Hmotnost: 2,15kg (akumulátor) Zdvih: 21mm / 0,827’’ Pohon: DC motor 18V Tažná síla: 12 000N Spoušť Nástavec Záchytná schránka Háček na opasek Akumulátor NABÍJEČKA AKUMULÁTOR Napětí : Vstupní napětí: 100-240VAC/50-60Hz Druh baterie: Li-ion 18VDC...
-
Page 33: Důležité Bezpečnostní Informace
DŮLEŽITÉ účelu elektrické nýtovací kleště nýtovacími kleštěmi pracovaly používáte), snížují riziko zranění. osoby, které nebyly s jejich BEZPEČNOSTNÍ používáním obeznámeny, nebo 3. Zabraňte nechtěnému spuštění které nečetly tyto bezpečnostní INFORMACE nýtovacích kleští. Před zapojením pokyny. rukou nezkušené nýtovacích kleští do elektrické osoby se nýtovací... - Page 34 ni určeným. Použití jakéhokoli 0°C à 40°C znamenat, že akumulátor jiného akumulátoru může poškozen. Pokud je ovšem vnější c. skladovací teplota: způsobit zranění a požár. těsnění poškozeno a tekutina -20°C à 60°C se dostane do kontaktu s kůží: Nenabíjejte při vyšším rychle omyjte vodou a mýdlem.
-
Page 35: Návod K Použití
NÁVOD K POUŽITÍ NÝTOVÁNÍ 1-Vyberte nástavec podle průměru nýtu (viz tabulka). POZOR použití špatného nástavce může poškodit výrobek. Nástavce 2-Umístěte trn nýtu do nástavce Nástavce Ø Nýt (mm) 3-Umístěte tělo nýtu do vyvrtaného otvoru. Ø2.4 Ø3.0/3.2 4-Stiskněte spoušť dokud se neulomí trn. Ø4.0 Ø4.8/5.0 ZÁCHYTNÁ... - Page 36 INDIKÁTOR AUTONOMIE AKUMULÁTORU Na akumulátoru můžete ověřit stav nabití baterie pomocí 4 světel: 100% 4 kontrolky zapnuté: zbývá 100% 3 kontrolky zapnuté: zbývá 75% 2 kontrolky zapnuté: zbývá 50% 1 kontrolka zapnutá: zbývá 25% Informace se může lehce odlišovat (+-5%) podle okolních podmínek.
-
Page 37: Výměna Nástavce
ÚDRŽBA Speciální klíč dodaný s nýtovacími kleštěmi Klíč SW14 VÝMĚNA NÁSTAVCE Použijte speciální klíč Odejměte nástavec pro odšroubování nástavce Našroubujte nástavec při Stiskněte spoušť stisknuté spoušti Použijte speciální klíč pro upevnění nástavce • 37 ELEMENT FIVE - Návod k použití... - Page 38 VÝMĚNA ČELISTÍ Použijte speciální klíč pro odšroubování přední hubice Použijte speciální klíč +SW14 pro odšroubování pouzdra kleštinek Zatlačte těsnící trubku Naolejujte těsnící trubku Odstraňte čelisti a pro ověření přitomnosti naolejujte pouzdro pružiny kleštinek 38 • ELEMENT FIVE - Návod k použití...
- Page 39 Vložte čelisti do pouzdra kleštinek Našroubujte pouzdro kleštinek na Upevněte pouzdro kleštinek nýtovací kleště pomocí speciálního kliče Našroubujte přední hubici na nýtovací Upevněte přední hubici pomocí kleště speciálního klíče UPOZORNĚNÍ Pokud trn nýtu není vymrštěn do záchytné schránky, je to kvůli přebytku oleje.
-
Page 40: Řešení Problémů
ŘEŠENÍ PROBLÉMŮ UVÍZNUTÝ TRN PŘÍČINA ŘEŠENÍ nástavec nevhodný nástavec Namontujte správný nástavec podle tabulky koncovek §1 nástavec v špatném Nahraďte nástavec stavu Sada čelistí Nýt zablokovaný v Očistěte/vyměňte sadu čelistí. čelisti plná záchytná schránka Odmontujte a vyprázdněte (>100 trnů) záchytnou schránku Trubička Opotřebovaná... -
Page 41: Prohlášení O Shodě
PROHLÁŠENÍ O SHODĚ EC PROHLÁŠENÍ O SHODĚ – EC DIRECTIVE 2006/42/EC ANNEX II 1A Výrobce: SCELL-IT 28 RUE PAUL DUBRULE 59810 LESQUIN FRANCE +33(0) 320 329 818 Tímto prohlašuje, že následující produkt: Označení výrobku: • E-5 / E-6 / E-T / E-7 / E-8 / E-SP / E-12 / E-HC •... -
Page 42: Specifiche Tecniche
SPECIFICHE TECNICHE UTENSILE Rivettatrice per rivetti ciechi Ø2,4mm-5,0mm Peso netto utensile : 2,15 kg / 4,73 lbs (compresa la batteria) Corsa : 21mm / 0,827’’ Grilletto Potenza : DC motor 18V Ugello Forza di trazione : 12000N / 2640 lbs min Canestro porta sfridi Clip cintura Batteria... -
Page 43: Importanti Informazioni Di Sicurezza
IMPORTANTI quando si afferra o si trasporta il funzionamento dell’utensile elettrico. l’utensile. Il trasporto di utensili Se danneggiato, far riparare l’utensile INFORMAZIONI DI elettrici tenendo la mano appoggiata prima dell’uso. Molti incidenti sono sull’interruttore o se gli stessi vengono causati da utensili elettrici in cattive SICUREZZA alimentati con l’interruttore in posizione condizioni di manutenzione. - Page 44 scollegare il carica batterie estraendo terminali. Un cortocircuito dei terminali liquido è una soluzione di idrossido di la spina. della batteria potrebbe provocare potassio al 25-35%. ustioni o un incendio. 7. Controllare che il carica batterie 18. Non conservare o trasportare le sia posizionato in modo tale da a.
-
Page 45: Istruzioni Di Funzionamento
ISTRUZIONI DI FUNZIONAMENTO RIVETTATURA 1- Scegliere l’ugello in funzione del diametro del rivetto da applicare. Fare riferimento alla tabella riportata qui accanto per la scelta dell’ugello corretto UGELLI ATTENZIONE L’IMPIEGO DI UN UGELLO ERRATO PUÒ DANNEGGIARE Ugello Rivetto Ø (mm) L’UTENSILE. - Page 46 INDICATORE CZ LIVELLO BATTERIA Le 4 luci sul pannello della batteria permettono 100% di controllare la carica residua. Tenere premuto il pulsante blu per controllare il livello della batteria. 4 luci accese: carica residua 100% 3 luci accese: carica residua 75% 2 luci accese: carica residua 50% 1 luce accesa: carica residua 25% Le informazioni sul pannello batterie possono variare...
-
Page 47: Manutenzione
MANUTENZIONE Chiave speciale fornita con Chiave SW14 l’utensile SOSTITUZIONE DELL’UGELLO Utilizzare la chiave speciale per svitare Estrarre l’ugello. l’ugello. Avvitare l’ugello premendo il grilletto Attivare il grilletto Utilizzare la chiave speciale per avvitare l’ugello. • 47 ELEMENT FIVE - Manuale Utente... - Page 48 SOSTITUZIONE DEL KIT MORSETTI Utilizzare la chiave speciale per svitare il canotto porta ugello. Utilizzare la chiave speciale la chiave SW14 per svitare il cono porta morsetti. Premere il tubo di scarico chiodi Lubrificare il tubo di scarico Smontare il kit morsetti per controllare la presenza della usurato e lubrificare chiodi...
- Page 49 Inserire il kit morsetti all’interno del cono porta morsetti Serrare il cono porta morsetti con la Avvitare il cono porta morsetti sull’utensile chiave speciale Avvitare il cannotto porta ugello Serrare il cannotto porta ugello con la chiave speciale ATTENZIONE Se il chiodo rotto non viene espulso nel canestro porta sfridi, ciò può essere dovuto ad un eccesso di grasso.
-
Page 50: Condizioni Di Garanzia
RICERCA DEL GUASTO Il chiodo è bloccato. Dove Causa Soluzione Ugello È stato montato un Montare un ugello corretto in base a ugello sbagliato quanto riportato nella tabella UGELLI §1 Ugello usurato Sostituire con uno nuovo Kit morsetti Chiodo bloccato tra i Pulire/sostituire il kit morsetti con il kit morsetti aggiuntivo fornito o ordinare un nuovo kit... -
Page 51: Dichiarazione Di Conformita
DICHIARAZIONE DI CONFORMITA’ DICHIARAZIONE DI CONFORMITA’ CE - DIRETTIVA CE 2006/42 ALLEGATO II 1A Il costruttore: SCELL-IT 28 RUE PAUL DUBRULE 59810 LESQUIN FRANCE +33(0) 320 329 818 dichiara che il seguente prodotto: Désignation du produit : • E-5 / E-6 / E-T / E-7 / E-8 / E-SP / E-12 / E-HC •... - Page 52 28 rue Paul Dubrule - 59810 Lesquin - FRANCE 52 • ELEMENT FIVE - User Manual...
Need help?
Do you have a question about the ELEMENT 5 and is the answer not in the manual?
Questions and answers