Advertisement
Quick Links
Owner's Manual
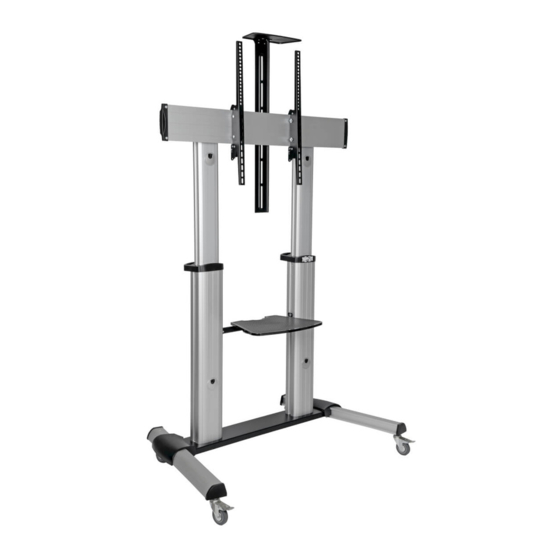
Heavy-Duty Mobile
Flat-Panel Floor Stand
Model: DMCS60100XX
Este manual está disponible en español en la página de Tripp Lite: tripplite.com
Ce manuel est disponible en français sur le site Web de Tripp Lite : tripplite.com
Русскоязычная версия настоящего руководства представлена на веб-сайте компании
Dieses Handbuch ist in deutscher Sprache auf der Tripp Lite-Website verfügbar: tripplite.com
CAUTION: DO NOT EXCEED MAXIMUM LISTED WEIGHT CAPACITY. SERIOUS INJURY OR
PROPERTY DAMAGE MAY OCCUR!
200 x 200 / 300 x 300 /
400 x 200 / 400 x 400 /
600 x 400 / 800 x 400 /
800 x 600 / 1000 x 600
WARRANTY REGISTRATION
1111 W. 35th Street, Chicago, IL 60609 USA • tripplite.com/support
Copyright © 2021 Tripp Lite. All rights reserved.
Tripp Lite по адресу: tripplite.com
100"
MAX
(100 kg)
(100 kg)
Register your product today and be
automatically entered to win an ISOBAR
surge protector in our monthly drawing!
tripplite.com/warranty
1
TV
TV
DVD
DVD
220 lb.
220 lb.
11 lb.
11 lb.
(5 kg)
(5 kg)
MAX
MAX
MAX
MAX
®
CAMERA
CAMERA
11 lb.
11 lb.
(5 kg)
(5 kg)
MAX
MAX
Advertisement

Related Manuals for Tripp Lite DMCS60100XX


Summary of Contents for Tripp Lite DMCS60100XX
- Page 1 Model: DMCS60100XX Este manual está disponible en español en la página de Tripp Lite: tripplite.com Ce manuel est disponible en français sur le site Web de Tripp Lite : tripplite.com Русскоязычная версия настоящего руководства представлена на веб-сайте компании Tripp Lite по адресу: tripplite.com Dieses Handbuch ist in deutscher Sprache auf der Tripp Lite-Website verfügbar: tripplite.com...
-
Page 2: Warranty And Product Registration
FREE Tripp Lite product!* * No purchase necessary. Void where prohibited. Some restrictions apply. See website for details. Tripp Lite has a policy of continuous improvement. Specifications are subject to change without notice. Photos and illustrations may differ slightly from actual products. -
Page 3: Component Checklist
Component Checklist IMPORTANT: Ensure that you have received all parts according to the component checklist prior to installing. If any parts are missing or faulty, visit www.tripplite.com/support for service. Middle Base (x1) Left Leg (x1) Right Leg (x1) Left Cover (x1) Right Cover (x1) Universal Plate (x1) Plastic Handle (x2) -
Page 4: Assemble The Base
1. Assemble the Base Middle Base Left Leg M6x16 Caster Right Leg Hex Key Wrench Never Overtighten • Insert the right leg into the base. Align the holes in the right leg to the holes in the base. Secure with the screws. Repeat this step for the left Screws leg. - Page 5 3. Attach Columns to Base During this step, the columns are not secured to the base with screws. Be careful not to knock the columns over. Plastic Handle Right Column Left Column...
- Page 6 4. Attach Universal Plate to Columns M6x14 Universal Plate Universal Plate Support Insert the Universal Plate’s Supports into the column along the column rails. Tighten all screws with a suitable Philips screwdriver. Top Cover 5. Secure Columns to Base Using the Hex Key, tighten the screws to secure the columns to the base.
- Page 7 5. Secure Columns to Base Tighten the safety screws. M6x25 Philips Rounded Head 6. Assemble the DVD Shelf Knob M6x25 Hex Rounded Head M6x14 Support Bar...
- Page 8 7. Attach DVD Shelf to Columns Support Block M6x25 Hex Socket Head Hex Key Hex Key Use the Hex Key and screws to secure the DVD Adjust the Columns to the desired height before Shelf Assembly to the Columns’ Support Blocks. installing the display.
- Page 9 8. Attach Adapter Brackets to Display 8.2 For Recessed-Back Screens or Access to A/V Inputs M6x30 M8x30 Washer Do not over-tighten Small screws. Spacer M6x30 M8x30 Washer Spacer M6x30 M8x30 M8x50 M8x50 M8x50 Washer Washer Washer Washer Small Small Small Spacer Spacer Spacer...
-
Page 10: Cable Management
10. Cable Management Route the power and connection cables through the openings on the Left and Right Columns. 11. Assemble the Camera Shelf M4x6 Camera Shelf M4x6 Connecting Plate Use a Philips screwdriver and screws to attach the Camera Shelf to the Connecting Plate. - Page 11 12. Attach the Camera Shelf Assembly to the Universal Plate Remove Screws Insert Removed Screws to attach Connecting Plate Remove the Universal Plate’s two rear screws, then attach the Camera Shelf Assembly using the same screws just removed. Adjust the Camera Shelf Assembly to the desired height, then secure by tightening the screws with a Philips screwdriver.
- Page 12 13. Adjustment +5° –10° 1200 mm 1250 mm 1300 mm 1350 mm 1400 mm 1450 mm 1500 mm TV panel center 1550 mm height measured 1600 mm from floor. 1650 mm Use the Hex Key to loosen the screws on Support Block both support blocks.
Need help?
Do you have a question about the DMCS60100XX and is the answer not in the manual?
Questions and answers