Advertisement
Owner's Guide
Thank you for purchasing your new Eureka vacuum!
Important instructions
For easy assembly, please
take a few moments to read
this owner's guide.
If you have questions about your
new vacuum, please contact our
c
s u
o t
m
e
s r
r e
i v
e c
at 1-800-282-2886.
We're here to help!
Eureka stands by our
Clean Promise seal.
Learn more at
www.eureka.com/cleanpromise
www.eureka.com
H
L E
P
L
N I
E
NES100 Series
Corded stick vacuum cleaner; household type
www.eureka.com
1
Advertisement
Table of Contents

Related Manuals for Eureka NES100 Series


Summary of Contents for Eureka NES100 Series
- Page 1 NES100 Series Corded stick vacuum cleaner; household type Owner’s Guide Thank you for purchasing your new Eureka vacuum! Important instructions For easy assembly, please take a few moments to read this owner’s guide. If you have questions about your new vacuum, please contact our at 1-800-282-2886.
-
Page 2: Important Safety Instruction
IMPORTANT SAFETY INSTRUCTION SAFETY GUIDELINES - DEFINITIONS It is important for you to read and understand this manual. The information it contains relates to protecting YOUR SAFETY and PREVENTING PROBLEMS. The symbols below are used to help you recognize this information. DANGER: Indicates an imminently hazardous situation which, if not avoided, will result in death or serious injury. - Page 3 DO NOT use vacuum cleaner with blocked DO disconnect the appliance from the power supply when not in use, before filters. Clean or replace filters before changing the filters, cleaning the continuing. (refer to User Maintenance section). filters or connecting/disconnecting the accessories.
-
Page 4: Transporting Your Vacuum
IMPORTANT SAFETY INSTRUCTION CONT. READ AND SAVE THESE INSTRUCTIONS Symbols • The labels on your tool may include the following symbols. The symbols and their definitions are as follows: V .......volts A .......amperes Hz .....hertz W ......watts min ....minutes or AC ....alternating current or DC ..direct current n o ......no load speed ......Class I Construction... -
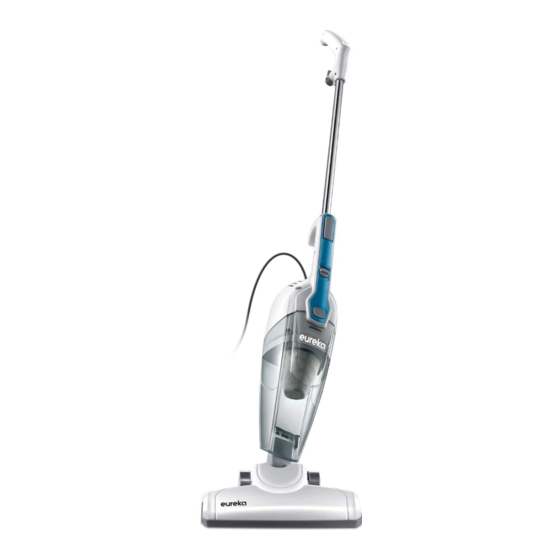
Page 5: Product View
Product View 1. Hand Grip 8. Dust Cup Latch 2. Cord Wrap 9. Filter 3. Power Cord 10. Dust Cup 4. Handle 11. Removable Floor Nozzle 5. Quick Release Button 12. Crevice Tool 6. Hand Vacuum Grip 7. Power On/Off CAUTION: Do not plug in your vacuum cleaner until you are familiar with all instructions and operating procedures. -
Page 6: Assembly/Operation
Assembly/Operation WARNING: Do not operate cleaner with damp or wet filters or without vacuum bags and all filters in place. Press the quick release button at the Attach the floor nozzle by inserting it into base of the hand vacuum grip and insert the opening at the bottom of the dust cup. -
Page 7: Crevice Tool
Assembly/Operation Power cord storage 1. Turn vacuum off (O). 2. Unplug power cord by grasping the polarized plug, NOT the cord, and disconnect from outlet. 3. Loop power cord around cord wrap on the handle. 4. Clip molded plug to power cord to secure. WARNING: To avoid injury, turn vacuum OFF and unplug cord from wall when not in use. - Page 8 Maintenance And Care - Emptying and Cleaning 1. Turn Vacuum off (O). Then, unplug 2. To remove dirt from the dust cup vacuum. and filter, hold the vacuum vertically. Depress and hold button on top of the vacuum to release the dust cup as the shown.
- Page 9 Maintenance And Care - Cleaning Vacuum And Tools DO NOT clean the vacuum cleaner, components or accessories using petroleum or any other flammable liquid or solvents, etc. Clean only the outside of the vacuum cleaner. Use only a moist cloth and mild detergent for cleaning the vacuum cleaner, components and accessories.
-
Page 10: Troubleshooting
Troubleshooting WARNING: To reduce the risk of electric shock, turn power OFF and disconnect plug from electrical outlet before performing maintenance or troubleshooting to the vacuum cleaner. Vacuum cleaner won’t run: Possible causes Remedies 1. Vacuum cleaner is not plugged in firmly 1. - Page 11 What Eureka will do: insurance charges if the defective product(s) must be shipped for warranty service or warranty Eureka will, at its option, repair or replace a evaluation; however, Eureka or a Eureka Authorized defective vacuum or vacuum part that is covered Warranty Station will pay the return shipping by this warranty.
Need help?
Do you have a question about the NES100 Series and is the answer not in the manual?
Questions and answers