Table of Contents

Related Manuals for Airvia medical AERO 100

Summary of Contents for Airvia medical AERO 100
- Page 1 AIRVIA Medical Air P urifier AERO 100 User Manual Thank you for purchasing an AIRVIA Medical Air Purifier. Please read this User Manual carefully before using your product. Make sure to store this manual in a safe place for future reference.
-
Page 3: Table Of Contents
Table of Contents I – Package Contents ..............4 II – Getting Started ................5 III – Technology Overview ............13 IV – Technical Characteristics ..........15 V – Maintenance ................17 VI – Troubleshooting ..............21 VII – Safety Instructions ............. 22 VIII –... -
Page 4: I - Package Contents
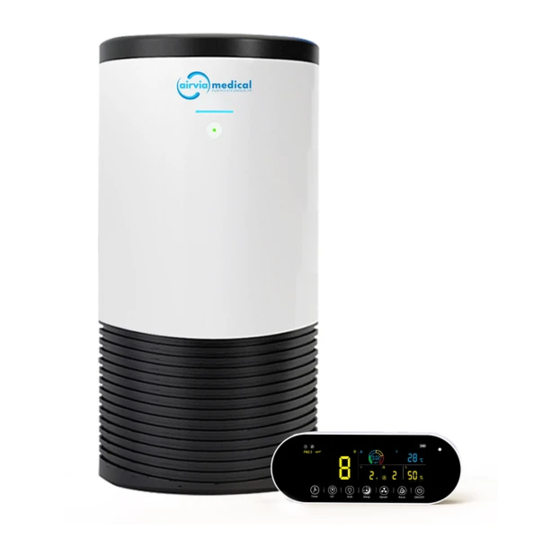
I – Package Contents Main Unit (includes filter) Charger for Remote Remote Control Display Take all items out of the box and unpack them. Verify that you have all the items listed above and that they all appear to be in good condition. -
Page 5: Getting Started
II – Getting Started Before using the Remote Control Display for the first time, please charge it fully. It can take up to 5 hours. The charging indicator light will turn red during the charge and turn off once fully charged. You can operate the main unit without the remote while it is charging, as detailed in paragraph 2) below. - Page 6 2) Using the main unit without the remote Start by plugging the main unit into an electrical outlet. The unit will emit a single beep and the power button will turn red. This means that the unit is plugged in, it does not mean that the unit is on. To turn the unit on, long press the power button (1-2 seconds).
- Page 7 3) Controlling the main unit using the remote Make sure that the Remote Control Display is fully charged before using it for the first time. The charging indicator light turns red when the remote is charging. Charge indicator Screen Commands Figure 3 –...
- Page 8 Figure 5 – Remote Control Display (Main unit OFF) Battery Indicator Temperature (20°C) Humidity (76%) UV function Timer ON Speed level (#3) PM2.5 level (5h) (48 μg/m Automatic Mode is ON Anion function Chemical Pollution level (0.04 mg/m Figure 6 – Remote Control Display (Main unit ON)
- Page 9 3.1) Remote buttons (from right to left) Figure 7 – Commands of the Remote Control Display a. ON/OFF Long press the “ON/OFF” button on the Remote Control Display to turn it on/off. With the main unit plugged in, short press the “ON/OFF” button on the Remote Control Display turn on/off the main unit.
- Page 10 or at any other time that you want a more discrete mode of operation. With the main unit on, short press the “Sleep” button to turn the Sleep mode on/off. In Sleep mode, the main unit will run extremely quietly and the air quality indicator bar will turn off.
- Page 11 4) Remote Control Display 4.1) Reading the display data To ensure the accuracy of the measurements, please let the remote and the main unit run one minute before reading the data. a. PM2.5 particles The big number on the left side of the Remote Control Display screen corresponds to the PM2.5 level, measured in μg/m3.
- Page 12 two years. The WHO established a safe level of exposure at 0.10 mg/m3 (0.08 ppm) for any 30-min period. Below are the colours and grades corresponding to each data range: Note: the Formaldehyde Sensor data may become inaccurate or corrupted when in presence of interfering gases. For more information, refer to the “Formaldehyde Sensor Interference Gases Table”...
-
Page 13: Technology Overview
It measures the volume of air cleaned in a given time. At over 500m3/h, the AERO 100 is one of the best on the market. It can clean the air in a space of 100 m2 in just a few minutes. - Page 14 2) Filtration technologies AIRVIA Medical air purifiers combine 8 different filtration technologies to filter all toxic particles without rejecting any ozone. The filtration process consists of a multi-layer filter with 6 different technologies, a UV lamp, and an ionizer. You will find the description of each of these functions below.
-
Page 15: Technical Characteristics
AIRVIA Medical uses a particularly powerful version of this technology to generate 20 million particles per cm3 at outlet, 6.3 million at 1 meter distance and 0.5 million at 3 meters distance. The total range of action is 5 meters. - Page 16 2) Main Unit SPECIFICATIONS TYPE Speed 1/Sleep Mode = 60; Speed 2 = 100; Speed 3 = CADR 210; Speed 4 = 317; Speed 5 = 503.1 Speed 1/Sleep Mode = 19.3; Speed 2 = 32.2; CADR HCHO Speed 3 = 67.6; Speed 4 = 102; Speed 5 = 162.2 P4 (highest possible rating) F4 (highest possible rating) HCHO...
-
Page 17: Maintenance
V – Maintenance Turn off and unplug your device before any maintenance operation. Aside from replacing the filter, non-professionals are not allowed to disassemble the device in order to avoid electric shock. 1) Cleaning the Air Purifier (once a month) ... - Page 18 Figure 8 – Location of the negative ion discharge outlets 2) Maintenance of Filter (once a month) The lifetime of the filter depends on the levels of air pollution in the environment you use it in. The recommended lifetime of the filter is one year but this will vary according to the aforementioned conditions.
- Page 19 3) Replacement of Filter (once a year) To ensure proper performances, you should only buy filters provided by AIRVIA Medical. The “Filter” is actually a composite filter made of several layers each made of a different filtration technology. Refer to the Technical Characteristics table for more information.
- Page 20 Step 3: Use both hands to slowly slide the old filter out. Step 4: Take the new filter out of its plastic bag and use both hands to slowly slide it in. Place the bottom cover back, rotate it clockwise until the black arrows align (or the brass bolts).
-
Page 21: Troubleshooting
VI – Troubleshooting Issue Possible Cause(s) Solution(s) Main unit is not plugged in Plug the main unit into an outlet Main unit does not work Main unit is tilted Make sure it lays flat This is normal with a new filter and is due to the natural bamboo New filter fibre. -
Page 22: Safety Instructions
VII – Safety Instructions 1) Precautions Make sure to turn off and unplug the device before inverting or tilting it. To avoid electric shock, non-professionals are not allowed to disassemble the device. If your home’s voltage is unstable, please use a voltage regulator with this device. - Page 23 If the device will not be used for a prolonged period of time, please unplug it. For your safety and the device’s guarantee, only use filters and affiliated accessories provided by AIRVIA Medical. Do not use the main unit as a ventilation fan.
- Page 24 The main unit cannot filter carbon monoxide. Do not use in an environment where carbon monoxide is present or may leak, it could lead to burns or fires. While the main unit is running, do not use sprays or pesticides. Every time you use sprays or pesticides when the unit is off, make sure to properly ventilate and air out the room afterwards.
- Page 25 4) Remote Control Display For accuracy, do not use the remote in an environment with strong air convection. If you are planning on using it for a long period at once, it is recommended to plug it using the power adapter. ...
- Page 26 5) Special Warnings 5.1) Usage Please only use the product once you have read the entire user manual. It is not recommended to let children near the main unit or operate the main unit without proper supervision. 5.2) Negative Ions In rare situations, negative ions might gather on the clothing or skin surface and cause a feeling of pinprick or a minor electric sensation.
-
Page 27: Warranty
+44 20 3878 4379. 1) Air purifier AIRVIA Medical air purifiers are under warranty for five (5) years from the date of purchase against any hardware failure. If you have a hardware problem with your AIRVIA Medical air purifier, please contact our customer service or the AIRVIA Medical distributor who sold you the product. - Page 28 In the event of a complaint or material defect in the purifier during the first five years of the date of receipt, the parts are insured by AIRVIA Medical. If it turns out that the item cannot be repaired, an exchange or credit will be offered.
- Page 29 Return shipping costs are the responsibility of the customer unless the purchase is eligible for free return shipping as specified in the Terms of Sale. AIRVIA Medical has 14 days to issue the refund. AIRVIA Medical can offer a credit or an exchange that the customer may choose to accept or not accept.
- Page 30 return of the product, the customer cannot exercise the right of withdrawal. The product must be shipped in its original packaging. The customer will have to print the return slip by his or her own means. 5) Deadlines We’re always doing our best to minimize processing times. The deadlines for receiving a repaired product or an exchange product are usually 2 to 8 weeks and are likely to vary depending on various constraints (transportation,...
-
Page 31: Appendix: Formaldehyde Sensor Data
Appendix: Formaldehyde Sensor Data Concentration Formaldehyde Sensor (ppm) Display Formaldehyde Benzene Toluene 0.46 Acetic acid 0.52 Alcohol 40.6 Hydrogen sulphide Carbon monoxide 0.64 Formaldehyde Sensor Interference Gases Table The gases listed above, through their presence in air, can interfere with the formaldehyde sensor and corrupt its data on the Remote Control Display. - Page 32 AIRVIA Medical Website: airpurifier.co.uk Email: info@airvialmedical.com Phone: +44 (0)20 3878 4379...
Need help?
Do you have a question about the AERO 100 and is the answer not in the manual?
Questions and answers