Emist EM360 Quick Start Manual
Electrostatic sprayer
Hide thumbs
Also See for EM360:
- User manual (16 pages) ,
- Quick start manual (2 pages) ,
- User manual (16 pages)
Table of Contents
Advertisement
Quick Links
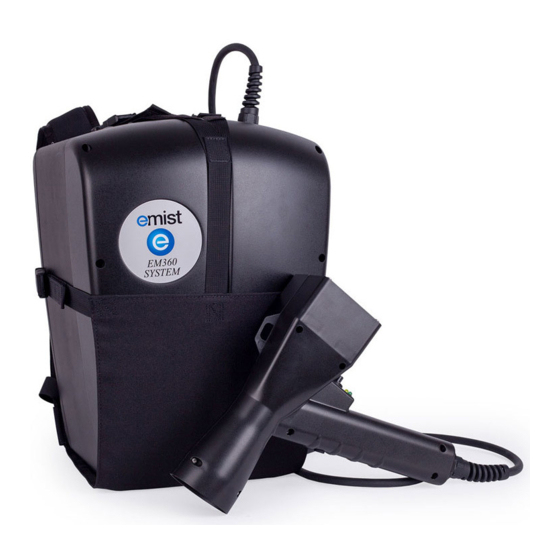
EM360™ Electrostatic Sprayer Quick Start Guide
Thank you for choosing the EMist
an easy to use system that combines advanced liquid application technologies with
improved mobility. The result is superior application and enhanced disinfection, as well
as a convenient convertible design for users.
CONTENTS: After unpacking, inspect the components for any damage or missing
hardware pieces, etc. The following components are included with your purchase:
1)
Power Pack with Applicator
2)
One Gallon Liquid Tank
3)
Rechargeable Battery
4)
Battery Charger (220v optional)
1
Step 1: Install the Battery
Make sure the battery is fully charged (4 bars = full charge).
•
With the power pack battery slots facing you, remove the battery covers by pinching the triangle.
•
Install the battery with the tab facing right.
•
Gently push the battery to seat it.
•
Replace the battery cover.
•
Step 2: Liquid Tank Insertion
For the initial set up/test, fill the liquid tank 1/3 full with water.
•
Gently place the liquid tank in the power pack.
•
Slightly rotate clockwise about 1/4 turn while depressing the tank until you feel resistance. The tank's handle should
•
line up with placard on the power pack.
Step 3: Grounding Strap Installation
Identify the white or brown portion of the grounding strap ring and install it by placing the white or brown portion on
•
the ball of the shoe.
Place the elastic strap around your heel.
•
Snap the button to the bottom of the power pack.
•
Step 4: Power Pack Harness Strap Adjustments (Optional)
Put the harness on the power pack.
•
Put the power pack on like you would a backpack and adjust the straps to fit comfortably.
•
Step 5: Pull Cart Installation (Optional)
Raise adjustable clamp, loosening the two knobs and positioning as desired then re-tightening the knobs.
•
Put the clamp over the hand grip of the power pack keeping the electro-fluid cable out of the way. This secures
•
the pack in place.
Use the applicator holster when system is not in use.
•
Step 6: Applicator Function Check
Push/flip the toggle power switch down and the green LED light will turn on.
•
Once the applicator trigger switch is depressed, the fan will turn on first, followed by the liquid spray.
•
The yellow LED light signifies that the high voltage power supply is charging the liquid droplets.
•
Once the applicator trigger is released, the liquid will stop, and the fan will turn off after a slight hesitation to ensure the
•
liquid is cleared inside the applicator.
To turn the system off push/flip the toggle power switch up. This will completely turn off the system.
•
EM360™ Electrostatic Sprayer. We have created
®
5)
Backpack Harness with Holster (Optional)
6)
Grounding Strap for Harness
7)
Pull Cart with Holster (Optional)
2
3
4
5
Resources
Scan here to
connect to
additional resources
for the EM360
Electrostatic Sprayer
6
7
Advertisement
Table of Contents

Related Manuals for Emist EM360


Summary of Contents for Emist EM360
- Page 1 EM360™ Electrostatic Sprayer Quick Start Guide Thank you for choosing the EMist EM360™ Electrostatic Sprayer. We have created ® an easy to use system that combines advanced liquid application technologies with improved mobility. The result is superior application and enhanced disinfection, as well as a convenient convertible design for users.
- Page 2 © 2021 SanoTech 360, LLC. All rights reserved. All product names, logos, and brands are property of their respective owners. Prices are in U.S. Dollars. Prices are subject to change. All use of the website and resources is subject to the Terms of Use. EMist-00056-20 - EM360 Quick Start Guide - 052721...
Need help?
Do you have a question about the EM360 and is the answer not in the manual?
Questions and answers