Advertisement
Quick Links
Advertisement

Related Manuals for Soundstream STEALTH Series


Summary of Contents for Soundstream STEALTH Series
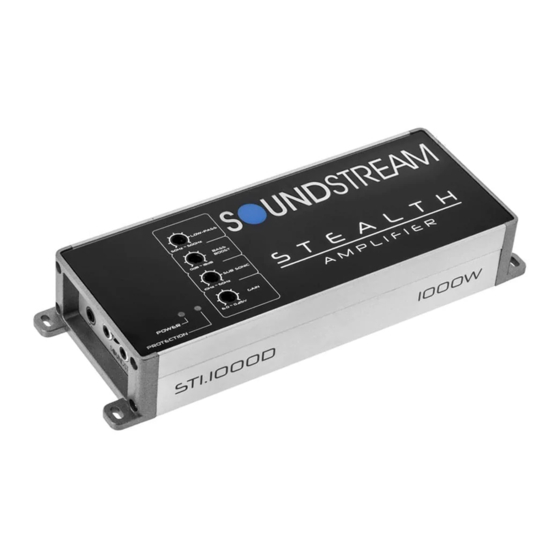
- Page 1 ST1.1000D ST2.1000D ST3.1000D ST4.1200D ST5.1300D...
- Page 2 It is important that you closely follow the wiring instructions contained in this Owners Manual so that you get the most from your STEALTH Series mobile amplifier. Caution, Read First Some of our amplifiers are capable of producing a sound pressure level that can cause permanent damage to your hearing system.
-
Page 3: Technical Features
TECHNICAL FEATURES ST1.1000D •Premium High-Efficiency Class D Monoblock Subwoofer Amplifier •Micro 3" x 8" Chassis Design Accommodates Any Application •Hybrid Aluminum Alloy Heatsink for Optimum Heat Dissipation •2-ohm Mono Minimum Impedance Stability •MOSFET Power Supply w/Audiophile Grade IRTM Transistors •Military Grade SMT PCB Maintains Dynamic Performance •Direct Short, Thermal, &... - Page 4 ST2.1000D •Premium High-Efficiency Class D Tow Channel Stereo Amplifier •Micro 3" x 6" Chassis Design Accommodates Any Application •Hybrid Aluminum Alloy Heatsink for Optimum Heat Dissipation •2-ohm Stereo & 4-ohm Bridged Impedance Stability •MOSFET Power Supply w/Audiophile Grade IRTM Transistors •Military Grade SMT PCB Maintains Dynamic Performance •Direct Short, Thermal, &...
- Page 5 ST3.1000D •Premium High-Efficiency Class D Three Channel Stereo Amplifier •Micro 3" x 8" Chassis Design Accommodates Any Application •Hybrid Aluminum Alloy Heatsink for Optimum Heat Dissipation •2-ohm Stereo & 4-ohm Bridged Stability For Speaker Channel •2-ohm Mono Minimum Impedance for Subwoofer Channel •MOSFET Power Supply w/Audiophile Grade IRTM Transistors •Military Grade SMT PCB Maintains Dynamic Performance •Direct Short, Thermal, &...
- Page 6 ST4.1200D •Premium High-Efficiency Class D Four Channel Stereo Amplifier •Micro 3" x 8" Chassis Design Accommodates Any Application •Hybrid Aluminum Alloy Heatsink for Optimum Heat Dissipation •2-ohm Stereo & 4-ohm Bridged Impedance Stability •MOSFET Power Supply w/Audiophile Grade IRTM Transistors •Military Grade SMT PCB Maintains Dynamic Performance •Direct Short, Thermal, &...
- Page 7 ST5.1300D •Premium High-Efficiency Class D Five Channel Stereo Amplifier •Micro 3 x 10 Chassis Design Accommodates Any Application •Hybrid Aluminum Alloy Heatsink for Optimum Heat Dissipation •2-ohm Stereo & 4-ohm Bridged Impedance Stability •MOSFET Power Supply w/ Audiophile Grade IR Transistors •Military Grade SMT PCB Maintains Dynamic Performance •Direct Short, Thermal, &...
-
Page 8: Installation Precautions
MOUNTING LOCATION Your STEALTH Series amplifier comes with mounting feet that need to be attached to the amplifier prior to installation. Once the feet are in place, use the amplifier as a template and mark the four screw locations. - Page 9 (+) terminal of the car battery. 8. Remote (Remote Input Connection) All STEALTH Series amplifiers can be turned on by applying 12 volts to this terminal. This can be found on the rear of the source unit in the form of an electric antenna output, or a remote output.
- Page 10 10.Power Indicator The GREEN when the power is on. 11. Gain Adjustment Control The input level can be adjusted with this control. Turn it in the clockwise direction when the output level of the car audio unit seems low 12. Sub Sonic Filter Variable subsonic filter (20Hz ~50Hz) The subsonic filter will roll off all of the unwanted frequencies below 20HZ ~50Hz.
- Page 11 Remote Subwoofer Level Control This input allows you to add remote that will allow you to control the subwoofer output of your STEALTH amplifier from your dashboard. and to adapt the amplifier to all kind of signal sources with varying levels there are a level control provided on the amplifier next to the phone jacks.
- Page 12 SPEAKER & POWER CONNECTION...
- Page 13 SPEAKER & POWER CONNECTION...
- Page 14 SPEAKER & POWER CONNECTION...
- Page 15 SPEAKER & POWER CONNECTION...
- Page 16 SPEAKER & POWER CONNECTION...
- Page 17 SPEAKER & POWER CONNECTION...
- Page 18 SPEAKER & POWER CONNECTION...
- Page 19 SPEAKER & POWER CONNECTION...
- Page 20 SPEAKER & POWER CONNECTION...
-
Page 21: Power Input Connections
POWER INPUT CONNECTIONS... - Page 22 These amplifiers are designed to work within a 10 to 16.8 volt DC range. Before any wires are connected, the vehicles electrical system should be checked for correct voltage supply with the help of a voltmeter. First, check the voltage at the battery with the ignition in the OFF position. The voltmeter should read not less than 12V.
-
Page 23: Troubleshooting Tips
TROUBLESHOOTING TIPS NOTE: If the RED protection LED. is activated with no speakers connected to the amplifier, and all the power connections are correct, this would indicate an internal problem with the amplifier. Contact Soundstream Technologies or your local dealer.
Need help?
Do you have a question about the STEALTH Series and is the answer not in the manual?
Questions and answers
COMO CONECTAR EL SUBWOOFER A MI AMPLIFICADOR