Table of Contents
Advertisement
Quick Links
Advertisement
Table of Contents

Related Manuals for Power smart PS3030


Summary of Contents for Power smart PS3030
- Page 1 INSTRUCTION MANUAL 16 inch Variable Speed Scroll Saw Model # PS3030 Item#SBS-16D Have product questions or need technical support? Please feel free to contact us! Website: www.Amerisuninc.com www.powersmartusa.com Toll free: 1-800-791-9458 M-F 9-5 EST Email: support@amerisuninc.com...
-
Page 3: Table Of Contents
Maintenance……………………………………………………...………. 17 Trouble shooting…………………………………………………………. 17 Exploded view…………………………………………………………… 19 Parts list…………………………………………………………………... 20 Warranty statement………………………………………………………. 22 TECHNICAL DATA 16 inch Variable Speed Scroll Saw Model # PS3030 Motor: 120 V, 60 Hz, 0.9 A No Load Speed: 400~1600RPM Throat Depth: 16 inch Blade: 5 inch pinned &... -
Page 4: Introduction
INTRODUCTION ® Thank You for Purchasing a PowerSmart Product. This manual provides information regarding the safe operation and maintenance of this product. Every effort has been made to ensure the accuracy of the ® information in this manual. PowerSmart reserves the right to change this product and specifications at any time without prior notice. -
Page 5: General Safety Rules
GENERAL SAFETY RULES Safety is a combination of common sense, staying alert, and knowing how your power tool works. SAVE THESE SAFETY INSTRUCTIONS. WARNING: Do not operate this unit until you read this instruction manual for safety, operation and maintenance instructions. Failure to follow all instructions listed below may result in electric shock, fire, and/or serious personal injury. - Page 6 CAUTION: In all cases, make certain the outlet in question is properly grounded. If you are not sure if it is, have a licensed electrician check the outlet. WARNING: Do not expose to rain or use in damp locations. Guidelines for using extension cords Make sure your extension cord is in good condition.
- Page 7 Avoid accidental starting. Be sure switch is off before connecting to power source and/ or battery pack, pick up or carrying the tool. Carrying power tools with your finger on the switch or energizing power tools that have the switch on invites accidents. ...
-
Page 8: Special Safety Rules For Scroll Saw
SPECIFIC SAFETY RULES FOR SCROLL SAW Wear eye protection. Do not operate with any guard disabled, damaged, or removed. Moving guards must move freely and close instantly. Secure saw to work bench or stand with clamps or mounting hardware. Secure work bench or stand ... - Page 9 VIBRATION SAFETY This tool vibrates during use. Repeated or long-term exposure to vibration may cause temporary or permanent physical injury, particularly to the hands, arms and shoulders. To reduce the risk of vibration-related injury: Anyone using vibrating tools regularly or for an extended period should first be examined by a ...
-
Page 10: Symbols
SYMBOLS Some of the following symbols may be used on this product. Please study them and learn their meaning. Proper interpretation of these symbols will allow you to operate the product better and safer. SYMBOL NAME DESIGNATION/EXPLANATION Volts Voltage Amperes Current Hertz Frequency (cycles per second) -
Page 11: Knowing Your Scroll Saw
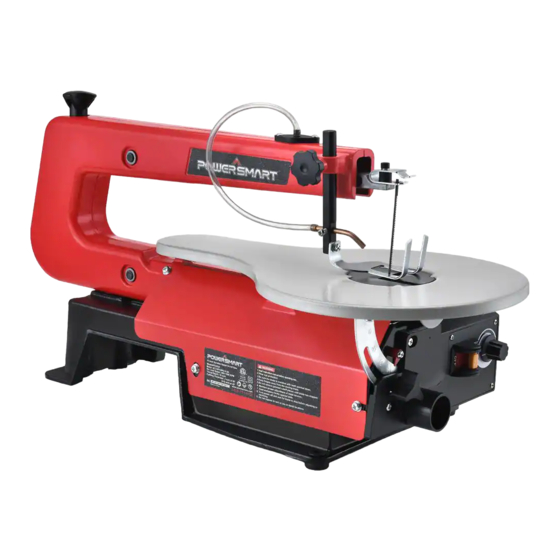
KNOWING YOUR SCROLL SAW Fig.1 Blade Tension Knob Dust blower Workpiece Foot Lock Knob Saw Blade Workpiece Foot Table Variable Speed Knob On/Off Switch with Safety Key Vacuum Hose Connection Table Lock Knob Bevel Scale Table insert Unpacking Unpack the power tool and all its parts, and compare against the list below. Do not discard the carton or any packaging materials. -
Page 12: Assembly Instruction
ASSEMBLY INSTRUCTION WARNING: Do not use this product if any parts on the packing list are already assembled to your product when you unpack it. Parts on this list are not assembled to the product by the manufacturer and require customer installation. Use of a product that may have been improperly assembled could result in serious personal injury. - Page 13 REMOVING AND INSTALLING BLADES WARNING: To prevent personal injury, always turn saw OFF and disconnect the plug from the power source before changing blades or making adjustments. This saw uses pinned and pinless blades. Pinned blades are thicker for stability and for faster assembly. They provide faster cutting on a variety of materials.
-
Page 14: Operating Instruction
INSTALLING PINLESS BLADE WARNING: To prevent personal injury, always turn saw OFF and disconnect the plug from the power source before installing blades. Remove the existing blade and table insert (see Removing and Installing blades). To install the pinless blade, use a hex wrench ... - Page 15 ON/OFF & SPEED CONTROL SWITCH The Switch needs to have the Safety Key inserted before the Switch can be used. This feature prevents unauthorized use of the Scroll Saw (See fig.5). Insert Safety Key into Switch. To turn Saw On, push Switch to the right. ...
- Page 16 CUTTING Straight, Cross, Bevel Cuts, and Ripping Using a pencil, mark the cut-line on the workpiece. Slide the workpiece underneath the Workpiece Foot. If necessary, adjust the Workpiece Foot by loosening the Workpiece Foot Lock Knob and sliding the Workpiece Foot up or down until it lightly rests on the workpiece.
-
Page 17: Maintenance
SAWDUST COLLECTION This scroll saw allows a hose or vacuum accessory (not provided) to be connected to the dust chute (C). If excessive sawdust buildup occurs inside the base, use a wet/dry vacuum cleaner to remove sawdust . This will keep your saw cutting efficiently (See fig.9). Fig.9 MAINTENANCE WARNING: Always turn the switch OFF, remove the safety key, and unplug the power... - Page 18 Problem Possible Cause Possible Solution 1. Make sure mounting hardware is secure. 1. Improper base mounting. 2. The heavier the work bench, the Excessive 2. Unsuitable mounting surface. less vibration will occur. Vibration 3. Loose motor mounting. 3. Check that motor mounting hardware is secure.
-
Page 19: Exploded View
EXPLODED VIEW... -
Page 20: Parts List
PARTS LIST Item Stock# Description Qty. Item Stock# Description Qty. PS3030-001 switch box plate PS3030-031 adjustable piece PS3030-002 motor PS3030-032 pressure plate PS3030-003 PS3030-033 PS3030-004 screw PS3030-034 flat washer PS3030-005 spring washer PS3030-035 compressed spring PS3030-006 screw PS3030-036 screw PS3030-007... - Page 21 Item Stock# Description Qty. Item Stock# Description Qty. PS3030-061 flat washer PS3030-076 screw Speed control circuit PS3030-062 screw PS3030-077 board PS3030-063 Riving knife PS3030-078 flat washer PS3030-064 screw PS3030-079 tapping screw down fixing blade PS3030-065 PS3030-080 switch plate PS3030-066 feet...
-
Page 22: Warranty Statement
TWO (2) YEARS LIMITED WARRANTY ® PowerSmart is committed to building tools that are dependable for years. Our warranties are consistent with our commitment and dedication to quality. TWO (2) YEARS LIMITED WARRANTY OF POWERSMART PRODUCTS FOR HOME USE. PowerSmart (“Seller") warrants to the original purchaser only, that all PowerSmart consumer power tools will be free from defects in material or workmanship for a period of two (2) years from date of purchase.
Need help?
Do you have a question about the PS3030 and is the answer not in the manual?
Questions and answers