Advertisement
Available languages
Available languages
Quick Links
Advertisement

Related Manuals for Logitech RALLY


Summary of Contents for Logitech RALLY
- Page 1 RALLY CAMERA Setup Guide | 设置指南 | 設定指南 | 설치 가이드 | Panduan Penggunaan...
- Page 2 English 简体中文 繁體中文 한국어 Indonesia...
- Page 3 • Mount device properly according to the provided instructions. Improper installation of © 2018 Logitech. Logitech, Logi, 罗技 and other Logitech marks are owned by Logitech and may be registered. All other trademarks are the property of their respective owners.
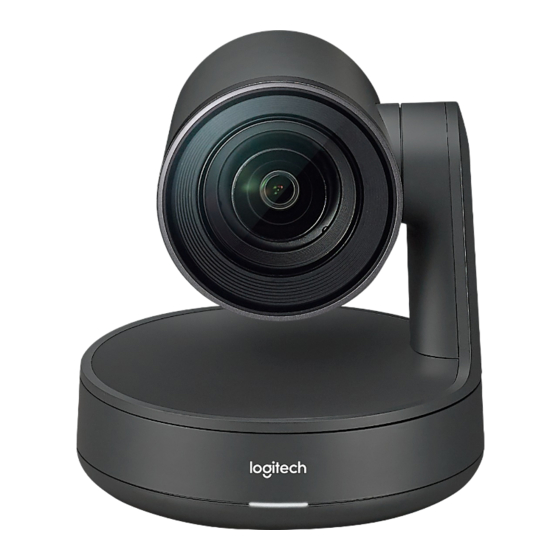
- Page 4 WHAT’S WHAT CAMERA 1. Remote Pairing Button 4. Security Slot 2. USB 5. MIPI 3. Status LED 6. Tripod Thread 7. Expansion Slot English...
- Page 5 REMOTE 1. Video Mute 4. Camera Presets 2. Pan/Tilt 5. Zoom In/Out 3. Camera Home English...
-
Page 6: Connect Your Camera
CONNECT YOUR CAMERA 4. The status LED will flash when the camera is connecting Connecting Rally Camera is the same Once complete, the camera head whether you plan on using a dedicated will rotate computer in the room, or your team... -
Page 7: Mount Your Camera
We offer a numer of options to mount the mount and connect to your Rally Camera For video calls, the camera we recommend placing the camera as close to eye level as possible Best results... -
Page 8: Pan And Tilt
To start a video call/capture session, start your application of choice and select Use this program to control the camera the Rally Camera The status LED will pan, tilt, zoom, focus, and image illuminate when video is streamed quality (like brightness and contrast) -
Page 9: Pairing The Remote
3. Once the remote and camera are paired the LED will stop flashing 4. If the pairing fails, the LED will keep flashing Start from step 2 and repeat FOR MORE INFORMATION You can find additional information on Rally including: – FAQs – Firmware Upgrades –... - Page 10 • Mount device properly according to the provided instructions. Improper installation of © 2018 Logitech. Logitech, Logi, 罗技 and other Logitech marks are owned by Logitech and may be registered. All other trademarks are the property of their respective owners.
- Page 11 硬件说明 摄像头 1. 遥控器配对按钮 4. 防盗锁插孔 2. USB 端口 5. MIPI 端口 3. LED 状态指示灯 6. 三脚架安装螺纹 7. 扩展插孔 简体中文...
- Page 12 遥控器 1. 视频静音 4. 摄像头预设位 2. 平移/俯仰 5. 变焦放大/缩小 3. 摄像头复位 简体中文...
- Page 13 4. 摄像头正在连接时, LED 指示灯会 连接摄像头 闪烁。 连接成功后, 摄像头会旋转。 无论您打算在会议室使用专用电脑, 还 是使用自带的笔记本召开会议, CC4900e 的连接方式都是一样的。 1. 将电源分线器的 USB 端插入摄像头的 USB 端口。 5. 若仍存在问题, 请咨询 www logitech com/support/ rallycamera 或致电技术支持。 2. 使用电源适配器将电源分线器与电源插 座相连接。 3. 使用 USB 线缆将电源分线器与计算机 相连接。 简体中文...
- Page 14 将 USB 端口穿过安装底座底部孔 安装摄像头 洞, 连接至摄像头。 我们为 CC4900e提供了多种安装方式。 对于视频通话, 建议将摄像头尽量置于与 视线平齐的高度。 通常来说, 安装于电视 下方效果更佳。 1. 放置于桌面或电视附近的架子上。 2. 安装于墙面上: a. 将壁装底座固定在墙面上。 请根据 墙壁类型选用适合的的螺丝类型。 d. 将电源分线器盒嵌扣入安装底座。 b. 将电源分线器放入电源分线器盒内, 走线方式如图所示。 e. 使用三脚架螺丝将摄像头固定于安 装底座上。 3. 安装于电视上: 选购选配电视安装 支架, 请访问 www.logitech.com。 简体中文...
- Page 15 复位即让摄像头恢复至开机位置。 按住此按 用程序, 并选择 CC4900e。 视频流传 钮 10 秒, 可保存新的复位位置。 输时, LED 状态指示灯会亮起。 摄像头设置应用程序 平移与俯仰 使用此程序可控制摄像头的平移、 俯仰、 点按按钮可进行位置微调, 按住按钮可控制 变焦、 对焦和画面质量 (如亮度和对比度)。 下载软件请访问 www logitech com/ 摄像头持续平移或俯仰运动。 support/rallycamera 注意: 手动旋转摄像头可能会造成设备 损坏。 RIGHTSIGHT 摄像头预设位 RightSight 自动移动摄像头并调节变焦以舒 适地取景拍摄会议参与者。 RightSight 支持 可设置 2 个预设位置。 摄像头位于要保...
- Page 16 摄像头和遥控器在出厂时已经配对。 如需将遥控器与摄像头配对 (如原遥控器丢失, 另配新遥控器) , 请按以下步骤操作: 4. 按住摄像头后侧按钮, 直至 LED 闪烁蓝色。 5. 按住遥控器上的视频静音按钮 10 秒, 使遥控器进入配对模式。 6. 遥控器和摄像头配对成功后, LED 会停止闪烁。 7. 若配对失败, LED 则保持闪烁。 从第 2 步开始重新执行。 获取更多信息 有关 CC4900e 的其他信息, 例如: –常见问题解答 –固件升级 –软件下载 –支持社区 –保修信息 –替换配件 –以及更多信息, 请访问 www.logitech.com/support/rallycamera 简体中文...
- Page 17 • Mount device properly according to the provided instructions. Improper installation of © 2018 Logitech. Logitech, Logi, 罗技 and other Logitech marks are owned by Logitech and may be registered. All other trademarks are the property of their respective owners.
- Page 18 項目說明 攝影機 1. 遙控器配對按鈕 4. 固定槽 2. USB 5. MIPI 3. 狀態 LED 指示燈 6. 三腳架螺紋 7. 擴充槽 繁體中文...
- Page 19 遙控器 1. 視訊靜音 4. 攝影機預先設定 2. 平移/傾斜 5. 放大/縮小 3. 攝影機歸位 繁體中文...
- Page 20 4. 狀態 LED 指示燈會在連接攝影機時 連線您的攝影機 閃爍。 完成後 ,攝影機頭會開始旋轉。 無論您是計劃在房間的專用電腦上使用 Rally 攝影機, 或是要在您的團隊成員帶進 房間進行會議之筆記型電腦上使用 , 連線方 式都是一樣。 1. 將功率分配器 USB 尾端插入到攝影機的 USB 連接埠。 5. 如果問題持續發生 , 請查詢 www logitech com/support/ rallycamera 或致電技術支援人員。 2. 將電源轉接器接到功率分配器上 , 然後插 入到牆壁插座。 3. 使用 USB 連接線連接功率分配器與您...
- Page 21 對於視訊通話 , 建議將攝影機裝設在盡可能 與眼睛同高的位置。 安裝在電視下方 ,一般 會有最好的效果。 1. 請安裝在桌面上或靠近電視的架子上 。 2. 壁掛安裝 : a. 將壁掛套件裝到牆上 。 請針對您的牆 面類型 ,使用適當的螺絲。 d. 將功率分配器盒子固定在安裝 套件上 。 b. 將功率分配器插入到功率分配器盒 子中 , 然後依照圖示接線。 e. 利用三腳架螺絲將攝影機固定在安裝 套件上 。 3. 安裝在電視上 : 在 www logitech com 提供有選用的電視安裝架。 繁體中文...
- Page 22 按住按鈕 10 秒可儲存新的歸位位置 。 串流播放視訊時 , 狀態 LED 指示燈會亮起 。 攝影機設定應用程式 平移和傾斜 使用此程式可控制攝影機的平移 、 傾斜 、 變焦 、對焦和影像品質 (例如亮度和對 按一 下可進行增量移動 , 按住不放可連續進 比) 。 此軟體可從 www logitech com/ 行平移和傾斜移動。 support/rallycamera 下載 注意 : 手動旋轉攝影機頭可能會對裝置造 成損害。 RIGHTSIGHT RightSight 會自動移動攝影機並調整變焦以 攝影機預先設定...
- Page 23 1. 按住攝影機背面的按鈕不放 , 直到 LED 指示燈閃爍藍燈。 2. 按住遙控器上的 「視訊靜音」 按鈕 10 秒不放 ,使其進入配對模式 。 3. 當遙控器與攝影機完成配對後 ,LED 指示燈會停止閃爍。 4. 如果配對失敗 ,LED 指示燈會繼續閃爍。 請重複步驟 2 以後的動作。 詳細資訊 您可以找到更多關於 Rally 的詳細資訊 , 包括 : – 常見問答集 – 韌體升級 – 軟體下載 – 支援社群...
- Page 24 • Mount device properly according to the provided instructions. Improper installation of © 2018 Logitech. Logitech, Logi, 罗技 and other Logitech marks are owned by Logitech and may be registered. All other trademarks are the property of their respective owners.
- Page 25 기능 및 명칭 카메라 1. 리모컨 페어링 버튼 4. 보안 슬롯 2. USB 5. MIPI 3. 상태 LED 6. 삼각대 나사 7. 확장 슬롯 한국어...
- Page 26 리모컨 1. 비디오 켜기/끄기 4. 카메라 프리셋 2. 상하좌우 이동/기울기 5. 확대/축소 3. 카메라 홈 한국어...
- Page 27 전용 컴퓨터를 사용하든, 팀원이 회의를 진행하기 위해 노트북을 가지고 오든 똑같습니다. 1. 전원 스플리터 USB 피그테일을 카메라의 USB 포트에 끼웁니다 5. 문제가 지속되면 www logitech com/ support/rallycamera를 참조하거나 로지텍 기술지원 센터에 문의하십시오 2. 전원 스플리터의 전원 어댑터를 콘센트에 끼웁니다 3. 전원 스플리터의 USB 케이블을...
- Page 28 마운트 바닥의 구멍을 통해 카메라 장착하기 USB 피그테일을 빼내 카메라에 Rally Camera는 여러 가지 방법으로 연결합니다 장착할 수 있습니다 화상통화는 가능한 한 눈높이에 가깝게 카메라를 설치하는 것이 좋습니다 일반적으로 TV 아래에 장착하면 최상의 결과를 얻을 수 있습니다 1. TV 근처의 테이블이나 선반 위에...
- Page 29 화상 통화/캡처 세션을 시작하기 위해서는 이 프로그램을 사용하여 카메라의 화상통화 애플리케이션을 시작하고 비디오 상하이동, 기울기, 확대/축소, 초점 및 영상 기기를 Rally Camera 로 선택합니다 화질(밝기 및 대비)을 제어할 수 있습니다 비디오가 스트리밍된 경우 상태 LED가 소프트웨어는 www logitech com/support/ rallycamera에서 다운로드 할 수 있습니다...
- Page 30 2. 리모컨의 비디오 음소거 버튼을 10초 동안 길게 누르면 페어링 모드로 전환됩니다 3. 리모컨과 카메라가 페어링되면 LED가 깜박임을 멈춥니다 4. 페어링이 안 되면 LED가 계속 깜박입니다 2단계부터 다시 시작하십시오 세부 사항 다음과 같은 Rally Camera 의 자세한 추가정보를 확인하실 수 있습니다 – FAQ – 펌웨어 업그레이드 – 소프트웨어 다운로드...
-
Page 31: Isi Kemasan
• Mount device properly according to the provided instructions. Improper installation of © 2018 Logitech. Logitech, Logi, 罗技 and other Logitech marks are owned by Logitech and may be registered. All other trademarks are the property of their respective owners. - Page 32 TERDIRI DARI KAMERA 1. Tombol Pairing Remote 4. Security Slot 2. USB 5. MIPI 3. LED Status 6. Ulir Tripod 7. Slot Ekspansi Indonesia...
- Page 33 REMOTE 1. Video Mute 4. Preset Kamera 2. Pan (Geser)/Tilt (Miring) 5. Zoom In/Out 3. Home Kamera Indonesia...
- Page 34 MENGHUBUNGKAN KAMERA 4. LED status akan berkedip ketika kamera sedang dihubungkan Setelah Cara menghubungkan Rally Camera selesai, kepala kamera akan berputar tetaplah sama, baik untuk digunakan dengan komputer khusus di dalam ruangan atau anggota tim Anda membawa laptop ke ruangan untuk menyelenggarakan meeting 1.
- Page 35 Masukkan USB pigtail ke dalam lubang di bawah mount dan Kami menawarkan sejumlah opsi untuk hubungkan ke kamera memasang Rally Camera Anda Untuk panggilan video, kami menyarankan untuk menempatkan kamera setinggi level mata Hasil terbaik biasanya didapatkan dari pemasangan di bawah 1.
- Page 36 Untuk memulai sesi merekam/panggilan Home adalah posisi yang dituju kamera video, aktifkan aplikasi pilihan Anda dan ketika kamera dinyalakan Simpan posisi pilihlah Rally Camera LED status akan Home yang baru dengan menahan menjadi terang ketika video sedang tombol selama 10 detik...
- Page 37 3. Setelah remote dan kamera berhasil terpairing, LED akan berhenti berkedip 4. Jika pairing gagal, LED akan terus berkedip Mulailah kembali dari langkah 2 dan ulangi INFORMASI LEBIH LANJUT Anda dapat menemukan informasi tambahan tentang Rally seperti: – FAQ – Upgrade Firmware – Unduhan Software –...
- Page 38 Type accepted No: ESD-1817260C No: ESD-1817259C © 2020 Logitech Logi, Logitech, 罗技 and the Logitech Logo are © 2020 Logitech, Logi, 및 Logitech 로고는 미국와 기타 국가에서 trademarks or registered trademarks of Logitech Europe S A and/ 로지텍 유럽 및/또는 그 계열사의 상표 또는 등록 상표입니다 그 밖의...