Chapters
Table of Contents

Related Manuals for Weidmüller PZ RK 10/120


Summary of Contents for Weidmüller PZ RK 10/120
- Page 1 Betriebs- und Wartungsanleitung Operating and maintenance instruction Crimpwerkzeuge Serie 10/120 Crimping tool series 10/120 Seriennummer: Serial number: 1548670000/00/06.14...
-
Page 3: Vorwort
Vorwort Vorwort Revisionsverlauf Version Datum Änderung 06/14 Erstausgabe Kontaktadresse Weidmüller Interface GmbH & Co. KG Postfach 3030 32720 Detmold Klingenbergstraße 16 32758 Detmold Telefon +49 (0) 5231 14-0 Telefax +49 (0) 5231 14-292083 E-Mail info@weidmueller.com Internet www.weidmueller.com 1548670000/00/06.14... - Page 4 Vorwort 1548670000/00/06.14...
-
Page 5: Table Of Contents
Inhalt Inhalt Vorwort Revisionsverlauf Kontaktadresse Inhalt Einleitung Sicherheitshinweise Bestimmungsgemäßer Einsatz Fachpersonal Richtigkeit technische Dokumentation CE-Kennzeichnung Konformitätserklärung Recycling nach WEEE Produktbeschreibung Technische Daten Bedienung Einstellen des Querschnittes Arbeitsanleitung Crimpvorgang Anzahl der Crimpungen Wartung Störungsbehebung 1548670000/00/06.14... -
Page 6: Einleitung
Einleitung Einleitung Sicherheitshinweise WARNUNG Niemals während des Crimpvorgangs zwischen die beiden Teile des Crimpeinsatzes greifen. WARNUNG Bei Nichtbeachtung besteht Lebensgefahr! Arbeiten Sie niemals an unter Spannung stehenden Leitungen. Die Span- nungsfreiheit ist vor dem Arbeitsbeginn sicherzustellen und mit geeigne- ten Mitteln zu prüfen. VORSICHT Es dürfen keinerlei Veränderungen am Crimpwerkzeug vorgenommen werden. -
Page 7: Bestimmungsgemäßer Einsatz
Eine andere Verwendung ist nicht bestimmungsgemäß und daher nicht zulässig. Andere als die nachfolgend aufgeführten Kabelschuhe und Verbinder dürfen nicht ver- arbeitet werden: Crimpwerkzeug PZ RK 10/120, Artikel-Nr. 1500450000 nur geeignet zum Verarbeiten von Weidmüller - Rohrkabelschuhen und Verbindern der Euro-Serie. Kompatibel zu vielen Serien anderer Hersteller. -
Page 8: Ce-Kennzeichnung
Einleitung CE-Kennzeichnung Das Produkt entspricht den Richtlinien der Europäischen Gemeinschaft (EU) und ist somit CE konform. Konformitätserklärung Das Produkt erfüllt die Niederspannungsrichtlinien 73/23/EWG und die EMV-Richtlinien 89/336/EWG. Recycling nach WEEE Entsorgung BtoB Mit dem Erwerb unseres Produktes haben Sie die Möglichkeit, das Gerät nach Ende seines Lebenszyklus an Weidmüller zurückzugeben. -
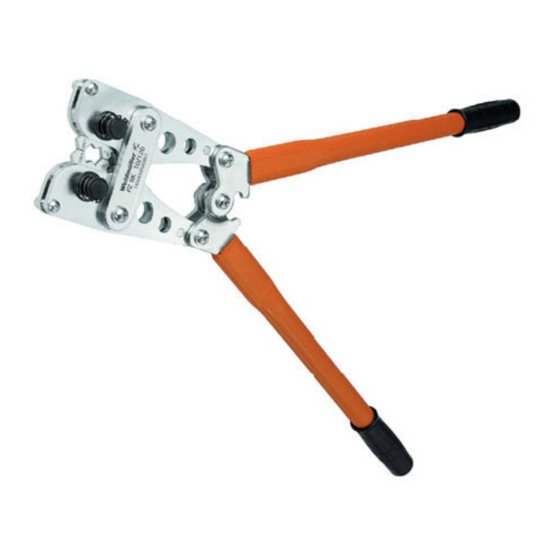
Page 9: Produktbeschreibung
A Verriegelungsbolzen B Crimpeinsatz C Kniehebel D Holmrohr Technische Daten Länge 660 mm Gewicht 4,1 kg Querschnittsbereich Kupfer von 10 bis 120 mm² (PZ RK 10/120, PZ PK 10/120) Aluminium von 10 bis 70 mm² (nur PZ PK 10/120) 1548670000/00/06.14... -
Page 10: Bedienung
Bedienung Bedienung Einstellen des Querschnittes 1 Das Werkzeug durch Auseinanderziehen der Holme ganz öffnen. 2 Den Verriegelungsbolzen des Crimpeinsatzes ganz gegen die Federkraft eindrü- cken. 3 Den Crimpeinsatz so lange drehen, bis die obere Querschnittangabe auf dem Crimpeinsatz mit der Querschnittangabe auf dem Kabelschuh / Verbinder überein stimmt. -
Page 11: Crimpvorgang
Bedienung Crimpvorgang VORSICHT Achtung, beim Crimpen besteht Quetschgefahr! 1 Das Crimpwerkzeug ganz öffnen und den Kabelschuh / Verbinder ganz unten in das Gesenk einlegen (siehe folgende Abbildung). Den Kabelschuh / Verbinder dabei nicht verkanten. Die Einheit Kabelschuh und Kabel soll einen rechten Winkel zum Crimpeinsatz bilden. - Page 12 Bedienung 5 Sind mehrere Crimpungen notwendig, ist an der Flanschseite beginnend zum Hül- senende zu crimpen (siehe Abbildung 3). Die Mindestanzahl der Crimpungen kann aus den aktuellen Weidmüller- Crimpanweisungen im Kapitel 4, Anzahl der Crimpungen entnommen wer- den. Die Crimpbreite beträgt bei allen Werkzeugtypen 5 mm. Bei Verbindern ist die Anzahl der Crimpungen auf jeder Seite durchzuführen.
-
Page 13: Anzahl Der Crimpungen
Kabelschuhen / Verbindern sind die Crimpungen auf den Crimpmarkierungen auszu- führen. Die Kennzahl des Kabelschuhs / Verbinders muss mit der Kennzahl auf dem Crimpgesenk identisch sein. Cu in mm² PZ RK 10/120, Artikel-Nr. 1500440000 Anzahl Crimpungen 1 + 1 2 + 2... - Page 14 Anzahl der Crimpungen Kennzahl Cu in Al in PZ PK 10/120, Artikel-Nr. 1500480000 mm² mm² Anzahl Crimpungen Bereich Kupfer Bereich Aluminium 1 + 1 2 + 2 2 + 2 2 + 2 3 + 3 2 + 2 4 + 4 3 + 3 5 + 5 3 + 3...
-
Page 15: Wartung
Wartung Wartung • Beseitigen Sie Staub, Feuchtigkeit und andere Verunreinigungen mit einer sauberen Bürste oder einem weichen baumwollfreien Tuch. Benutzen Sie keine Gegenstände, die das Werkzeug beschädigen könnten. • Stellen Sie sicher, dass alle Bolzen und beweglichen Teile und die Werkzeugoberflä- che mit einem dünnen Ölfilm eines hochwertigen Öls überzogen sind. -
Page 16: Störungsbehebung
Störungsbehebung Störungsbehebung Störung Ursache Behebung Es entsteht eine Flü- • Ein zu kleiner Querschnitt • Den richtigen Quer- gelbildung an der Ver- wurde eingestellt schnitt einstellen bindungstechnik • Es werden ungeeignete • Den zu verarbeitenden Kabelschuhe bzw. Verbin- Kabelschuh / Verbinder der verwendet wechseln •... - Page 17 Störungsbehebung Störung Ursache Behebung Die Vorspannung beim • Werkzeug ist verschlissen • Crimpwerkzeug muss Schließen im leeren vom Hersteller überprüft Zustand ist nicht mehr werden vorhanden 1548670000/00/06.14...
- Page 18 Störungsbehebung 1548670000/00/06.14...
-
Page 19: Foreword
Foreword Foreword Revisions Version Date Modification 06/14 First release Contact address Weidmüller Interface GmbH & Co. KG Postfach 3030 32720 Detmold - Germany Klingenbergstraße 16 32758 Detmold - Germany Telefon +49 (0) 5231 14-0 Telefax +49 (0) 5231 14-292083 E-Mail info@weidmueller.com Internet www.weidmueller.com 1548670000/00/06.14... - Page 20 Foreword 1548670000/00/06.14...
-
Page 21: Table Of Contents
Table of contents Table of contents Foreword Revisions Contact address Table of contents Introduction Safety notes Conventional application Qualified staff Accuracy of the technical documentation CE label EU Declaration of Conformity Recycling in accordance with WEEE Product description Technical data Operating Adjustment of the cross-section Preparation of the conductor... -
Page 22: Introduction
Introduction Introduction Safety notes WARNING Never grab between the dies during a pressing is proceeding. WARNING If you don’t pay attention you’re in danger of life! Never work with energised conductors. Ensure that voltage has been switched of before starting to work and check this with adequate instruments. CAUTION Alteration of the tool is absolutely prohibited. -
Page 23: Conventional Application
The instructions given in this manual must be absolutely followed. Do not use the crimping tools for other cable lugs or connectors than mentioned below: Crimping tool PZ RK 10/120, Art. Nr. 1500450000 Only for processing Weidmüller cable lugs and connectors of the euro-series. -
Page 24: Ce Label
Introduction CE label The product complies with the European Union (EU) directives and is therefore CE compliant. EU Declaration of Conformity The product meets the Low Voltage Directive 73/23/EEC and the EMC Directive 89/336/EEC. Recycling in accordance with WEEE BtoB disposal Purchasing our product gives you the opportunity to return the device to Weidmüller at the end of its service life. -
Page 25: Product Description
B Profile die C Toggle D Tube Technical data Length 660 mm Weight 4.1 kg Cross section Copper from 10 up to 120 mm² (PZ RK 10/120, PZ PK 10/120) Aluminium from 10 up to 70 mm² (only PZ PK 10/120) 1548670000/00/06.14... -
Page 26: Operating
Operating Operating Adjustment of the cross-section 1 Open the tool completely by dispersing the tubes 2 Press down the locking-bolt of the profile die against the spring force. 3 Rotate the profile die until the upper stamped cross section fits to the cross section on the cable lug / connector. -
Page 27: Process Of Crimping
Operating Process of crimping CAUTION Attention: During the crimping process you are in danger of bruising 1 Open the crimping tool and put in the cable lug/connector at the lower bound of the crimping dies (see the following drawing). Do not tilt the cable lug / connector. The unit cable lug/cable should be right angled to the profile dies. - Page 28 Operating 5 Whenever several crimpings are necessary start crimping from the flange to the end of the sleeve (see Figure 3). You find the minimum amount of crimpings in the current Weidmüller crimp- ing-instructions in chapter 4, Crimping instructions. The crimping width of all cross-sections for these types of tool is 5 mm. When processing connectors, the mentioned number of crimpings has to be dedicated to each side of the connector.
-
Page 29: Crimping Instructions
For solid (massive) conductors please consult Weidmüller Interface GmbH & Co.KG. If only one crimping is necessary, please place it concentrically on the cable lug / con- nector. Several crimpings should be placed evenly. Copper PZ RK 10/120, Order no. 1500440000 cross section mm² quantity of crimpings 1 + 1... - Page 30 Crimping instructions Cu in Al in PZ PK 10/120, Order no. 1500480000 K-number mm² mm² quantity of crimpings Copper Aluminium 1 + 1 2 + 2 2 + 2 2 + 2 3 + 3 2 + 2 4 + 4 3 + 3 5 + 5 3 + 3...
-
Page 31: Maintenance
Maintenance Maintenance • Remove dust, humidity and other impurities with a clean brush or a soft cotton-free cloth. Do not use objects that could damage the tool. • Take care that the bolts, any moveable parts and the tool surface are coated with a thin film of high quality oil. -
Page 32: Trouble-Shooting
Trouble-shooting Trouble-shooting Problem Solution Cause wings at crimped ca- • a too small cross section is • adjust the right cross ble lug / connector adjusted at the crimping section tool • usage of wrong, unquali- • change the cable lug / fied cable lugs / connec- connector tors for the tool... - Page 33 Trouble-shooting 1548670000/00/06.14...
- Page 34 Trouble-shooting 1548670000/00/06.14...
- Page 36 Weidmüller Interface GmbH & Co. KG Postfach 3030 32720 Detmold Klingenbergstraße 16 32758 Detmold Telefon +49 (0) 5231 14-0 Telefax +49 (0) 5231 14-292083 E-Mail info@weidmueller.com Internet www.weidmueller.com...
Need help?
Do you have a question about the PZ RK 10/120 and is the answer not in the manual?
Questions and answers