
Subscribe to Our Youtube Channel
Related Manuals for Jensen JEP-750


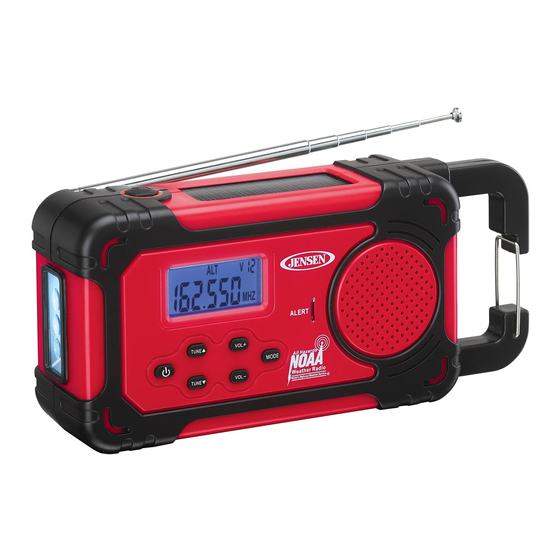
Summary of Contents for Jensen JEP-750
- Page 1 AM/FM/NOAA WEATHER BAND RADIO MODEL: JEP-750 USER MANUAL PLEASE READ THIS USER MANUAL COMPLETELY BEFORE OPERATING THIS UNIT AND RETAIN IT FOR FUTURE REFERENCE...
-
Page 2: Important Safety Instructions
IMPORTANT SAFETY INSTRUCTIONS When used in the directed manner, this unit has been designed and manufactured to ensure your personal safety. However, improper use can result in potential electrical shock or fire hazards. Please read all safety and operating instructions carefully before installation and use, and keep these instructions handy for future reference. -
Page 3: Compliance With Fcc Regulations
COMPLIANCE WITH FCC REGULATIONS This device complies with Part 15 of the FCC Rules. Operation is subject to the following two conditions: (1) this device may not cause harmful interference, and (2) this device must accept any interference received, including interference that may cause undesired operation. -
Page 4: Dear Jensen® Customer
DEAR JENSEN® CUSTOMER Selecting fine audio equipment such as the unit you've just purchased is only the start of your musical enjoyment. Now it's time to consider how you can maximize the fun and excitement your equipment offers. This manufacturer and the Electronic Industries Association's Consumer Electronics Group want you to get the most out of your equipment by playing it at a safe level. -
Page 5: Location Of Controls
LOCATION OF CONTROLS 1 2 3 4 ALERT VOL. TUNE MODE TUNE VOL. 9 10 1.F lashlight ON/OFF button 2 . Clock/Radio Tune Up button 3. LCD Display 4. Volume Up (+) button 5. Solar Panel 6. LED Flashlight 7. Power On/Standby button 8 . -
Page 6: Power Source
1. Turn the hand crank to wake up the display. Press the RESET button on the back and the JEP-750 should return to normal operation. Please see “Resetting the Unit” under CARE AND MAINTENANCE section of... - Page 7 A) FOUR WAYS TO POWER THE UNIT 1) “DYNAMO” POWER OPERATION 1.A 3.7V DC rechargeable lithium battery is included with JEP-750. When first time using the unit, open the battery compartment and insert the rechargeable battery according to the polarity shows inside the compartment.
- Page 8 Charge batteries on a fireproof surface away from flammable items or liquids. Batteries should NEVER be left unattended while charging. Only adults should charge the batteries. Follow the manufacturer's instructions for charging the product and do not charge longer than recommended. Unplug the charger when the battery is charged.
-
Page 9: Clock Setting
2. Put the unit in direct sunlight, making sure the solar panel of the unit is facing towards the sun. If the sunlight is strong enough, the solar charging Indicator will light indicating the unit is charging. More power is generated the longer you leave the unit in direct sunlight, and the Radio listening time will be extended (Radio reception only). -
Page 10: Listening To The Radio
4.P ress the MODE button after the hour is set, Minute digits flashing to prompt for input. 5.T ap the TUNE button repeatedly to set the minute value. Press and hold the buttons to speed up the forward or reverse scanning of the digits. 6.P ress the MODE button again to finish clock setting. -
Page 11: Listening To A Weather Channel
LISTENING TO A WEATHER CHANNEL 1) Weather Band 1.P ress the button to turn on the unit. 2.T ap the MODE button to select weather band until "WB" icon appears steadily on display. 3.T ap the TUNE button to select your local weather broadcasting. 4.P ress the VOLUME +/- button to obtain the desired sound level. -
Page 12: Charging The Internal Battery
4.T ap the MODE button to turn off the NOAA Alert by switch it to other mode. It is recommended to use the AC adaptor to power the radio when you turn on the NOAA Alert. Note: 1.) The radio will continue to drain the battery if it's left in Weather Standby Mode, so it is highly recommended that you use a USB power adaptor (not included) to prevent the battery from completely draining and turning the radio off while in use. - Page 13 2.P lug one end of the USB cable (not included) into the USB port located on the back of the JEP-750. Plug the other end of the cord into the device you wish to charge. 3. Press and hold the button for 2 seconds until “PHONE”...
- Page 14 USB port. Please refer to your device user manual before you attempt to charge them. 2.) It is normal for the JEP-750 to be warm while the USB port is in use and charging your smart phone or portable device.
-
Page 15: Using The Flashlight
USING THE FLASHLIGHT An LED flashlight is built into the side of the unit. To use the flashlight, press the Flashlight button on the top to turn it on. When the flashlight is on, press the button once to turn it off, or quickly press the flashlight button twice to change to SOS flashing mode. -
Page 16: Troubleshooting Guide
CAUTION: DO NOT USE A SHARP OR POINTED OBJECT TO PRESS THE RESET BUTTON. IT MAY DAMAGE THE RESET SWITCH INSIDE THE UNIT. DC IN RESET TROUBLESHOOTING GUIDE If you experience difficulties in the use of this music system please check the following or call 1-800-777-5331 for Customer Service. -
Page 17: Specification
SPECIFICATION Power requirement: DC Input: 3 X AAA (UM-4) Batteries or Built-in DC 3.7V, 800mAH Li-ion rechargeable battery or USB Power DC 5V, 500mA (Max.) Frequency Range Radio Band FM 87.5 - 108 MHz AM 520 - 1710 KHz WX CH1 – 7 At Spectra, environmental and social responsibility is a core value of our business. - Page 18 2.T his warranty does not cover damage or equipment failure caused by electrical wiring not in compliance with electrical codes or SPECTRA user manual specifications, or failure to provide reasonable care and necessary maintenance as outlined in the user manual. 3.W arranty of all SPECTRA products applies to residential use only and is void when products are used in a nonresidential environment or installed outside the United States.
Need help?
Do you have a question about the JEP-750 and is the answer not in the manual?
Questions and answers