Table of Contents
Advertisement
Quick Links
Antistatic Shoe Resistance Measurement Device
Thank you for purchasing the SHOETESTERⅡ. Please read this manual before using the
product in order to fully understand its functions. Also make sure to store this manual so
that it can be referred to in the future.
Functions
The SHOETESTER II is a dedicated device for measuring the electrical resistance of antistatic shoes for preventing
human body electrostatic charging while they are worn.
Characteristics
1. The device can be used in various ways, such as mounted on a wall, placed on a desk, or combined with the
measurement stand.
2. Maximum and minimum values can be set, with the device warning the user with a light and buzzer when the
measured value exceeds them.
SHISHIDO ELECTROSTATIC, LTD.
SHOETESTERⅡ
Instruction Manual
Advertisement
Table of Contents

Related Manuals for SSD SHOETESTER II


Summary of Contents for SSD SHOETESTER II
- Page 1 Also make sure to store this manual so that it can be referred to in the future. Functions The SHOETESTER II is a dedicated device for measuring the electrical resistance of antistatic shoes for preventing human body electrostatic charging while they are worn. Characteristics 1.
-
Page 2: Safety Precautions
Safety Precautions Make sure to follow the information in this manual for your safety. Areas indicated with a contain information relating to safety. This device does not conform to explosion-proof specifications. Do not install it in locations where flammable gases or solvents are handled, such as painting booths etc. -
Page 3: Items Included With The Device
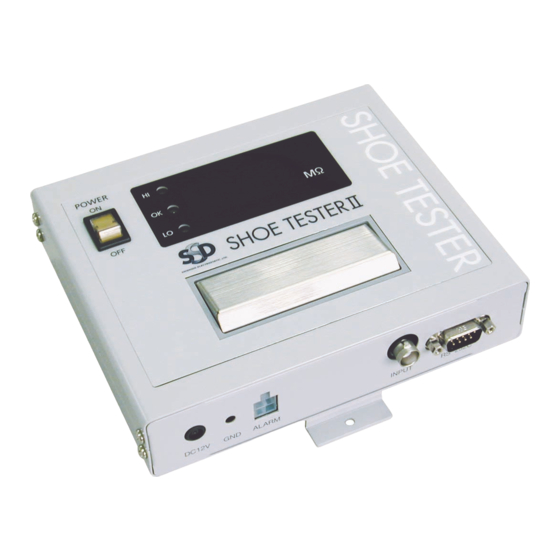
Items Included With the Device Confirm that the following items are included with the device before using it for the first time. Instruction manual/warranty x 1 (this document) Main Device Measurement result display area Self-check button Power Minimum setting switch switch Minimum setting... - Page 4 ■Dust protection sticker EarthLead ■Measurement signal cabl ■AC adapter Cautions When Measuring With the Measurement Signal Cable ■ Step onto the measurement stand with your feet together so that your shoes do not protrude from the stainless steel plate, and then press the touch button. ■...
- Page 5 Preparation Attaching the Main Device to the Measurement Stand Connect the measurement signal cable to the bottom of the main device. Connect the cable to the measurement signal connector on the bottom of the main device. Connect the AC adapter to the power connector of the main device.
- Page 6 Setting and Checking the Device The following procedure should be performed by the supervisor of the device. Device Operation Settings Minimum setting Self-check Set the operation setting switches 1 to 4 down for ON and up for OFF. switch button The default factory setting is "OFF"...
- Page 7 Checking the Device Operation If you press the self check button, an internal 1 MΩ resistance is measured so the device can self-diagnose whether it is working properly. The device is working properly if a measurement between 0.95 and 1.05 MΩ is displayed in the measurement result area.
- Page 8 Measuring .Turn the power of the main device on. The power switch lights, and the measurement display area is off. The area turns on when the touch button is pressed. .While wearing the shoes to measure, step onto the measurement stand, and press the touch button in with your bare hands until you hear a click, and hold it there for three seconds.
-
Page 9: Adjustment And Maintenance
When measurement is complete, turn the power switch off. Adjustment and Maintenance Clean the measurement stand periodically. Troubleshooting If the device does not operate correctly, it may be the result of one of the following. ■ The screen is not displayed after switching the power on. Cause: The AC adapter is broken. -
Page 10: Warranty
Warranty Valid for: 1 year after delivery Product SHOE TESTER II name Serial Model number Date of Inspection Delivery Stamp 1. If any malfunctions or damage occur to the product due to any of the following reasons, a charge will be incurred for repairing or replacing the product. 2.
Need help?
Do you have a question about the SHOETESTER II and is the answer not in the manual?
Questions and answers