Advertisement
Instruction Manual
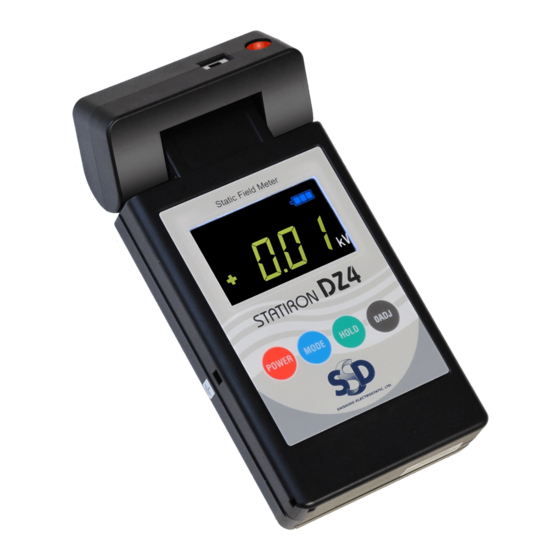
Static Field Meter STATIRON
DZ4
Thank you for purchasing the Statiron DZ4. Please read this manual before using the
product in order to fully understand its functions. Also make sure to store this manual so
that it can be referred to in the future.
Functions
The static field meter Statiron DZ4 is a portable static electrical potential meter with digital readout, for measuring
the electrical potential of charged objects.
When measuring fluctuating static electricity, you can temporarily hold an indicated value, and check maximum
voltages in the MAX mode.
Characteristics
1. Enables you to measure surface potentials of charged bodies without coming into contact.
2. Enables you to take measurements in narrow locations by rotating the sensor head.
3. With the optional ion balance plate, you can carry out ionizer balance checks.
SHISHIDO ELECTROSTATIC, LTD.
Advertisement
Table of Contents

Related Manuals for SSD Statiron DZ4


Summary of Contents for SSD Statiron DZ4
- Page 1 Functions The static field meter Statiron DZ4 is a portable static electrical potential meter with digital readout, for measuring the electrical potential of charged objects. When measuring fluctuating static electricity, you can temporarily hold an indicated value, and check maximum voltages in the MAX mode.
-
Page 2: Safety Precautions
Safety Precautions This device is a precision electrical instrument. For the sake of safety, be sure to follow the instructions described in this manual. mark are precautions that must be followed in order to use the product safely. This device does not conform to explosion-proof specifications. Do not install it in locations where flammable gases or solvents are handled, such as painting booths etc. -
Page 3: Items Included With The Device
Items Included With the Device Confirm that the following items are included with the device before using it for the first time. Instruction manual/warranty x 1 (this document) Main Device ... - Page 4 Important Points About Taking Measurements Grounding If the user's body retains an electrical charge, or highly accurate measurements are required, ground the earth terminal of this device. Also, if the charged object is expected to have a large charge, be sure to ground the device to avoid breakdown due to discharge. Adjusting the Measurement Distance The strength of the electrical field of a charged object changes with the distance between the charged object and the sensor portion of the measuring instrument.
-
Page 5: Measurement Procedure
Preparation Insert the battery. Remove the battery case cover and insert a 9 volt dry cell battery. Replace the cover carefully, taking care to keep the battery leads clear of the cover. Connect the earth lead to the earth terminal, and reliably ground the earth lead. - Page 6 Zero point adjust the meter. Point the sensor at a grounded object and press the 0ADJ button. NOTE Zero point adjustment is reset when you turn the meter off. If you want to measure a maximum potential, use the MAX mode.
- Page 7 Measuring Ion Balance By attaching the optional ion balance plate (sold separately) to the meter, you can measure ion balance (offset voltage). Turn the meter on. Press the POWER button for more than one second, until you hear a beep. Set the mode you want to use.
- Page 8 Point the ion balance plate at the measurement location. The potential on the ion balance is measured. NOTE If the display panel blinks "1", the charged voltage has exceeded the measurable range (over-range). If this occurs, stop measuring immediately, as this may cause damage to the meter.
-
Page 9: Adjustment And Maintenance
Adjustment and Maintenance Rotating the Sensor Head You can rotate the sensor head of the meter. This enables you to easily take measurements in narrow locations etc. that were previously difficult to access. The sensor head rotates in 45° increments. When rotating the head, stop at angles where the sensor head clicks into place. -
Page 10: Troubleshooting
Troubleshooting If the device does not operate correctly, it may be the result of one of the following. The display panel is not active when the power is turned on. Cause 1 The battery has not been installed, or the positive and negative terminals have been connected the wrong way around. -
Page 11: Specifications
Specifications Signal detection method Oscillating chopper method Display refresh frequency 0.5 seconds Measurable potential range Normal mode: 0.00 - ±19.99kV (resolution: 0.01kV) I.B mode: 0.000 - ±1.999kV (resolution: 0.001kV) Continuous operating limit Approximately 10 hours (with alkaline battery) Measuring distance 30 mm (between object being measured and sensor) Measuring distance adjustment Red LED beam focusing method... -
Page 12: Warranty
Warranty Valid for: 1 year after delivery Product Static Field Meter STATIRON name Serial Model number Date of Inspection Delivery Stamp 1. If any malfunctions or damage occur to the product due to any of the following reasons, a charge will be incurred for repairing or replacing the product. 2.
Need help?
Do you have a question about the Statiron DZ4 and is the answer not in the manual?
Questions and answers