Advertisement
12Vdc
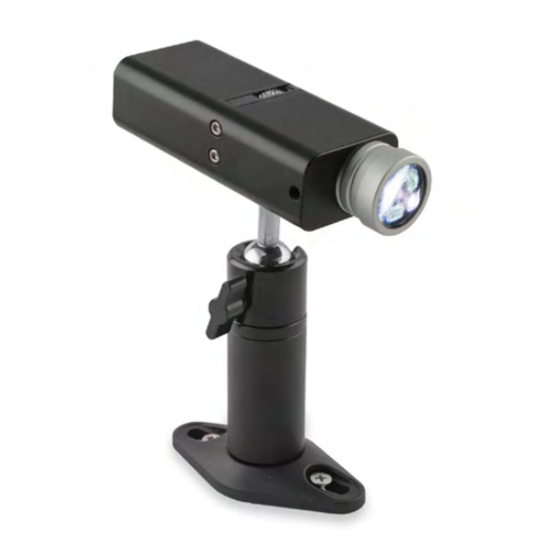
EVICA EP10 12VDC LED EFFECTS PROJECTOR
Contents
Safety instructions and precautions
Installation
Safety instructions and precautions
• Never look directly into the beam or shine in anyone's eyes.
• Do not block the ventilation inlet or outlets on the unit.
• Ensure that there is sufficient ventilation around the unit, recommended minimum 1m².
• This product is designed for indoor use only and should not come into contact with water or excessive
dust.
• No user serviceable parts inside.
• Use only approved accessories.
• Do not use this device in the presence of flammable or oxygen rich atmospheres.
• To prevent injury, this apparatus must be securely attached to the ceiling/wall.
Installation
Prior to mounting the unit please refer to the distance/spot size chart to achieve the required image size.
Diagrams show the full width half peak Beam Angle.
Fix the projector to the mounting bracket or Track Adapter. Check locknut is fitted to threaded end of
Mount Arm. Place washer over end of mount arm and screw into the Projector. Orientate project as
required and tighten locknut against Projector until tight.
1m
2m
3m
4m
Distance
Light Projects 23 Jacob St London SE1 2BG Tel +44 (0)20 7231 8282
Website www.lightprojects.co.uk Email info@lightprojects.co.uk
0.30m
0.60m
0.90m
1.20m
17°
Diameter
0.35m
1m
2m
0.70m
3m
1.05m
4m
1.40m
Distance
20°
Diameter
pg 1
Advertisement
Table of Contents

Related Manuals for Light Projects EVICA EP10


Summary of Contents for Light Projects EVICA EP10
- Page 1 Projector until tight. 0.30m 0.35m 0.60m 0.70m 0.90m 1.05m 1.20m 1.40m Distance 17° Diameter Distance 20° Diameter Light Projects 23 Jacob St London SE1 2BG Tel +44 (0)20 7231 8282 pg 1 Website www.lightprojects.co.uk Email info@lightprojects.co.uk...
- Page 2 6. To reposition the projector, loosen the butterfly screw, position as desired and tighten the butterfly screw to fix into position. Light Projects 23 Jacob St London SE1 2BG Tel +44 (0)20 7231 8282 pg 2 Website www.lightprojects.co.uk Email info@lightprojects.co.uk...
- Page 3 (1) and (2) first and then (3) and (4). Figure 4 Figure 6 shows where the blades will effect the framing on the object. Figure 5 Figure 6 Light Projects 23 Jacob St London SE1 2BG Tel +44 (0)20 7231 8282 pg 3 Website www.lightprojects.co.uk Email info@lightprojects.co.uk...
- Page 4 The information contained within this document is subject to change without notice. Light Projects Ltd makes no warranty of any kind with regard to this material, including, but not limited to, the implied warranties of merchantability and fitness for a particular purpose.
Need help?
Do you have a question about the EVICA EP10 and is the answer not in the manual?
Questions and answers