Advertisement
Quick Links
Advertisement

Related Manuals for Adhesive Dispensing 6oz Size

Summary of Contents for Adhesive Dispensing 6oz Size
- Page 1 6oz Size Barrel Filler USER GUIDE...
- Page 2 To achieve maximum performance from Adhesive Dispensing equipment, please read the instructions carefully. After completing this guide, please do not hesitate to contact the technical team at Adhesive Dispensing Ltd or contact your authorised Adhesive Dispensing Ltd reseller. Tel. 00 44 845 652 0058...
-
Page 3: Table Of Contents
We strive to develop strong partnerships by delivering cost effective solutions that provide savings in assembly time and raw materials. So your confidence and trust in Adhesive Dispensing Ltd is of the utmost importance to us. Thank you. Meets applicable CE requirements. -
Page 4: Specifications
Specifications Capacity: 180cc, 180ml (6oz) Initiation: Pneumatic Dispenser Air Input: 0 to 100psi (0 to 6.9 bar) Pressure Vessel: Anodised Aluminium Pressure Cap: Cast Aluminium Base Stand: Steel and Stainless Steel Rod Weight: 1.2kg (without filled cartridges) -
Page 5: First Steps
First Steps Step 1: Unpack the shipping box and use the supplied checklist to make sure all items are present. If any items are missing, please contact us immediately. Step 2: Ensure the area where you are setting up the equipment has access to compressed air. -
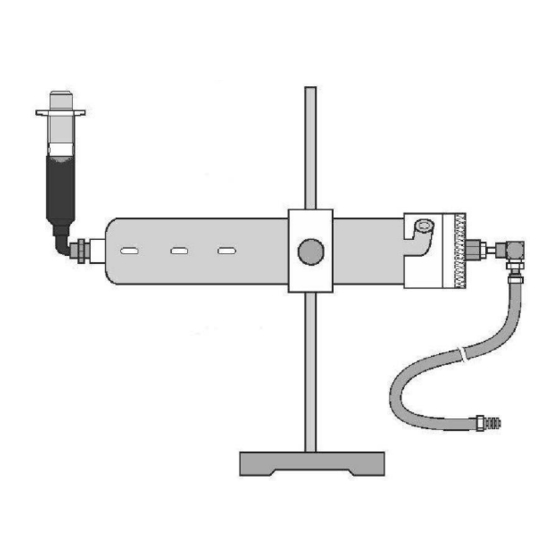
Page 6: Setup
Locate the 6oz metal retainer and remove the cap (5) by twisting counter clockwise (bayonet fitting). Insert a 6oz size cartridge reservoir that is pre-filled with your assembly fluid, in the retainer (7). Remove the red storage cap from the large end of the cartridge if its been attached. - Page 7 Typical Setup This system is designed to work with a manual or timed pneumatic dispenser for the ON/OFF control. Fittings are supplied to connect to most dispensers. Part 1. Upright steel mounting rod Part 2. Base unit Part 16. Cartridge bracket Part 13.
-
Page 8: Reservoir Filling
Syringe Filling Pressurise the reservoir pressure chamber (15) by turning the knob on your air dispenser pressure regulator clockwise. Adjust to a pressure that is appropriate to the fluid you are filling. Some common settings are as follows: 5psi for low viscosity fluids 80psi for high viscosity fluids. - Page 9 Dispense Component Selection Guide Syringe Barrels and Cartridge Reservoir Pistons Kits Available in: Clear for regular Each kit comes complete with fluids; Black for visible light a gasket, plunger, cartridge cure fluids; Amber for UV and luer lock needle adapter. cure fluids.
-
Page 10: Component Selection Guide
Dispense Component Selection Guide Cartridge Reservoir Each cartridge system comes with an air cap and retainer Part # Part Size 918-031-000 Retainer 6oz 11-3/4” 1-3/4” 918-001-004 Part of above dimensions Accessories Each cartridge system comes with an air cap and retainer Part # Description TSD931-7... -
Page 11: Troubleshooting
Troubleshooting Problem Possible Solution No Fluid Flow Check that air supply is properly connected. Check air in from mains supply and air feed from dispenser to syringe filling system. Air pressure is too low. Gradually increase the air pressure until fluid flows. Air Pressure Leaking Check all connections to make sure they are secure. -
Page 12: Warranty
Warranty One Year Limited Warranty Adhesive Dispensing Ltd (ADL) warrants its product to be free from defects in materials and workmanship for a period of one year from the date of purchase. Under this warranty, ADL will repair or replace any defec ve part or, at its own op on, the complete value regardless of fault.
Need help?
Do you have a question about the 6oz Size and is the answer not in the manual?
Questions and answers